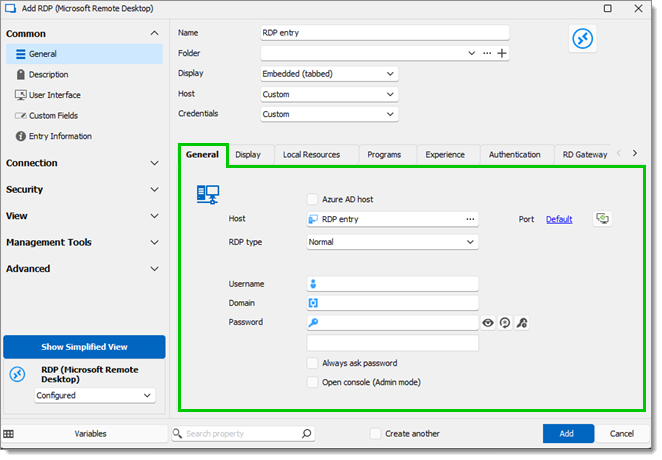
The following properties can be configured when creating or editing the RDP entry. Most of the general properties require you to close the RDP entry completely, then reopen it to take effect.

| SETTINGS | DESCRIPTION |
|---|---|
| Name | The name of the RDP entry. |
| Folder | The folder of the RDP entry. A folder can be added by clicking the arrow or the three dots to open the folder window. To create a new folder, select the plus icon. |
| Display | How the RDP entry is displayed. Embedded (tabbed) means that the remote desktop connection is open within the same window as the other tabs or entries. Each connection has its own tab, making it easy to switch between them. An external display indicates that the remote desktop connection is open in a separate window or a different application altogether. This approach is useful when you want to view the remote session in a dedicated window, separate from the main application. An undocked display refers to the remote desktop connection being detached from the main window, similar to an external display. It allows you to move and resize the remote session window freely on your desktop. |
| Host | Custom lets you select the host. Linked (Vault) indicates that the host for the RDP entry is linked to an external vault. Inherited is used when the host is inherited from a higher-level or parent entry. |
General tab
| SETTINGS | DESCRIPTION |
|---|---|
| Azure AD host | Remotely access and manage the server or virtual machine safely over RDP with Azure AD credentials. |
| Host | Choose the host from the Computer list window. You can also expand your search by clicking on the three dots at the bottom left of the window and selecting either Search in Active Directory, Search in Network Neighborhood, and Select by IP Address. |
| Port | Choose the Port. To generate new ports, click on the Port Generator icon. You can also include well known ports, registered ports, and ports used by others sessions. |
| RDP type | Choose from Normal, Azure Cloud Services, and Hyper-V (embedded only). For Azure Cloud Services, you will need to input both the Role name and the ID. Clicking Hyper-V (embedded only) requires you to provide the Hyper-V instance. |
| Username | Choose a Username. |
| Domain | Enter the Domain. |
| Password | Provide a Password. Check Always ask password if needed, and Open console (Admin mode) to open the console in admin mode when you log in. |


