The purpose of the CyberArk Dashboard entry is to provide Remote Desktop Manager users with an interface that eliminates the need to use Password Vault Web Access (PVWA) to see the list of safes and credentials that the currently logged on user has access to. Combined with password-less scenarios and/or our rich role-based access control (RBAC), this means that a user does NOT need to know the CyberArk credentials to be presented with a list of accounts they have access to. Additionally, since the dashboard is meant to authenticate once to your server and, most importantly, maintain an active session for as long as it is active, it has the significant advantage of only requiring MFA once when you launch the dashboard.
Another design principle of the dashboard is that its main usage model is to go through the CyberArk Privileged Session Manager (PSM) to reach assets. This means that Remote Desktop Manager does NOT need to read the password for the account to be used. Less secure models are available to support older scenarios that some of our customers are still using.
Learn more about the CyberArk MFA delimiter option.
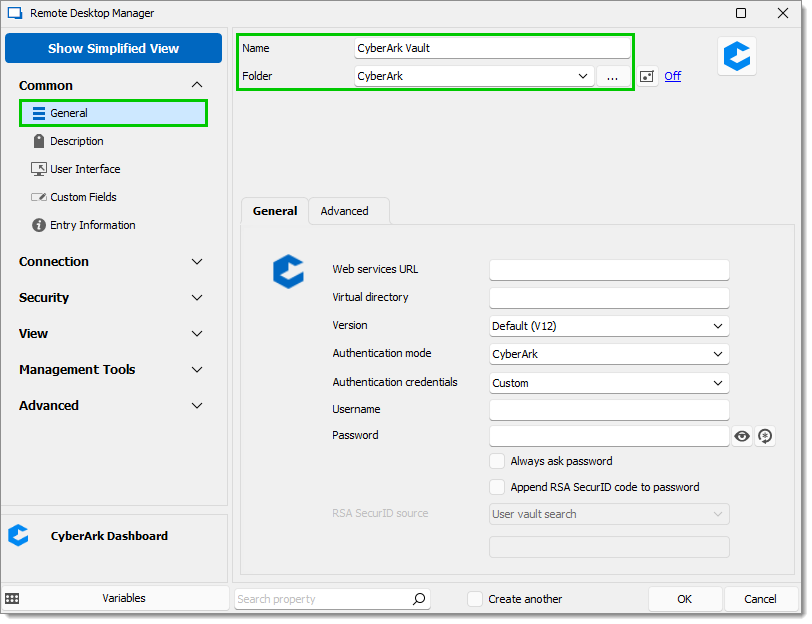
Create a new CyberArk Dashboard entry or go to the Properties of your existing one.
In the General section, specify a Name and Folder for your entry if that is not already done.
-
Enter the Web services URL to connect to your CyberArk instance. It is the address of the server and should look like "https://<server name>.<our domain>.loc/".
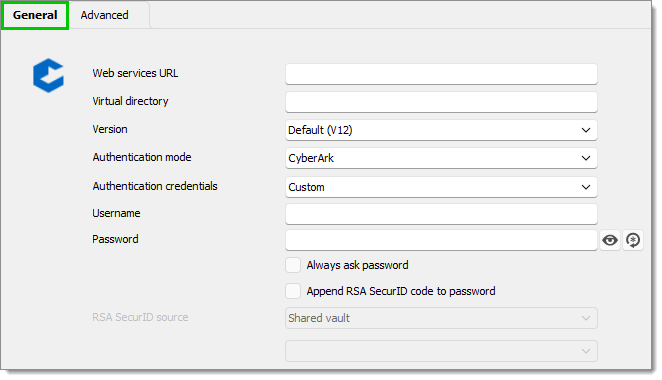
The following is what your Web services URL will be, depending on your CyberArk subscription:
SelfHosted : Short URL
PrivilegeCloud: Short URL if the URL does not end in "cyberark.cloud"
PrivilegeCloud: /privilegecloud if the URL ends in "cyberark.cloud"
-
Enter a Virtual directory. This field is either /privilegecloud or empty.
-
Select a Version in the drop-down list. This refers to the CyberArk PVWA version seen on the CyberArk authentication page.
Please note that we only support the CyberArk V12 API for now and that CyberArk version 12.1 is required.
-
Select the Authentication mode used to connect to the CyberArk instance (CyberArk, Windows, LDAP, RADIUS, or SAML).
SAML authentication is supported with CyberArk since version 2022.3.25 of Remote Desktop Manager, but important improvements and bug fixes have been implemented in ulterior versions. We recommend to at least update to the 2023.1 version of Remote Desktop Manager if your current version is older. One of the improvements in version 2023.1 is that you no longer have to provide the IdP sign-in URL when configuring your SAML authentication. If you have trouble with your SAML authentication, consult SAML Configuration and Troubleshooting. SAML authentication for CyberArk Privilege Cloud requires Remote Desktop Manager 2023.2.17 or newer.
Your CyberArk vault administrator should provide you with the authentication model being used, but if, in the PVWA, you click on a link that matches your corporate domain name, this indicates that the LDAP model is being used.
-
In the Authentication credentials drop-down list, select Custom to enter your credentials below or select them using a Remote Desktop Manager mechanism. This list is not available with the SAML Authentication mode.
As with all Dashboard entries in Remote Desktop Manager, if you are creating an entry that will be visible to multiple users, we recommend choosing My Account Settings PVWA, then visiting File – My Account Settings – CyberArk PVWA to enter your personal CyberArk credentials.
-
Follow this step if you selected Custom in the Authentication credentials list. If not, skip to the Advanced tab section.
Enter your Username and Password in the corresponding fields. Use the Password generator to help you create a secure password.
Check the Always ask password box to be prompted for your password each time you connect.
If you have a RSA SecurID code, check the Append RSA SecurID code to password box, then select below the RSA SecurID source.
-
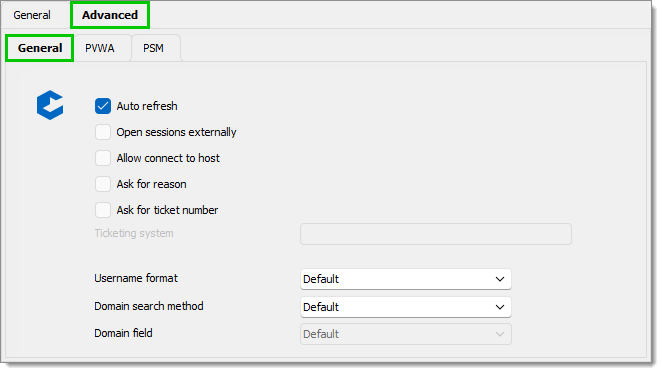
The Auto refresh option is enabled by default. It maintains the connection to your CyberArk environment and removes the need to enter 2FA credentials on every connection. It is recommended to leave it enabled.
-
Check Open sessions externally if you do not want your sessions to open in embedded mode in Remote Desktop Manager. This is mostly useful for applications that only support being open externally, such as PSM-Putty (PSM-SSH) and many other PSM connection components. It is required to connect to remote applications using PVWA connections.
For most connection components requiring the opening of an application on PSM, the Open Externally option must be enabled. This is due to a limitation of the RDP ActiveX we use, which does not support RDP RemoteApp mode. However, this limitation can be mitigated by setting a connection component parameter in CyberArk. This parameter is called DisableRemoteApp and must be set to Yes. For more information, see CyberArk's documentation page on the subject.
-
Check Allow connect to host if you want to allow a direct connection to the remote machine, meaning that the currently logged on user needs to have the right to view the password; it is therefore less secure and is not recommended by the CyberArk team.
-
Check Ask for reason if you are required to have a reason to establish a connection.
-
Check Ask for ticket number if you are required to provide a ticket number to establish a connection depending of your CyberArk configuration. The Ticketing system field that is paired with this option is a string value that makes sense in your environment. It is informative and we send it along with the number.
-
The Default Save loads your Safes. You can also check the Load favorites by default box to load your favorite safes.
-
Set the default Username format to be able to connect to the remote machine. It can also be changed in the dashboard for ad hoc connections, but this will be the default format for this dashboard instance.
-
Select the Domain search method in the drop-down list.
-
The Domain field drop-down list is only relevant when the Username format is set to the Field value. Depending on how your vault was set up, there can be various CyberArk fields used to hold the domain information. Choose the value that corresponds to your vault settings.
-
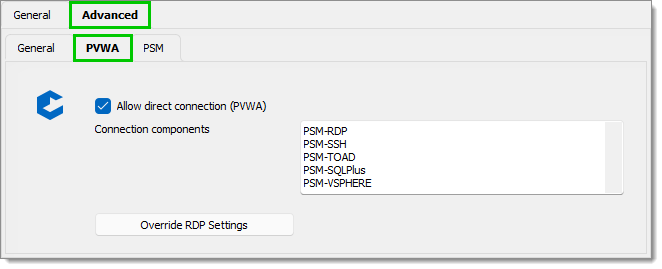
The Allow direct connections (PVWA) option is enabled by default and is the recommended method. It allows the exact same action as the Connect button offers in PVWA.
-
In the Connection components box, enter the components you wish to use for your connections. We initialize the field with the default components of a vanilla CyberArk installation, but this list MUST match the components configured in your vault.
-
Since Remote Desktop Manager version 2023.2.24, there is a new feature called Override RDP Settings. By default, RDP settings are fetched from CyberArk PVWA when generating the PSM session. This new option allows you to ignore settings provided by CyberArk and apply the ones specified in the CyberArk Dashboard entry instead. This override is for all PSM sessions established from this dashboard to have different display settings. One might consider creating different instances of the dashboard entry to reflect different users' preferences.
Remote Desktop Manager and Devolutions Server versions must be at least 2023.2.28 and 2023.2.8 for Override RDP Settings to work.
The Allow connect using PSM (alternate shell) option is disabled by default. Enable it if you want to allow connections via PSM, but using the legacy method of providing an alternate shell.
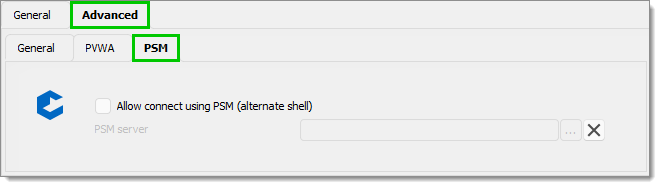
Enable the following policy to only allow Cyberark PSM connect.
%Root%\SOFTWARE\Policies\Devolutions\RemoteDesktopManager\DisableCyberArkPasswordRetrievalHere are the restrictions related to PSM:
PSM Alternate Shell PSM /u <account to use> /a <endpoint> /c <component> restrictions
A user must connect to the PSM server via RDP and be granted permission to do so.
PSM has to be able to link the LDAP account with a CyberArk PVWA profile (could work with a SAML Azure AD when LDAP is cloned on Azure AD)
The account to use must be found without any ambiguity in the CyberArk vault.
This is provided as a convenience and is not recommended by the CyberArk team. It has some limitations when compared to the Connect action from PVWA which uses a limited lifetime token. You must have a PSM Server entry configured in the same vault. Select it in the PSM server drop-down list.
Please note that for the sake of clarity, this section will only provide information about the main usage model of connecting through the PSM.
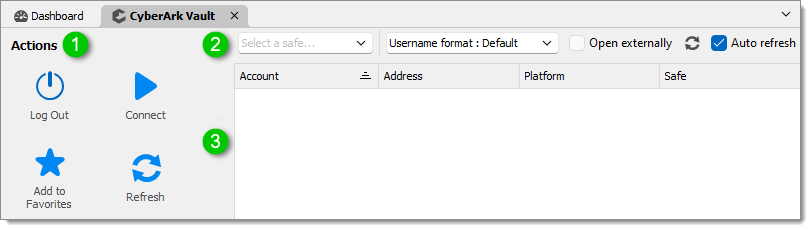
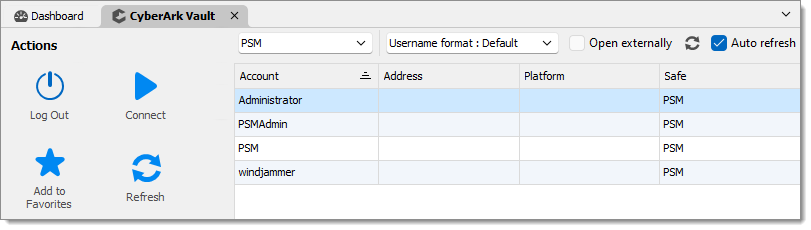
The Actions menu allows you to:
Log in or out from the dashboard.
Connect to a host using the selected credentials.
Refresh the content of the safe.
Add a safe to your favorites.
The top menu allows you to:
Select a safe to connect to.
Select the Username format.
Allow or disallow the session to Open externally (not embedded in Remote Desktop Manager).
Refresh the content of the safe.
Enable or disable the Auto refresh. If disabled, PSM connections may require MFA upon every connection.
The content area allows you to see and interact with the accounts within a safe or group. You can see the Account, its Address, its Platform, and the Safe in which it is located.
With the safe selector, you can browse your safes and select the one you wish to use.
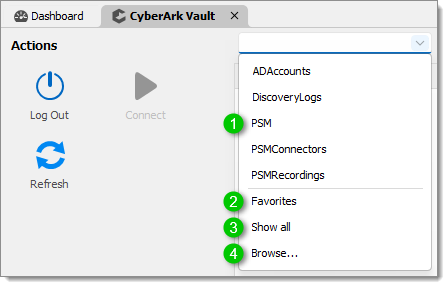
The upper section of the drop-down list contains a subset of the safes that one has access to. You can also see and manage the list of excluded safes in File – Settings – Types – CyberArk.
Favorites will display accounts that have been tagged as favorites, but from within Remote Desktop Manager. This is not a CyberArk functionality.
Show all will list all accounts that the user has access to. For certain users, this we be a sizeable list and will not be a quick operation. It is provided for users that have access to a finite list of accounts.
Browse... will display the safe selection dialog, where there is paging and filtering to help the user to locate the relevant safe. Again, they are listed by default in the order received from CyberArk.
Below is a preview of the CyberArk Select Safe page that appears after selecting Browse... in the safe selector. 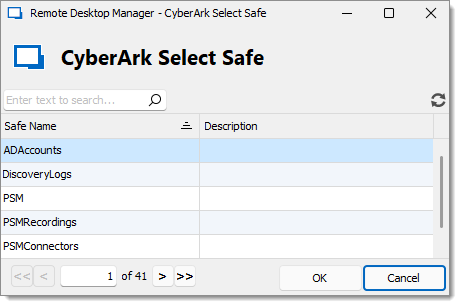
In this view, if you select a safe and click OK, you will then be able to view the accounts from that safe.
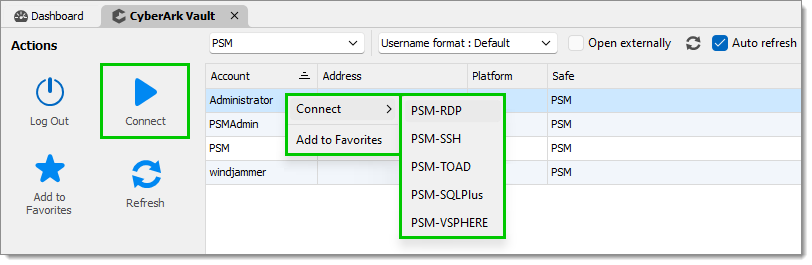
After selecting the account you wish to use, you can either use the Connect button in the Actions menu or right-click and select the appropriate connection component.
In both cases, you will then see a dialog box that allows you to specify the host you want to connect to.
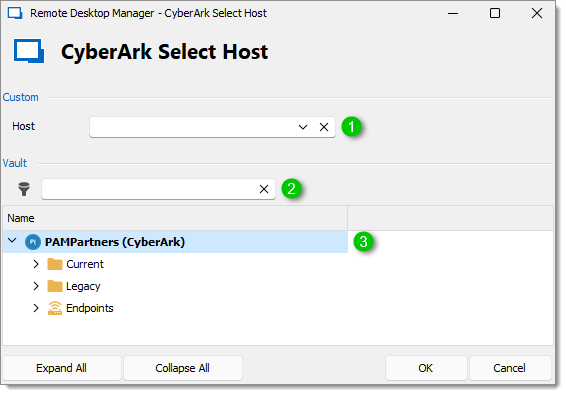
Host field
If the CyberArk Remote machine access field is used in the account properties, the endpoints that were entered will be listed in this field. It allows for connections even for assets that are not managed in Remote Desktop Manager.
If the CyberArk Remote machine access field is not used, you can type in any name in the control to connect to it. Please note that name resolution is performed at the PSM level. Therefore, please adhere to the standards of your CyberArk installation to achieve success.
Filter field: Type in characters that fit an asset name to have a filter applied in the grid below.
The grid will display entries that represent a host system. Therefore, connect to the one that represents the endpoint you need to connect to.
After selecting the account in the CyberArk Dashboard, you can also use the Navigation pane to select a host by right-clicking an entry and navigating to the Connect using menu.
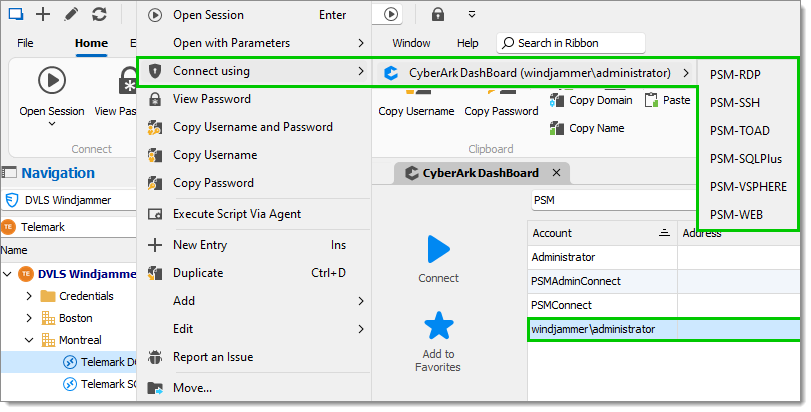
The menu can be bypassed by allowing a double-click action when there is only one possible combination of account/gateway/component.
You can use a batchedit PowerShell script to allow a double-click action instead of selecting the option described in the steps below.
$connection.ConnectUsingDashboardOnDoubleClick = "True";
$RDM.Save();
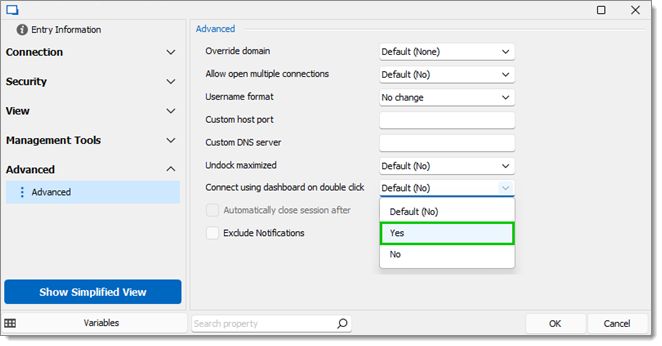
-
Select an entry and go to Properties – Advanced.
-
Go to Connect using dashboard on double click and click Yes.
The same option can be found in File – Settings – Types.
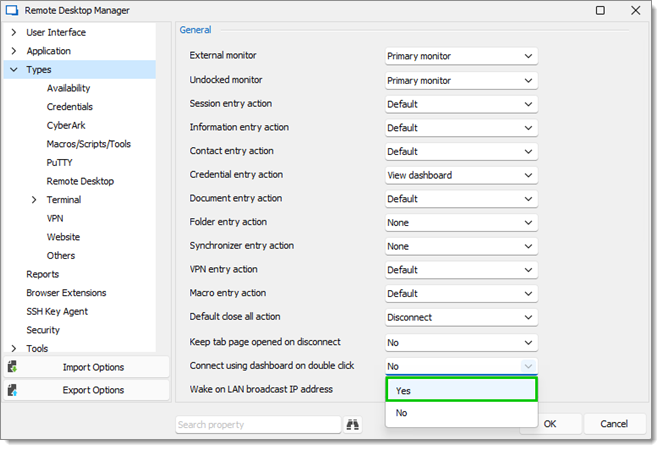
File – Settings – Types -
Click OK to save and close the window.
Double-clicking will now automatically open the Dashboard.