When importing CSV files into Remote Desktop Manager, there are some decisions to be made about the strategies to use and the format of the content.
The most important decision is about if and how to apply a template as part of the process.
Both methods of importing from CSV allow you to choose a template for newly created entries. If you do choose a template as part of the process, it will be applied to all entries created from that batch. Sometimes, it may be a good strategy to split the entries in different CSV files by grouping them by entry types you wish to create. This ensures that they are imported correctly in Remote Desktop Manager and reduces the number of actions required after the import action.
If you want a more specific configuration, you can set the template to use in the Template column of the CSV file. However, since you can set the entry type for each entry individually in the CSV file (ConnectionType), this may not be necessary.
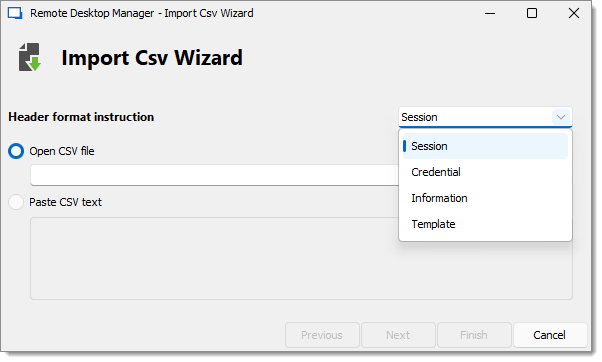
In File – Import, we recommend you use the Import generic CSV wizard option first. You can modify, if needed, the Header format instruction. 
Session: The content of the CSV file is imported as Session type entries in Remote Desktop Manager. Unless a ConnectionType is mentioned in your CSV or a template is used, your entries will be imported as RDP entries by default.
Credential: The content of the CSV file is imported as Credential type entries in Remote Desktop Manager, such as Username/Password, Password list, and 1Password.
Information: The content of the CSV file is imported as Information type entries in Remote Desktop Manager, such as Credit card, Bank account, and Alarm codes.
Template: The content of the CSV file is imported as Templates in Remote Desktop Manager.
Some entry settings checks are not performed during the import, but rather when the session(s) properties dialogs are invoked after the import. Therefore, using the import process may result in invalid entries that may trigger errors. Please validate the relevant entries carefully.
In the CSV file, the Host and the Name fields are mandatory. If no template is specified, the RDP type will be used as a fallback type. Fields must be separated by commas.
We cannot provide the list of all supported fields for all entry types because Remote Desktop Manager uses an open architecture and is therefore not aware of all the entry type fields that are provided by our add-on system. A good method of finding out the field structure is creating an entry of the desired type, right-clicking it and selecting Clipboard – Copy, then pasting the content in your favorite editor. You will see the structure and the field names.
Default values for fields are not serialized, meaning that they are simply left out of the serialized structure.
Implementing support for all fields comes at a cost. The import process is time consuming because of all the dynamic field access that takes place. A massive initial import of entries should be separated in batches of manageable sizes. Please perform trials and tune the number of entries to achieve acceptable performance.
All of our entries share a basic set of fields; the rest is tied to the specific technology being interfaced with (RDP, SSH, etc.). Some fields are grouped in structures, like the Information Tab. Those fields are accessible only when providing the structure name as a prefix, for example, "MetaInformation\OS" or "MetaInformation\PurchaseDate".
The CSV file can contain our variables: they will be resolved upon saving. For instance, you could use the $HOST$ variable in fields like Description , URL, Putty\CustomSessionName, etc. It will be replaced by the corresponding value.
Below is a non-exhaustive list of some relevant fields.
| FIELD | DESCRIPTION |
|---|---|
| Host | Host name of the device. This field is mandatory. |
| Name | Name of the entry. This field is mandatory. |
| ConnectionType | Token representing the connection type. It is best to use the Clipboard – Copy method to obtain the acceptable values. If no connection type is specified, RDP will be used by default. |
| Group | Destination folder. Note that if the import process itself defined a destination folder, the folder listed here would be created below the one from the process. |
| Description | Description of the entry. |
| Open (Embedded) | Boolean value (true or false) that indicates to open the session embedded. The default value is false, meaning that the native client will be used depending on the technology (MSTSC.EXE, for instance). |
| Username | Username used to open a session to the device. |
| Domain | Domain used to open a session to the device. |
| Password | Password used to open a session to the device. Please note that this field is encrypted and stored into another field upon being imported. |
| MetaInformation\SerialNumber | Serial number of the device. |
| MetaInformation\ServiceTag | Service tag of the device. |
| MetaInformation\PurchaseDate | Purchase date in a ISO8601 format (i.e., yyyy-mm-dd). |
Here is an example of a CSV file template to import SSH hosts as SSH Shell entries in Remote Desktop Manager:
| ConnectionType | Name | Group | Host | Port | CredentialUserName | CredentialDomain | CredentialPassword |
|---|---|---|---|---|---|---|---|
| SSHShell | SSH Shell | YourFolderName | 123.123.123.123 | 123 | YourUsername | YourDomain | YourPassword |