Vaults are containers that organize your folders and entries. They help divide your advanced data sources into multiple compartments. Vaults improve the security and user experience of Remote Desktop Manager, as well as its performance by limiting the amount of entries that load at once.
To learn about the different vault types and ways to access them, visit Vaults.
This topic covers the following:
Follow the steps below to learn how to create a new vault.
For security and performance reasons, we recommend creating a different vault for each customer and/or department, depending on how you use Remote Desktop Manager.
-
In the Ribbon, go to Administration – Vaults.

If you are using a Devolutions Server or Devolutions Hub Business data source, vault management is done in their respective web interfaces. For more information, consult either Devolutions Server vaults or Devolutions Hub vaults.
-
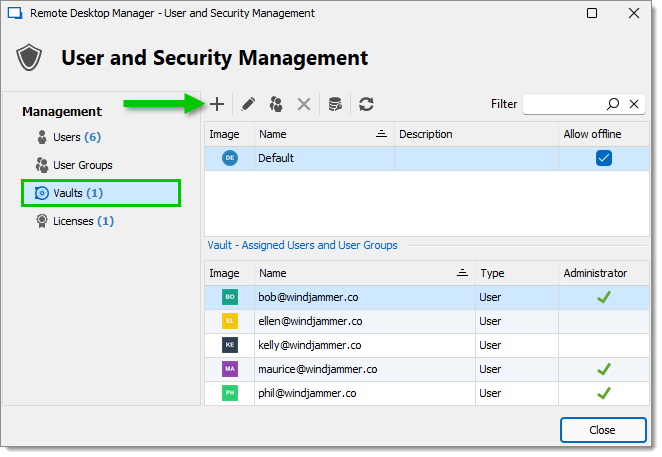
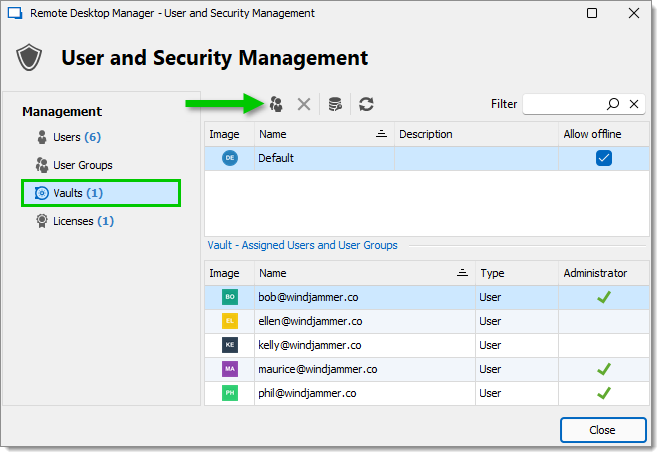
In the User and security management window, select the Vaults tab, then click on Add vault.
-
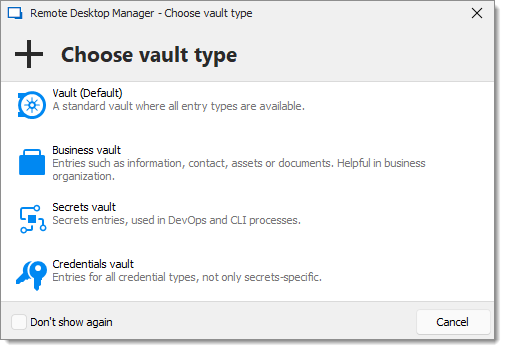
Choose a vault content type (default, business, secrets, or credentials). Vault content types limit the entry types that can be created in this specific vault.
-
In the General tab, an ID is generated automatically. Enter a Name (mandatory) and a Description (optional) for your new vault. The Visibility setting determines if this specific vault is visible to all users (public) or only to users that have access to the vault (private). It is set on the default setting, which can be modified in Administration – System settings – Vault management – Vault. The vault can be created as soon as a Name has been specified, but other options are available. They are presented in the next step.
To use an existing vault template, select it from the Template drop-down list. Unlike other settings, this one cannot be configured later since it changes how the vault is created. Learn about Templates before deciding.
The Allow offline option is enabled by default. If it is disabled, the new vault will not be able to be used in Offline mode. This setting can still be modified after the creation of the vault by going back to Administration – Vaults, selecting the vault to modify and clicking on Edit vault settings.

Vault management – General -
Optional: Users and user groups, Security, and Vault Owners options are available in the other tabs in the left menu. Configure them to your needs now, or do it later by going back to Administration – Management – Vaults, selecting the vault to modify and clicking on Edit vault settings.
Users and user groups: Choose which Users and User groups will have access to the vault by checking/unchecking them. For security reasons, administrators always have access.
Security: Specify a Master password for access to the vault and indicate whether the old password should be asked when overwriting the password.
Vault owners: Select user groups or users to be owners of this vault, meaning they can manage this specific vault without having access to data source administration.
-
Click OK when done.
-
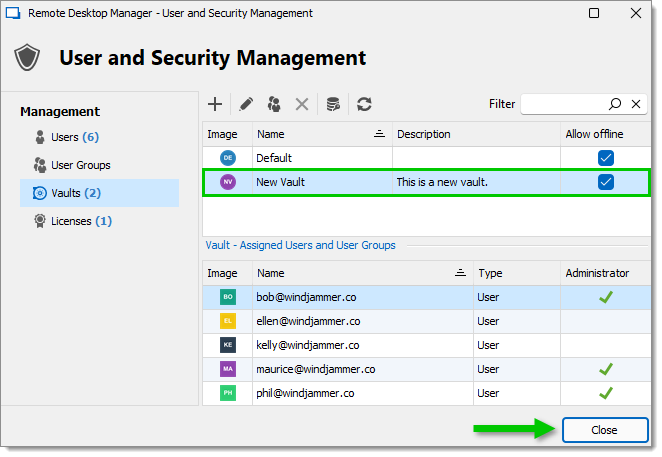
The new vault will appear in the User and security management window. You can Close this view to access the vault from the Navigation pane.
-
In the Ribbon, go to Administration – Vaults.
If you are using a Devolutions Server or Devolutions Hub Business data source, vault management is done in their respective web interfaces. For more information, consult either Devolutions Server vaults or Devolutions Hub vaults.
-
In the User and security management window, select the Vaults tab, then click on Add vault.
-
Choose a vault content type (default, business, secrets, or credentials). Vault content types limit the entry types that can be created in this specific vault.
-
In the General tab, an ID is generated automatically. Enter a Name (mandatory) and a Description (optional) for your new vault. The Visibility setting determines if this specific vault is visible to all users (public) or only to users that have access to the vault (private). It is set on the default setting, which can be modified in Administration – System settings – Vault management – Vault. The vault can be created as soon as a Name has been specified, but other options are available. They are presented in the next step.
To use an existing vault template, select it from the Template drop-down list. Unlike other settings, this one cannot be configured later since it changes how the vault is created. Learn about Templates before deciding.
The Allow offline option is enabled by default. If it is disabled, the new vault will not be able to be used in Offline mode. This setting can still be modified after the creation of the vault by going back to Administration – Vaults, selecting the vault to modify and clicking on Edit vault settings.
-
Optional: Users and user groups, Security, and Vault Owners options are available in the other tabs in the left menu. Configure them to your needs now, or do it later by going back to Administration – Management – Vaults, selecting the vault to modify and clicking on Edit vault settings.
Users and user groups: Choose which Users and User groups will have access to the vault by checking/unchecking them. For security reasons, administrators always have access.
Security: Specify a Master password for access to the vault and indicate whether the old password should be asked when overwriting the password.
Vault owners: Select user groups or users to be owners of this vault, meaning they can manage this specific vault without having access to data source administration.
-
Click OK when done.
-
The new vault will appear in the User and security management window. You can Close this view to access the vault from the Navigation pane.
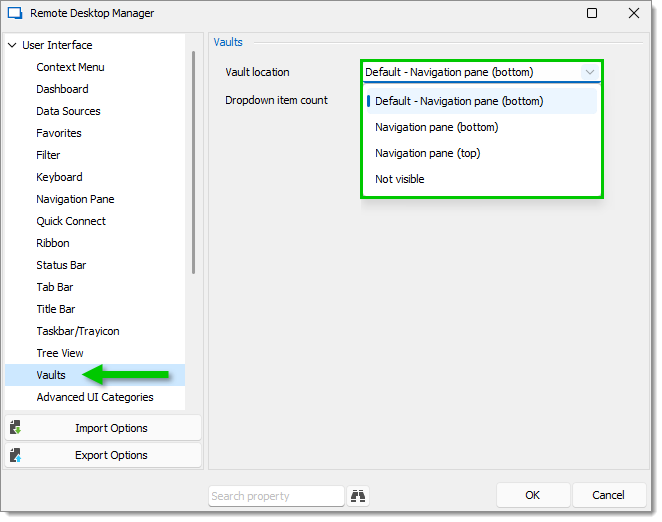
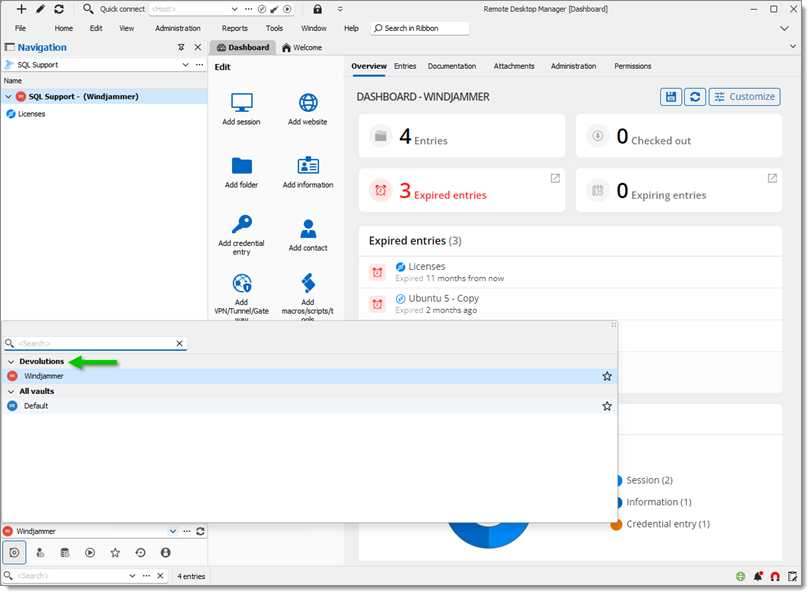
In the Navigation pane, you can use the vault selector to move between vaults.
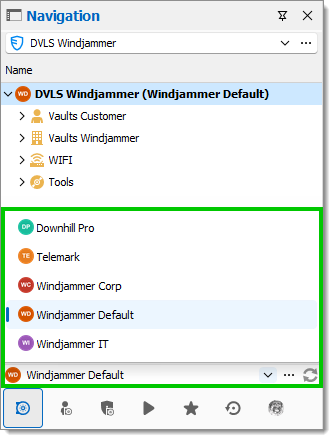
You can change the location of the vault selector in File – Settings – User interface – Vaults – Vault location. By default, the selector is at the bottom of the Navigation pane.
In the Navigation pane, go to the vault you want to transfer entries out of.
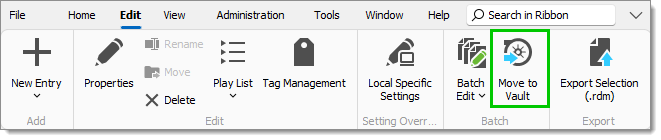
In the Ribbon, go to Edit – Batch – Move to vault.
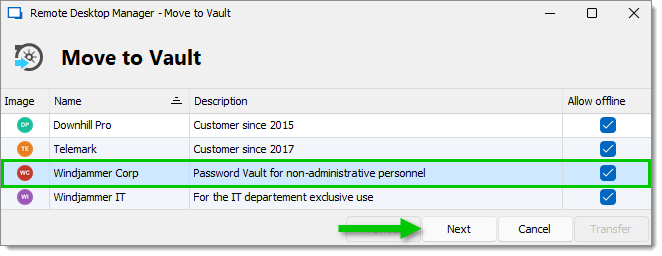
Select the vault you want to move entries to, then click Next.
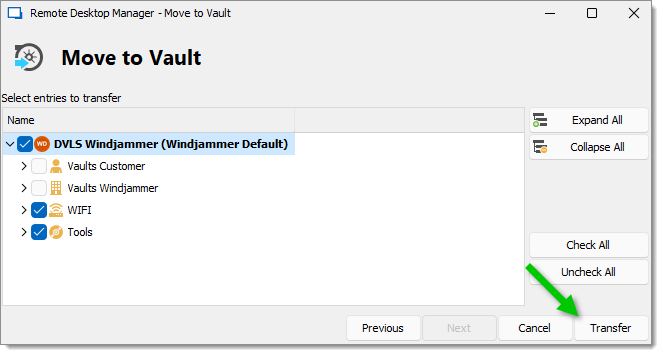
Choose the entries you want to transfer to the new vault by checking the boxes next to them, then click Transfer.
A message will let you know that the transfer was successful. Click on Finish to close this view.
In the Navigation pane, go to the vault you want to transfer entries out of.
In the Ribbon, go to Edit – Batch – Move to vault.
Select the vault you want to move entries to, then click Next.
Choose the entries you want to transfer to the new vault by checking the boxes next to them, then click Transfer.
A message will let you know that the transfer was successful. Click on Finish to close this view.
Your selected entries can now be found in the destination vault.
Vaults simplify user management because Active Directory (AD) groups define who has access to a vault. These AD groups are known as User groups in Remote Desktop Manager. In general, most groups have access to a couple of vaults, while some groups will only have access to one vault. Limiting access to vaults minimizes the need to set permissions on lower-level folders.
Follow the steps below to assign Users and Roles to a vault.
-
In the Ribbon, go to Administration – Vaults.
If you are using a Devolutions Server or Devolutions Hub Business data source, vault management is done in their respective web interfaces. For more information, consult either Devolutions Server vaults or Devolutions Hub vaults.
-
In the User and security management window, select the Vaults tab, then click on Assign users and roles.
-
In the Vault assignment window, choose which Users and User groups will have access to the vault by checking/unchecking the box next to them.
For security reasons, administrators always have access.
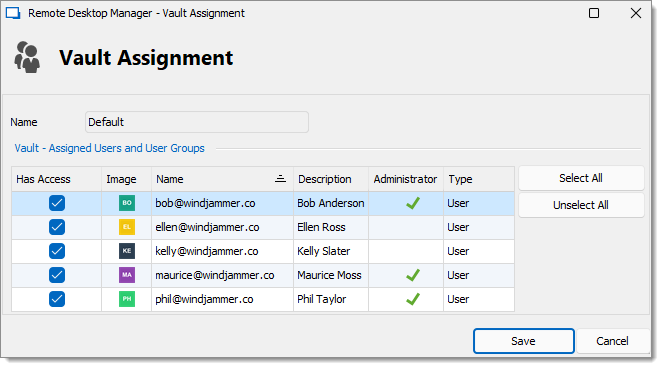
Vault assignment -
Save your changes.
Keep in mind that even if you assign a role/user to a vault, the permissions that are set in the Vault settings can change what users can see or do in the vault.
-
In the Ribbon, go to Administration – Vaults.
If you are using a Devolutions Server or Devolutions Hub Business data source, vault management is done in their respective web interfaces. For more information, consult either Devolutions Server vaults or Devolutions Hub vaults.
-
In the User and security management window, select the Vaults tab, then click on Assign users and roles.
-
In the Vault assignment window, choose which Users and User groups will have access to the vault by checking/unchecking the box next to them.
For security reasons, administrators always have access.
-
Save your changes.
Keep in mind that even if you assign a role/user to a vault, the permissions that are set in the Vault settings can change what users can see or do in the vault.
Vaults can be organized into Business units, improving efficiency and reducing search time. Business units, which can be generated through reports and listed as activity logs, are only available for SQL Server and SQL Azure data sources.
Select Business units in the ribbon of Remote Desktop Manager.

Click Business units in the User and security management window.
Select Add business units to open the Business unit management window.
Enter the information in the General section.
Go to vaults, and choose the vaults who will have access to the Business unit.
Click OK to save.
The Business units are displayed in the vault selector.
Select Business units in the ribbon of Remote Desktop Manager.
Click Business units in the User and security management window.
Select Add business units to open the Business unit management window.
Enter the information in the General section.
Go to vaults, and choose the vaults who will have access to the Business unit.
Click OK to save.
The Business units are displayed in the vault selector.
To navigate between vaults, you can use the vault selector drop-down menu or vault shortcuts. These shortcuts are a type of session entry called Vault (shortcut).
If you have access to multiple vaults, you can create vault shortcuts to navigate between vaults. Here are recommendations to make your Remote Desktop Manager experience smoother and more secure if you do decide to use these shortcuts:
Centralize all of your vault shortcuts entries into one main (default) vault.
In each vault, add a Vault (shortcut) entry that returns the user to the main vault.
Remove the data source drop-down list when using vault shortcuts. To do so, navigate to File – Settings – User interface – Data sources and select Not visible in the Data source location drop-down list. Then, the vault selector can be moved above the Navigation pane for easier access.
Follow the steps below to create a Vault (shortcut) entry.
In the Navigation pane, go to the data source and vault in which you want to create your shortcut.
In the Ribbon, go to Edit – Add – New entry.

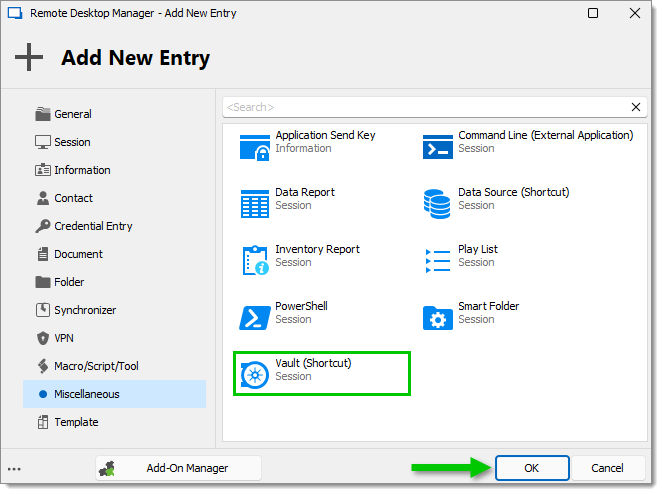
In the Miscellaneous tab, select the Vault (shortcut) session entry, then click OK.
In the Name field, enter the name of the vault you are creating a shortcut to, then select the Folder in which to create your shortcut in the corresponding drop-down list.
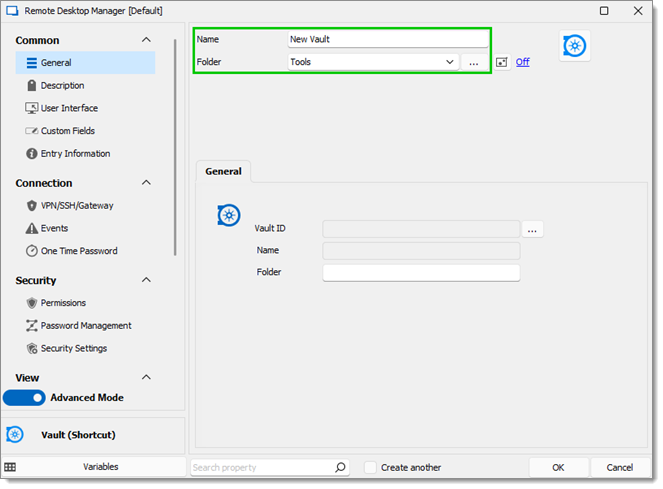
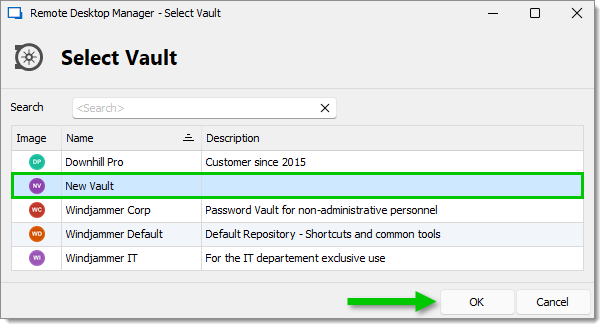
Use the ellipsis button next to the Vault ID field to find the vault. In the Select vault window, you can use the Search field to help you find it.
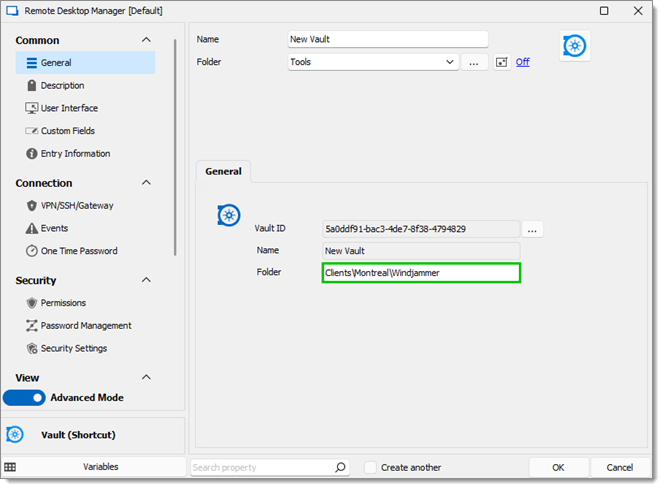
Enter a Folder path in the corresponding field to create a shortcut to a specific folder or sub-folder. To do so, follow these guidelines:
The Folder field is case sensitive. This means that, for example, writing the folder name "clients" (lowercase "c") will not redirect to the "Clients" (uppercase "C") folder and vice versa.
To specify a sub-folder, write the entire path that leads to it, separating every folder with a backslash (""). Start by writing the name of the first parent folder, then name every subsequent folder in the path, and end with the last folder. For example, in the screenshot below, the parent folder is "Clients" and the destination folder is "Windjammer". The "Montreal" folder is the only folder between them.
Save your changes.
In the Navigation pane, go to the data source and vault in which you want to create your shortcut.
In the Ribbon, go to Edit – Add – New entry.
In the Miscellaneous tab, select the Vault (shortcut) session entry, then click OK.
In the Name field, enter the name of the vault you are creating a shortcut to, then select the Folder in which to create your shortcut in the corresponding drop-down list.
Use the ellipsis button next to the Vault ID field to find the vault. In the Select vault window, you can use the Search field to help you find it.
Enter a Folder path in the corresponding field to create a shortcut to a specific folder or sub-folder. To do so, follow these guidelines:
The Folder field is case sensitive. This means that, for example, writing the folder name "clients" (lowercase "c") will not redirect to the "Clients" (uppercase "C") folder and vice versa.
To specify a sub-folder, write the entire path that leads to it, separating every folder with a backslash (""). Start by writing the name of the first parent folder, then name every subsequent folder in the path, and end with the last folder. For example, in the screenshot below, the parent folder is "Clients" and the destination folder is "Windjammer". The "Montreal" folder is the only folder between them.
Save your changes.
Your shortcut has now been created and is ready to be used.