You may have noticed an increased level of collaboration between Devolutions and CyberArk. As a result of this partnership, all of our integration types have been enhanced to take full advantage of CyberArk’s improved APIs. These updates now enable organizations to adopt passwordless workflows for their daily operations, streamlining access while strengthening security.
To take advantage of these enhancements, your organization must include CyberArk's Application Access Manager (AAM) in its deployment. This module enables private key authentication, allowing your IT department to manage the entire identification and authentication process. As a result, traditional passwords become unnecessary within the CyberArk workflow.
The term passwordless applies specifically to the CyberArk integration. You will still need to authenticate to Remote Desktop Manager, depending on the data source you are using.
To better illustrate the solution, refer to the following diagram: 
This workflow enables secure, passwordless privileged access using CyberArk integration in Remote Desktop Manager:
The user signs in to Remote Desktop Manager using a least privilege account, which grants them access to the Remote Desktop Manager content according to the permissions defined in our user group-based access control system.
When a privileged account is required to initiate a connection using a supported technology, Remote Desktop Manager retrieves the corresponding private key from the user's workstation. This key must be available in the user’s certificate store.
The private key is then used to authenticate to the CyberArk vault. The vault is configured with an application object, which acts as a user proxy to query the vault.
Remote Desktop Manager retrieves the credentials for the appropriate privileged account. Crucially, the user never sees or handles the actual password to their own privileged account.
Remote Desktop Manager the uses the privileged account to:
Launch a PSM (Privileged Session Manager) connection,
Connect to the PVWA (Password Vault Web Access),
Or initiate any other supported session type. This is all done while keeping the password hidden and ensuring that the authentication p^rocess remains seamless and secure.
To begin, you must generate and deploy private keys for each user across their workstations. While CyberArk's official documentation remains the definitive source for this process, we provide basic guidance in our integration documentation.
On the Remote Desktop Manager side, we offer multiple ways to manage private keys, depending on your environment and level of administrative control:
This is the simplest method, establishing a one-to-one relationship between users, keys, and accounts. Each user is responsible for managing their own entry and private key details. It’s straightforward but decentralized.
This method separates responsibilities: administrators configure the AAM entries in Remote Desktop Manager, while users provide their own private key details through their personal settings.
Depending on your approach, privileged account lookup can be handled in one of two ways:
Each user must have a dedicated privileged account, accessible via shared keywords defined in the AAM entry.
Administrators are responsible for placing each user’s account in isolated safes and ensuring consistent keyword use across all relevant accounts.
Administrators create a unique AAM entry per user, each configured with user-specific keywords.
Access to these entries is controlled using Remote Desktop Manager’s user group-based access control, ensuring that users can only view and use their own assigned entries.
As with many features in Remote Desktop Manager, these methods can be mixed and matched to suit your organization’s specific security and workflow requirements.
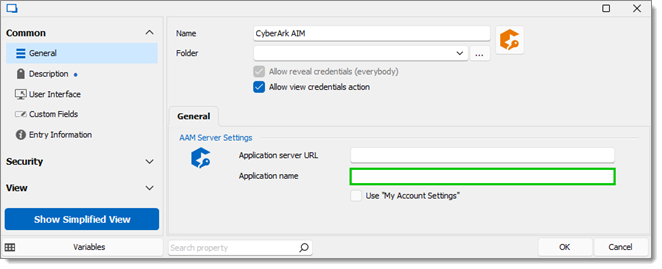
An application name other than AIMWebService must be specified in the application name field.
Due to the scope and complexity of CyberArk’s Privileged Session Manager (PSM), we recommend referring to CyberArk’s official documentation for complete configuration and deployment details.
On the Remote Desktop Manager side, integration with PSM is straightforward once you have set up the AAM configuration as described in the previous section.
If storing your private key information in an entry within your user vault, use user-specific settings in Remote Desktop Manager to link each user's PSM-Server entry with their corresponding AAM entry stored in the vault. This ensures that each user’s connection uses their own private key for authentication.
If storing your private key information stored in My account settings, we recommend configuring the PSM-Server entry to use Credential repository combined with prompt on connection.
This setup provides a smooth onboarding experience for new users, who will be prompted to select the appropriate credentials. More experienced users can later personalize their experience by switching to User-specific settings to make a persistent link to their assigned AAM entry.
While organizations operating entirely within the CyberArk ecosystem typically rely on core integrations such as PSM and Application Access Manager (AAM), we also offer support for the CyberArk Webservices SDK to provide additional flexibility.
This integration type is particularly useful when:
Privileged Session Manager (PSM) is not a viable option, or
You are unable to use Remote Desktop Manager’s account brokering features for a specific use case.
Using the Webservices SDK allows Remote Desktop Manager to retrieve specific credentials directly from the CyberArk Vault, while still ensuring that:
Access is performed on behalf of a privileged account.
The end user never sees or controls the password.
This enables secure, policy-based access to credentials even in scenarios where the standard AAM or PSM flows are not applicable—while maintaining strict control and compliance.
To explore the full capabilities of our CyberArk integrations, we recommend reviewing both CyberArk’s official documentation and our own detailed guides. Below, you will find links to each supported integration type, as well as references to Remote Desktop Manager features mentioned throughout this article:
Integration guides (download link from our CDN)
Remote Desktop Manager Help
As always, please contact our customer support team at service@devolutions.net if you’d like a walk-through or if you need to clarification on certain aspects.