Remote Desktop Manager can be downloaded as setup files or as a binary compressed file (ZIP) via our Devolutions website. It can also be downloaded from the Microsoft Store.
Depending on the downloaded media, either run the setup or extract the files from the archive in any folder and launch the executable.
If you wish to use a portable device or run multiple independent copies of the application, please consult Portable (USB).
| OPTIONS | DESCRIPTION |
|---|---|
| Windows (.msi, x64) | Download a Microsoft Software Installation package for 64-bit PCs (most desktops and laptops). |
| Windows (.msi, arm64) | Download a Microsoft Software Installation package for Windows devices using ARM. |
| Windows (.msi, universal) | Download a Microsoft Software Installation package containing binaries for both x64 and arm64 machines and devices. |
| Windows (.exe, universal) | Download a .exe package containing binaries for both x64 and arm64 machines and devices. |
| Windows (.7z, x64) | Download Remote Desktop Manager as a highly compressed, pre-optimized for x64, .7z file. Use for better startup performance. |
| Windows (.7z, arm64) | Download Remote Desktop Manager as a highly compressed, pre-optimized for armx64, .7z file. Use for better startup performance. |
| Windows (.zip, universal) | Download Remote Desktop Manager as a compressed .zip file containing binaries for both x64 and arm 64 machines and devices. While .7z files are smaller, .zip files are more universally supported. |
It is possible to try Remote Desktop Manager with a Free trial. If you possess a purchased license, please follow the instructions Registration.
By default, a local data source is created using the SQLite format. You can add as many data sources as needed. Please consult Data sources for more information.
To use an SQL Server or Azure SQL data source, refer to Configure SQL Server or Configure Azure SQL.
Configure your installation path for all external applications you intend to use such as RealVNC, Putty, Filezilla, etc. Set the paths in File – Settings – Application – Paths.
Please consult Terminal Services / Remote Desktop Services.
Remote Desktop Manager macOS can be downloaded as a DMG file via our Devolutions website.
Depending on the downloaded media, either run the setup or extract the files from the archive in any folder and launch the executable.
It is possible to try Remote Desktop Manager with a Free trial. If you possess a purchased license, please follow the instructions Registration.
By default, a local data source is created using the SQLite format. You can add as many data sources as needed. Please consult Data sources for more information.
To use an SQL Server or Azure SQL data source, refer to Configure SQL Server or Configure Azure SQL.
Remote Desktop Manager can be downloaded as DEB or RPM files via the Devolutions website.
It is possible to try Remote Desktop Manager with a Free trial. If you possess a purchased license, please follow the instructions Registration.
By default, a local data source is created using the SQLite format. You can add as many data sources as needed. Please consult Data sources for more information.
To use an SQL Server or Azure SQL data source, refer to Configure SQL Server or Configure Azure SQL.
Depending on the downloaded media, either run the setup or extract the files from the archive in any folder and launch the executable. If this method of installation does not meet your needs, follow the instructions below.
Devolutions offer RDM through Cloudsmith for Debian and RedHat-based distributions. For Arch-based distributions, the package is available through AUR, and finally, Devolutions offers a Flatpak package that should cover most other platforms.
The repository must be set up before installing Remote Desktop Manager through Cloudsmith on any Debian-based distributions, including but not limited to Ubuntu, Pop!_Os, and Kali Linux.
The following example showcases an Ubuntu system using APT as package manager.
To set up the repositary, run the bash script that most fit your needs from the choices below:
curl -1sLf \
  'https://dl.cloudsmith.io/public/devolutions/rdm/setup.deb.sh' \
  | sudo -E bash
curl -1sLf \
  'https://dl.cloudsmith.io/public/devolutions/rdm/setup.deb.sh' \
  | sudo -E distro=some-distro codename=some-codename arch=some-arch bash
apt-get install -y debian-keyring  # debian only
apt-get install -y debian-archive-keyring  # debian only
apt-get install -y apt-transport-https
# For Debian Stretch, Ubuntu 16.04 and later
keyring_location=/usr/share/keyrings/devolutions-rdm-archive-keyring.gpg
# For Debian Jessie, Ubuntu 15.10 and earlier
keyring_location=/etc/apt/trusted.gpg.d/devolutions-rdm.gpg
curl -1sLf 'https://dl.cloudsmith.io/public/devolutions/rdm/gpg.FE7407ECB26FD2FE.key' |  gpg --dearmor >> ${keyring_location}
curl -1sLf 'https://dl.cloudsmith.io/public/devolutions/rdm/config.deb.txt?distro=ubuntu&codename=xenial' > /etc/apt/sources.list.d/devolutions-rdm.list
apt-get update
Be sure to replace ubuntu and xenial in the above with your actual operating system (distribution and distribution release/version).
Install the package through your chosen package manager (APT here) by running the following script:
sudo apt-get install remotedesktopmanager
The repository must be set up before installing Remote Desktop Manager through Cloudsmith on any RedHat-based distributions, including but not limited to RHEL, CentOS, SUSE, Fedora. For specific distribution based instructions please refer to Cloudsmith’s guide.
The following example showcases a Fedora system using DNF as package manager.
To set up the repositary, run the bash script that most fit your needs from the choices below:
curl -1sLf \
  'https://dl.cloudsmith.io/public/devolutions/rdm/setup.deb.sh' \
  | sudo -E bash
curl -1sLf \
  'https://dl.cloudsmith.io/public/devolutions/rdm/setup.deb.sh' \
  | sudo -E distro=some-distro codename=some-codename arch=some-arch bash
dnf install yum-utils pygpgme

rpm --import 'https://dl.cloudsmith.io/public/devolutions/rdm/gpg.FE7407ECB26FD2FE.key'
curl -1sLf 'https://dl.cloudsmith.io/public/devolutions/rdm/config.rpm.txt?distro=fedora&codename=29' > /tmp/devolutions-rdm.repo
dnf config-manager --add-repo '/tmp/devolutions-rdm.repo'
dnf -q makecache -y --disablerepo='*' --enablerepo='devolutions-rdm' --enablerepo='devolutions-rdm-source'
Be sure to replace fedora and 29 in the above with your actual operating system (distribution and distribution release/version).
Install the package through your chosen package manager (DNF here) by running the following script:
sudo dnf-get install remotedesktopmanager
For Arch-based distributions, including but not limited to Arch, Manjaro, EndeavourOS, Devolutions strongly recommends Yay. The package can also be built from scratch.
If Yay is not already installed on the machine, do so by using this script:
sudo pacman -Sy yay
Install the remote-desktop-manager package:
yay -Sy remote-desktop-manager
Run a full system synchronization (recommended):
yay -Syu
or only upgrade the remote-desktop-manager package (may cause dependency issues):
yay -Sy remote-desktop-manager
Install base-devel with the following script:
sudo pacman -S base-devel
Clone the remote-desktop-manager repository in a particular location:
git clone https://aur.archlinux.org/remote-desktop-manager.git
Build and install the pack by running this script and replacing "path_to_the_cloned_repo":
cd path_to_the_cloned_repo/
makepkg -si
To install Remote Desktop Manager on Flatpak-supported distributions, start by setting up Flatpak on the machine according to Flatpak's Quick Setup page. Then, install the package using flathub by running these scripts:
flatpak install flathub com.devolutions.remotedesktopmanager
flatpak run com.devolutions.remotedesktopmanager
Here is a simple guide to help installing Remote Desktop Manager Linux on an unsupported distro.
Here are required dependencies:
glibc 2.29
libwebkit2gtk-4.0 or libwebkit2gtk-4.1
ca-certificates
libsecret-1-0
gnome-keyring
libvte-2.91
Devolutions also suggests the following libraries:
libappindicator
xdotool
lsof
Install Remote Desktop Manager Linux using the following steps:
-
Download the latest .deb version of Remote Desktop Manager.
-
Make a directory:
mkdir ./extractedData/ -
Move the DEB file to the newly created folder and open that same folder:
mv ./RemoteDesktopManager_x.x.x.x_amd64.deb ./extractedData cd ./extractedData -
Extract the DEB file's content:
ar -x RemoteDesktopManager_x.x.x.x_amd64.deb -
Extract data.tar.xz content:
tar -xf data.tar.xz -
Copy the extracted data’s bin/remotedesktopmananger to /bin:
cp -r /bin/remotedesktopmananger /bin -
Copy the extracted data’s usr/lib/devolutions/RemoteDesktopManager to /usr/lib/devolutions/RemoteDesktopManager:
cp -r /usr/lib/devolutions/RemoteDesktopManager /usr/lib/devolutions/RemoteDesktopManager
Remote Desktop Manager can then be launched using the remotedesktopmanager terminal command.
On the Apple Store, search for the Remote Desktop Manager application and install the application on your device.
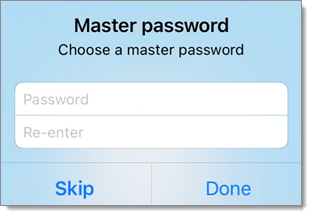
When launching the application on your device, the Master password window will appear, you can either decide to enter a password protecting Remote Desktop Manager, which will prompt you for your password every time you open the application or if you leave the field blank the application will open without prompting you for a password. You can also choose to use Touch ID and Face ID.
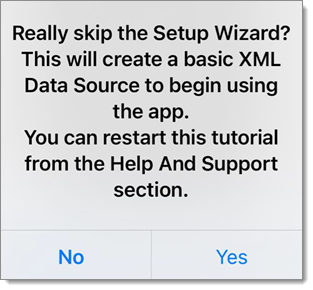
Remote Desktop Manager iOS automatically creates an XML data source the first time it is launched if you choose to skip the Setup Wizard.
On the Google Play Store store, search for the Remote Desktop Manager application and install the application on your device.
When launching the application on your device, the Master Password window will appear, you can either decide to enter a password protecting Remote Desktop Manager, which will prompt you for your password every time you open the application or if you leave the field blank the application will open without prompting your for a password.
Remote Desktop Manager Android will automatically create an XML data source upon first launch.