Use Okta with Devolutions Hub Business for single sign-on (SSO) authentication by following the steps in this page. First see the requirements and supported features below.
Even with a configured SSO, accessing sensitive data still requires entering a password, answering a push notification, scanning a QR code, or fulfilling any other confirmation prompt deemed necessary to respect the zero-knowledge principle. Installing Devolutions' encryption service allows you to circumvent this measure.
To use SSO or automatic provisioning (SCIM) with Okta, an Okta account with the appropriate rights is required. The Domain validation procedure must also be completed to verify ownership of the configured domain(s). Only users with emails whose domains have been verified are allowed to log in via SSO or be provisioned via SCIM.
Connect to the Hub via Okta SSO
Just-in-time (JIT) provisioning of connected users via Okta SSO
Synchronize your Okta to Devolutions Hub
Create/update users from Okta to Devolutions Hub (create users, update user attributes, and deactivate users)
Create/update groups from Okta to Devolutions Hub (group push)
Users provisioned JIT by SSO or created by SCIM synchronization must be invited to the Hub in Administration – Users , as described in the steps below.
Here are the steps to validate the domain, configure single sign-on, and perform user provisioning.
In Devolutions Hub Business
-
Go to Administration – Authentication – Domain, then click on Add Domain.
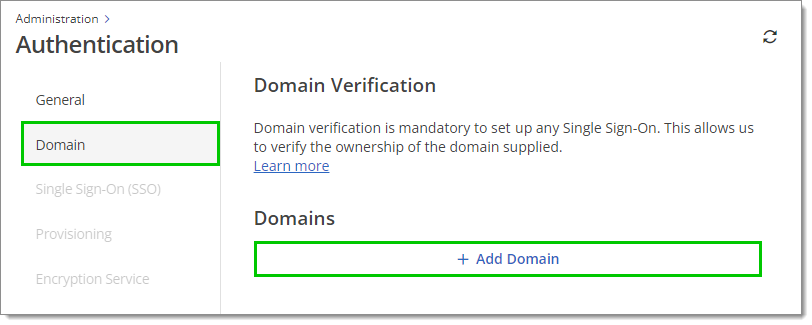
Administration – Authentication – Domain – Add domain -
Fill in the domain, then click on the checkmark to start the verification process.
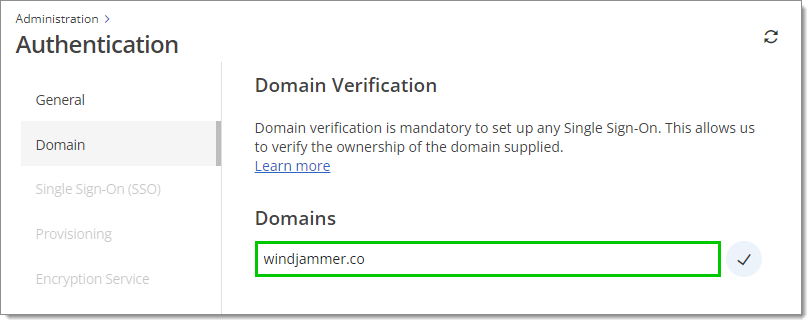
Domain For security purposes, only emails that end with your domain name are allowed to log in to Devolutions Hub using Okta authentication. For example, if employees' emails are in the format "bob@windjammer.co", the domain is "windjammer.co".
-
To have multiple domains, click Add domain once again, fill in your other domain, then click on the checkmark. Repeat this process for every domain you wish to add.
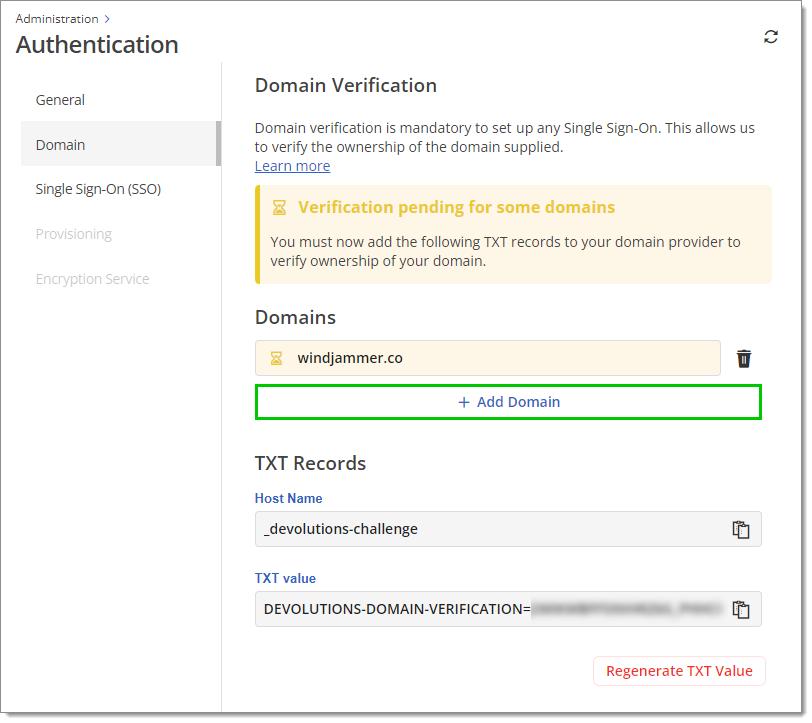
Multiple domains -
Create a DNS TXT Record using the provided Host name and TXT value. This allows us to verify the ownership of the domain(s) supplied.
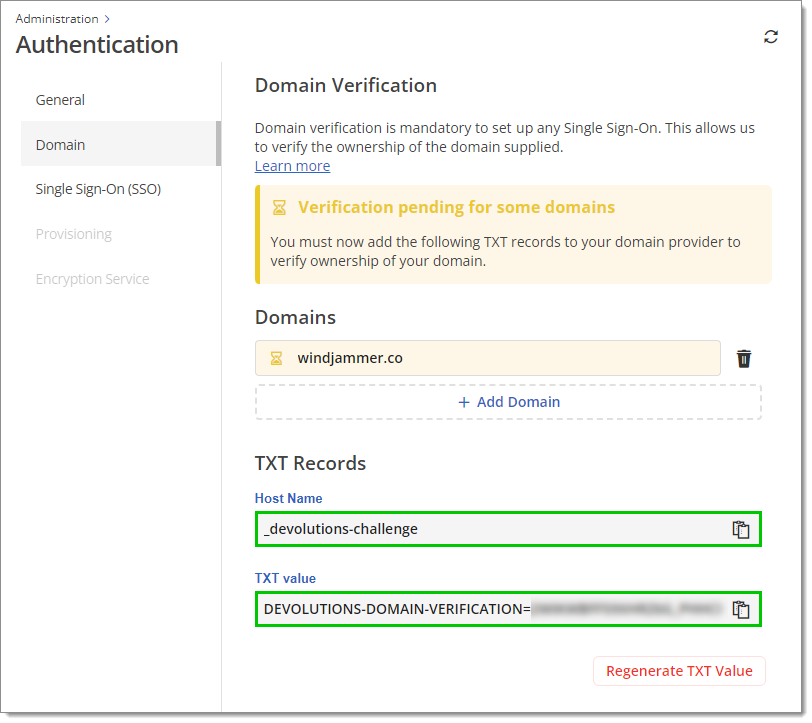
Host name and TXT value It is recommended to verify that the configuration is adequate using DNS querying tools such as MXToolBox or whatsmydns.net. The example below uses MXToolBox's TXT Lookup tool. The first part of the Domain Name must match the Host name in Devolutions Hub and the Record must match the TXT value in Devolutions Hub as well.
TXT DNS Records can take a while to propagate. Once the domain is verified, there is no need to keep the TXT DNS record.
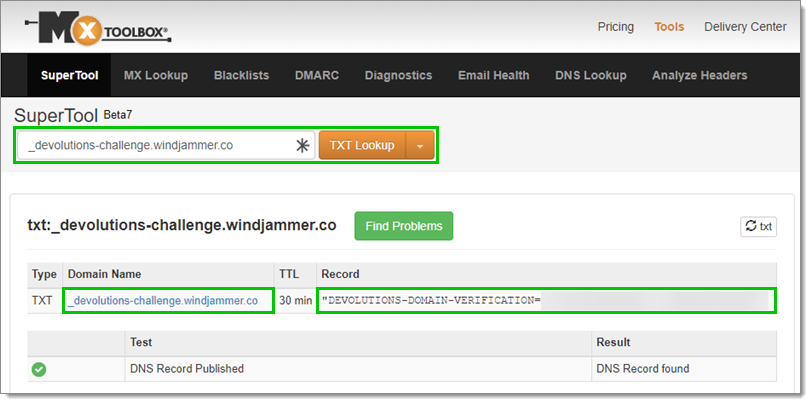
DNS TXT Record in MXToolBox -
Await domain verification. Upon successful verification, a checkmark within a green circle will display next to the domain. Proceed to configure single sign-on (SSO) during the verification process; however, user provisioning becomes accessible only after the domain has been verified.
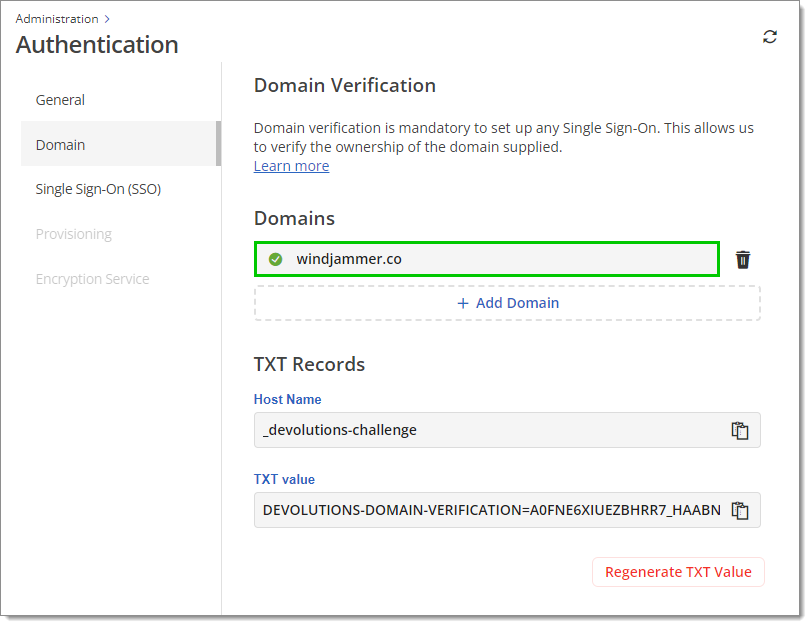
Verified domain This validation lasts for 48 hours and does not restart automatically after that period. If the TXT record is not configured within those 48 hours, the validation status will be Expired. If that happens, click on Retry.
If issues occur while trying to verify the domain, visit our Domain validation troubleshooting guide.
-
Go to Administration – Authentication – Single sign-on (SSO), then click on Okta single sign-on (SSO) to be redirected to the configuration page.
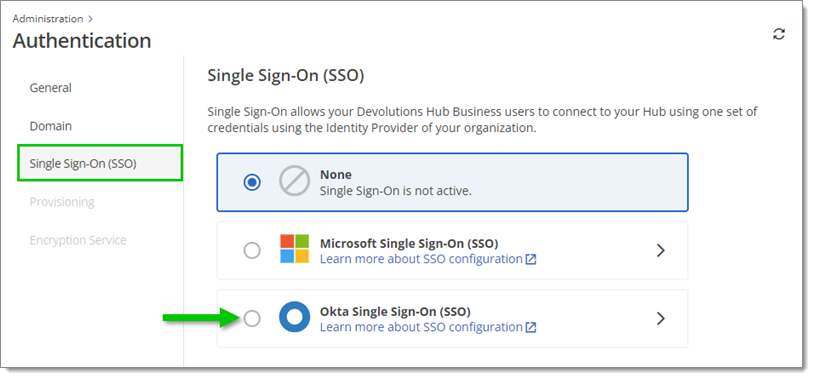
Administration – Authentication – Single sign-on (SSO) – Okta single sign-on (SSO) -
Name the SSO configuration. This name will only appear in the Devolutions Hub SSO settings menu. The default name is "Okta".
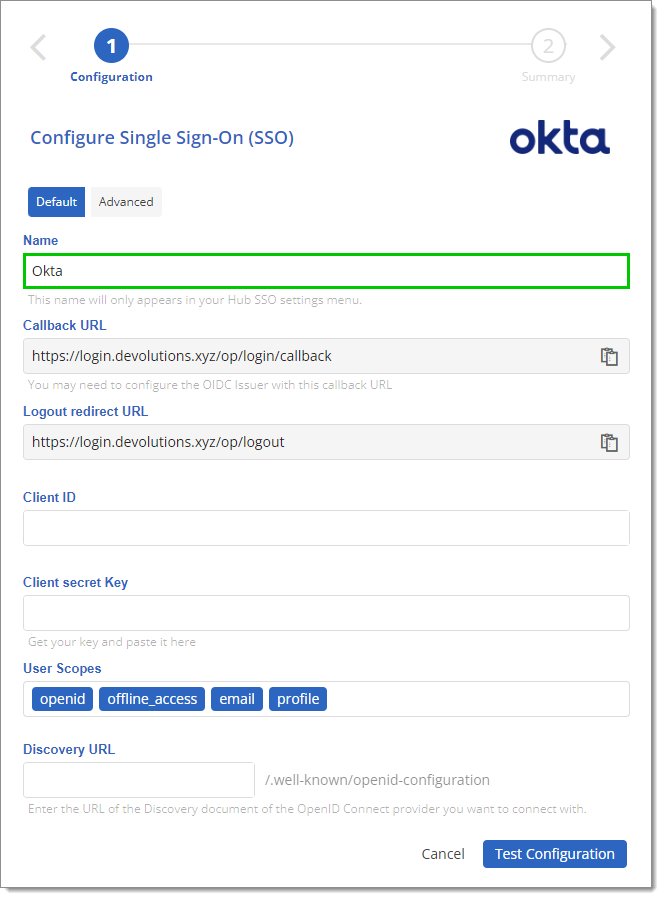
Configuration name Do not close this setup page, as the following steps show where to find the information to enter in its fields.
In Okta
-
Log in to the Okta account.
-
In Applications, click Browse App Catalog.
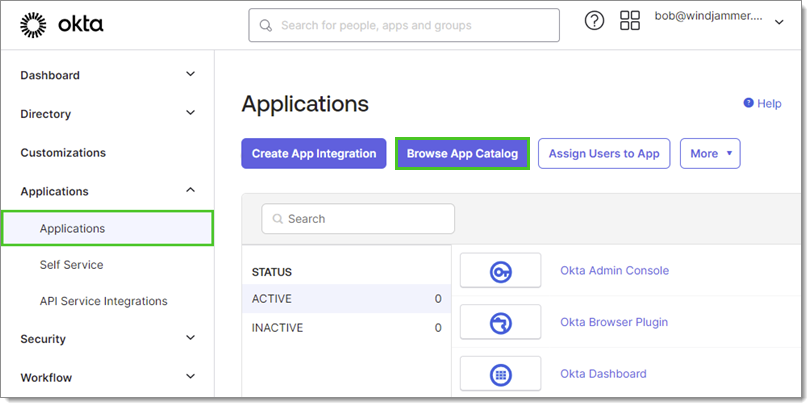
Applications – Browse App Catalog -
Search for Devolutions Hub, then click on the application in the search results.
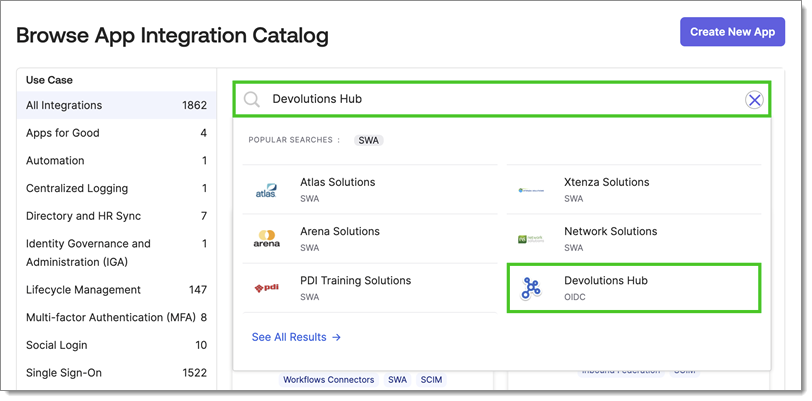
Search for -
Click on Add Integration at the top.
-
In the Sign On tab, copy the Client ID.
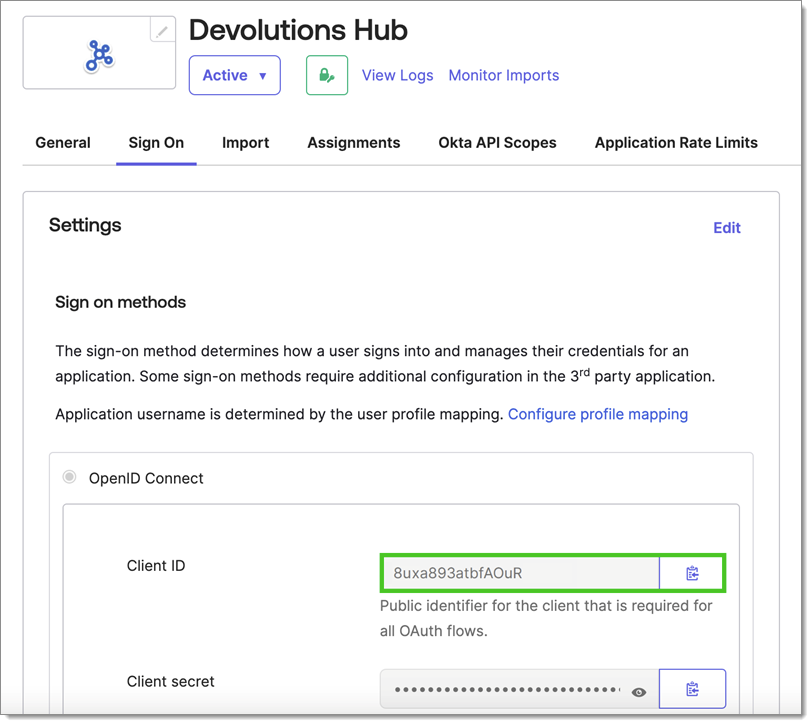
Copy the client ID
In Devolutions Hub Business
-
Back to the Configure Single Sign-On (SSO) page, paste the Client ID from the last step in the field of the same name.
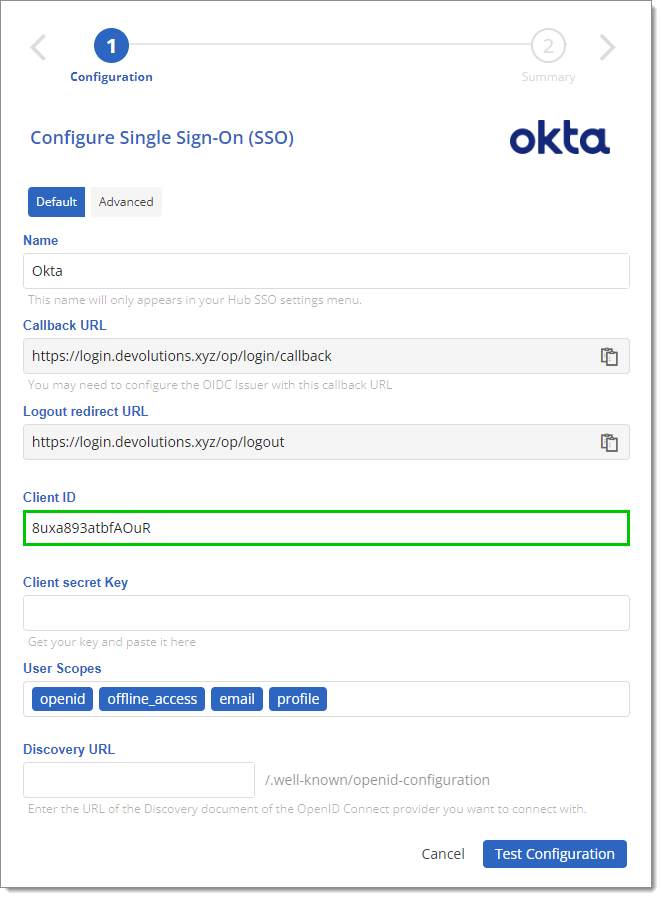
Paste the client ID
In Okta
-
Back to the Sign On tab, copy the Client secret.
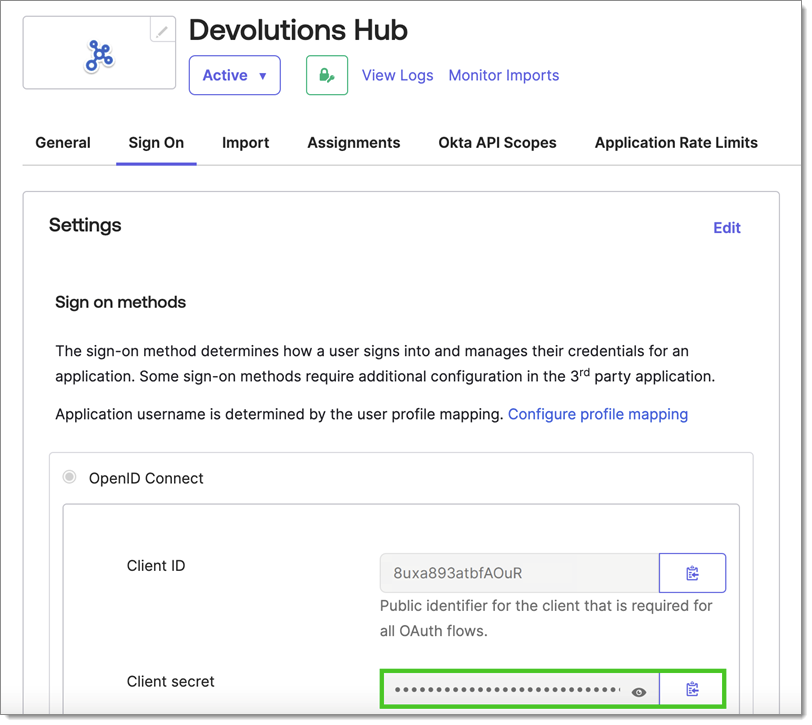
Copy the client secret
In Devolutions Hub Business
-
Back to the Configure Single Sign-On (SSO) page, paste the Client secret from the last step in the Client secret Key field.
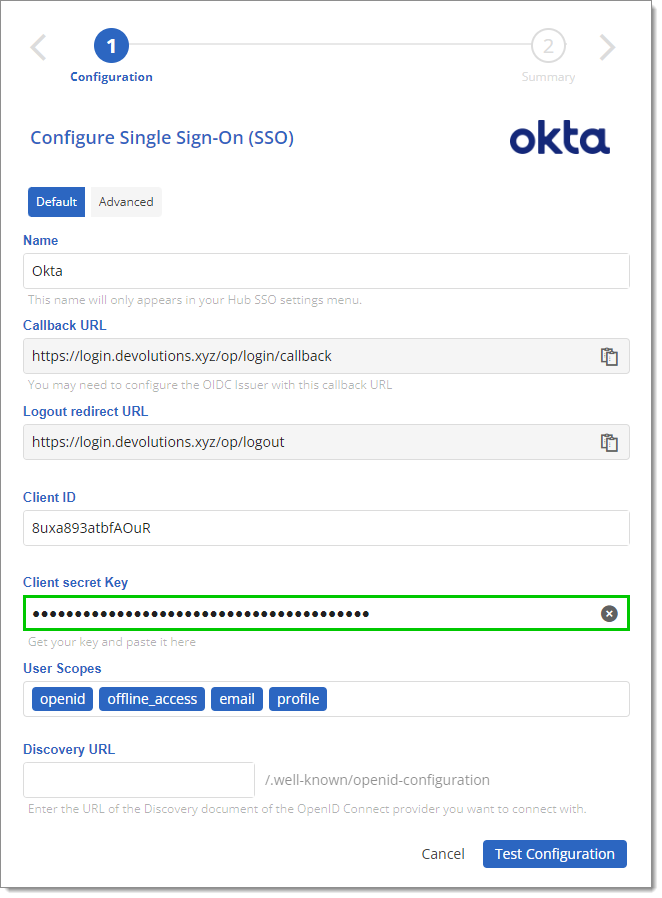
Paste the client secret -
In Discovery URL, enter the URL used to access Okta, without the "-admin" part.
Do not test the connection just yet, as users need to be assigned to the application first.
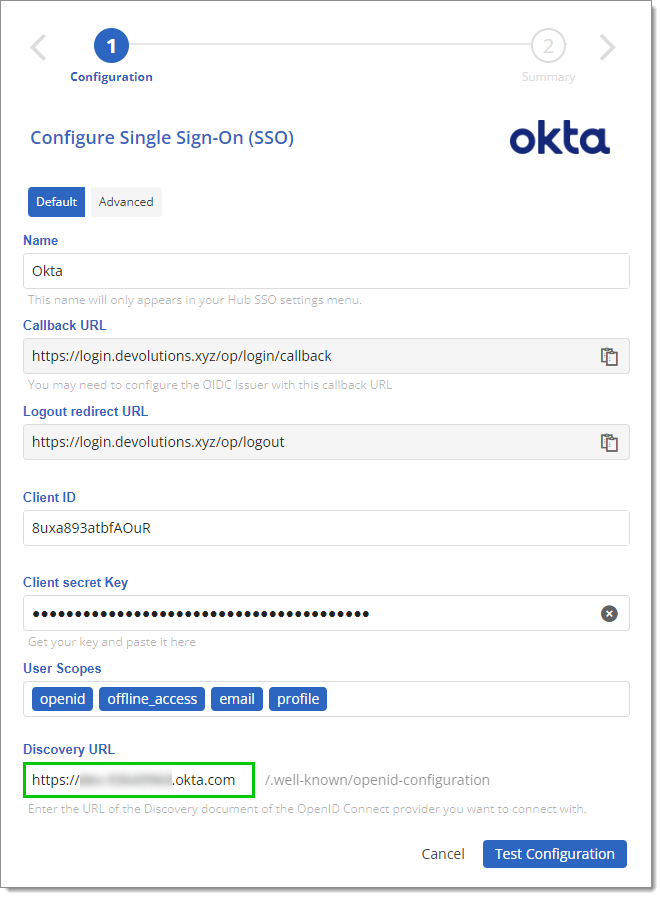
Discovery URL
In Okta
-
In the Assignments tab, ensure each user used to test the configuration is assigned to the application. For more details, see Okta's own documentation on user management and application assignment.
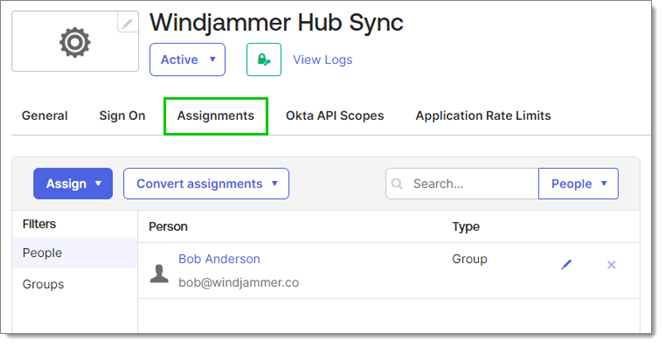
Assignments
In Devolutions Hub Business
Test the configuration in Devolutions Hub. A new window opens to connect you to Devolutions Hub through Okta. When connected, a success message appears.
If the popup does not appear, the browser or a browser extension may be blocking it. Change the browser and/or extension settings. If it still does not work, deactivating/removing the extension or changing browser may also solve the problem.
-
Click Save in the Summary of the Okta SSO configuration.
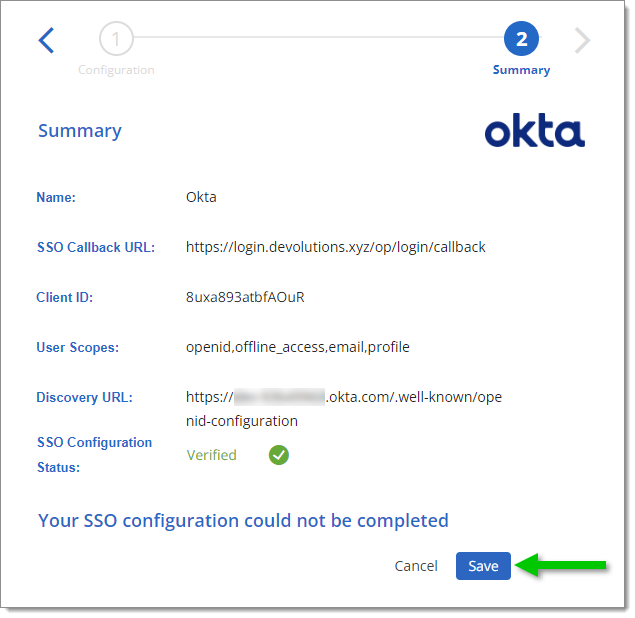
Save the configuration
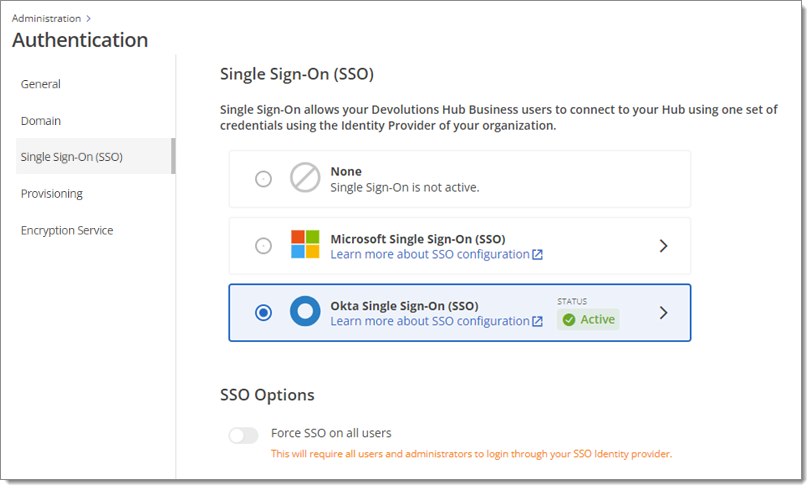
The SSO configuration is now complete. A green checkmark icon should now be visible next to the configuration, meaning that the SSO configuration through Okta is now enabled on the Hub.
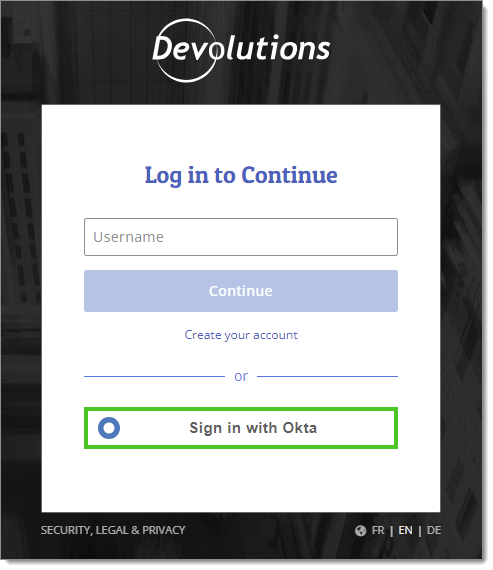
When logging in to the Hub, click on Sign in with Okta.
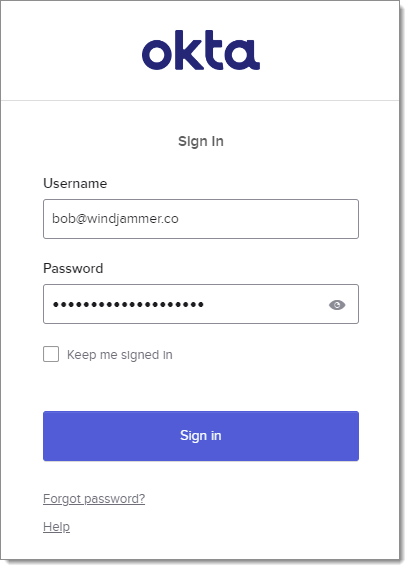
An Okta login page will open. Enter the Okta credentials and click Sign in. The Hub will then be accessible.
Synchronize users and user groups from providers to the Hub by following the steps in this section. First see the list of supported features below.
Note that we only support synchronization in one direction, from Okta to Devolutions Hub, specifically for users and groups. Synchronization from Devolutions Hub to Okta is not supported.
Create users
Update user attributes
Deactivate users
Group push
In Okta
-
Go to the Devolutions Hub Business application.
-
In the Provisioning tab, click Configure API Integration.
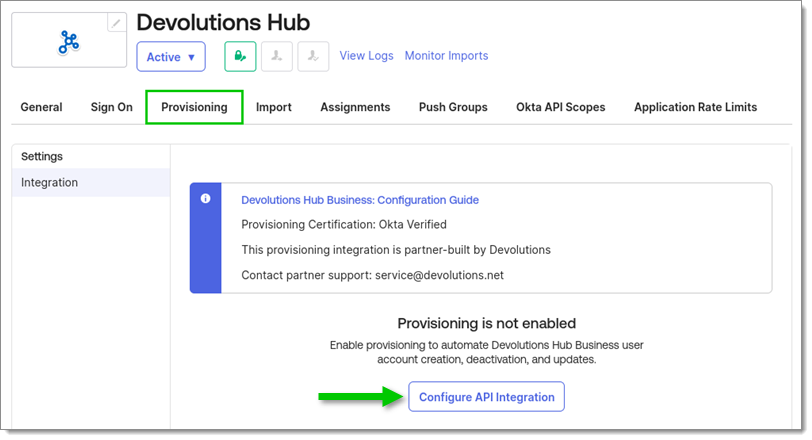
Provisioning – Configure API Integration -
Check the Enable API Integration box.
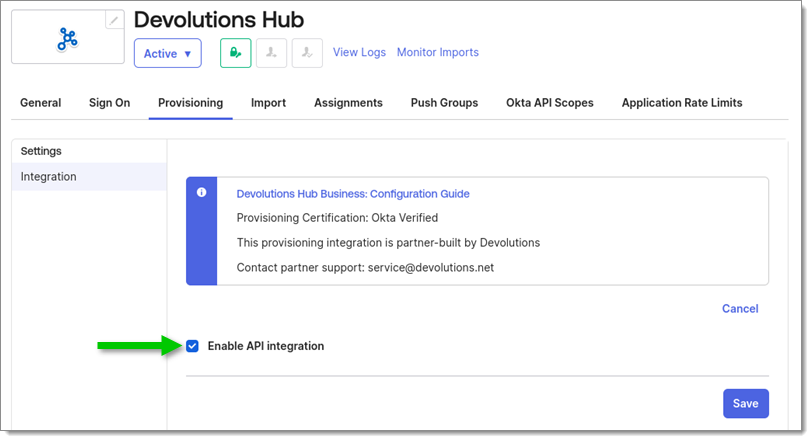
Enable API Integration
In Devolutions Hub Business
-
Go to Administration – Authentication – Provisioning and enable SCIM provisioning.

Enable SCIM provisioning -
Copy the Secret token by clicking on the Copy to clipboard icon next to it.
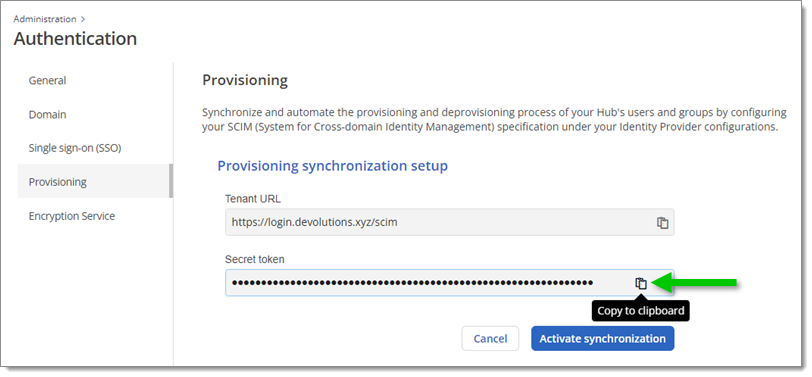
Copy the secret token
In Okta
-
Back to the Provisioning tab in Okta, paste the Secret token from the last step in the API Token field.
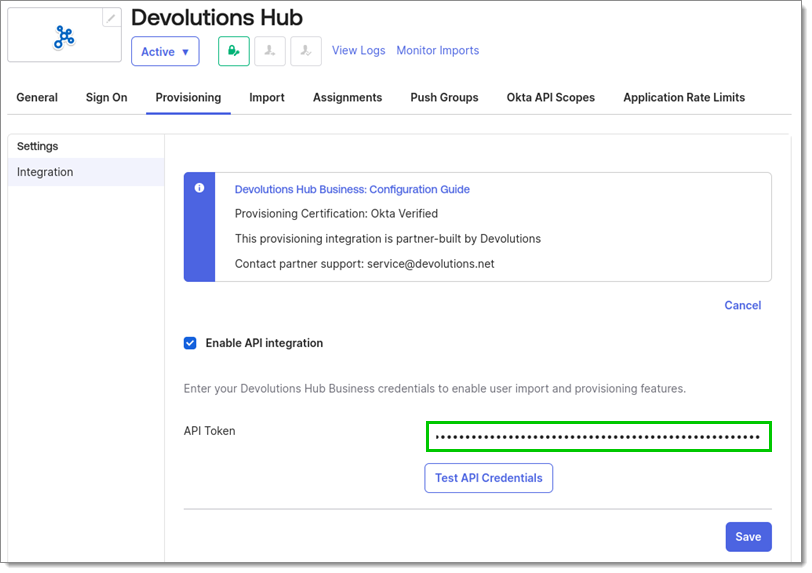
Paste the secret token -
Click on Test API Credentials. A success message should appear.
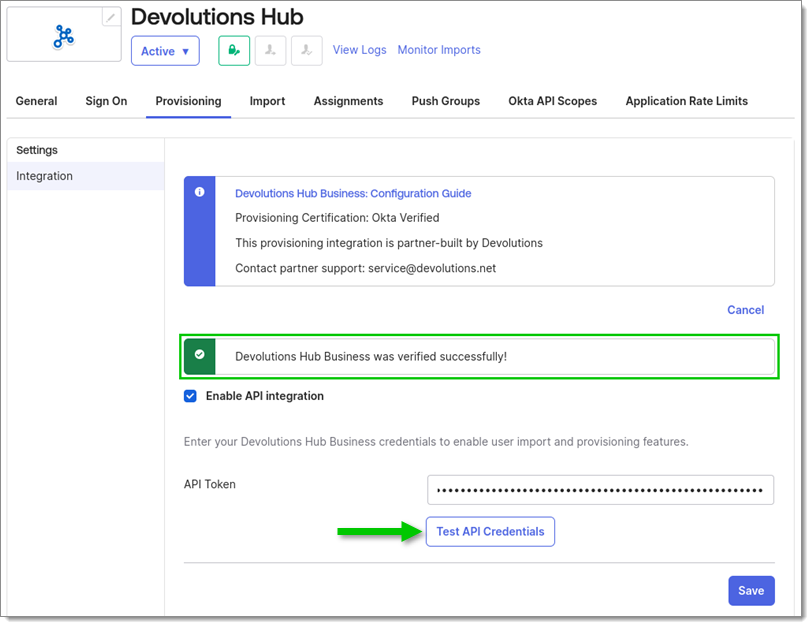
Test API Credentials
In Devolutions Hub Business
-
Back to the Provisioning configuration in Devolutions Hub, click on Activate synchronization.
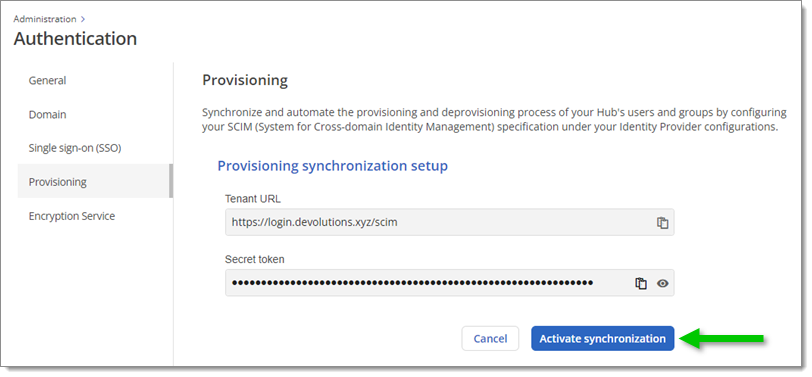
Activate synchronization
In Okta
-
Save the Okta provisioning configuration.
-
Still in the Provisioning tab, go to the To App settings, then click on Edit.
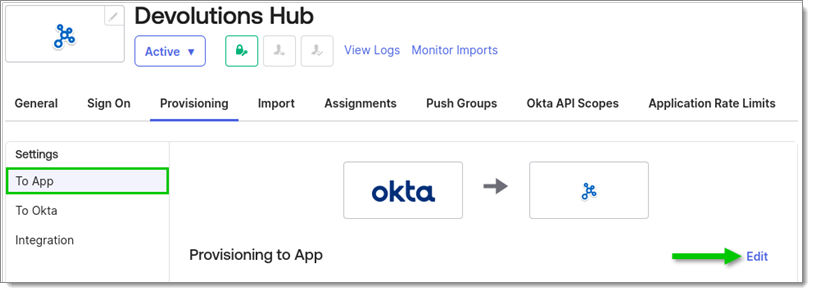
Edit "To App" settings -
Enable/disable the following settings:
Enable:
Create Users
Update Attributes
Deactivate Users
Disable:
Set password when creating new users (under the Create Users setting)
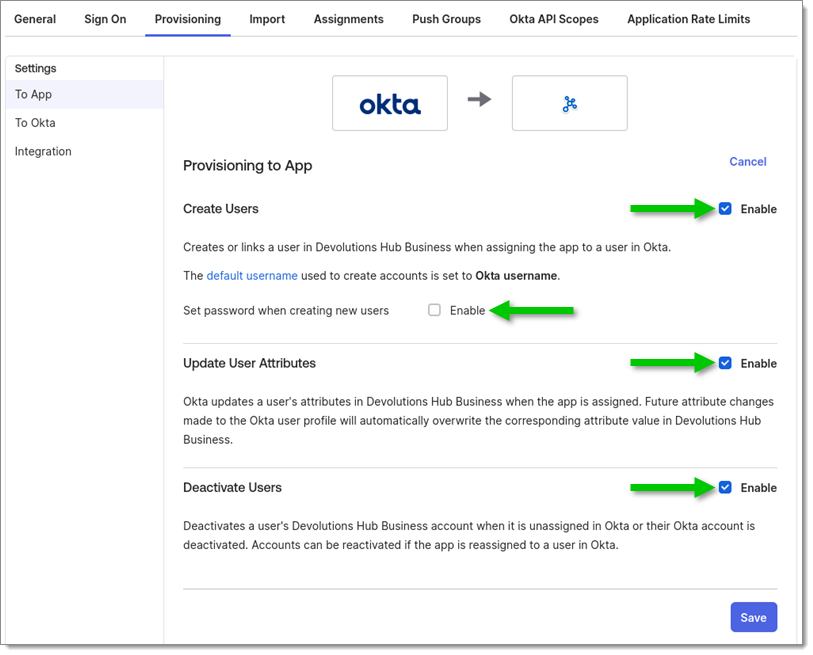
Enable/disable settings -
Save the changes.
Synchronization from Okta to Devolutions Hub Business is now configured.
It is possible to assign users and groups to be synchronized. For more details, see Okta's own documentation on assigning applications to users and assigning an app integration to a group.
Q: Why are users still receiving a password prompt after SSO sign-in?
A: This prompt is related to the private key. When users connect, they are prompted to choose how the private key will be stored. If they choose password, they will need to enter it the first time they connect from a new browser or after clearing their browser cache.
Q: Can this private key prompt be disabled?
A: The only way to disable the private key prompt is by configuring your own encryption service. For more details, see the following article.
Q: How can we add guest users to our Devolutions Hub?
A: If guest users are part of Okta, they can be added through the provisioning process. Once guest users no longer need access, simply remove them from the provisioning setup.
Q: The client ID or secret supplied by your organization is invalid, please contact an administrator of your organization.
A: This most likely means that the client secret has expired in Okta. The solution is to create a new secret and update it in the Devolutions Hub Business SSO configuration.
Q: If the option to force all users and administrators to sign in with SSO is enabled, what would happen if the SSO fails?
A: If Force SSO is enabled for all users, they will lose access to Devolutions Hub Business in case of a misconfiguration or downtime of the SSO provider. It is strongly recommended to inform all existing users in Devolutions Hub Business about this new authentication method prior to activation. Alternatively, see Disable Force SSO on all users in Devolutions Hub Business using PowerShell to temporarily disable the feature.
Q: Can the UPN of a user be changed?
A: Devolutions Hub Business uses the UPN, not the email, to authenticate users in the database. Changing the UPN also changes information related to the user. Devolutions Hub considers this a new user, requiring the invitation process to be repeated.