Dieser Artikel bezieht sich auf Installationen, die eine Datenbank als Datenquelle verwenden.
Bei einigen Remote Desktop Manager Versionen muss die Struktur der Datenbank geändert werden. Diese Änderungen werden automatisch durchgeführt, aber es ist ratsam, vorher eine Sicherung Ihrer Datenquelle zu erstellen. Wenn Sie im Team arbeiten, dürfen keine weiteren Benutzer während der Aktualisierung mit der Datenbank verbunden sein.
Key points to consider:
Der Benutzer, der die Aktualisierung durchführt, muss über administrative Rechte für die Datenbank verfügen. (SYSDBA oder DB_OWNER).
Erstellen Sie eine Sicherung der Datenbank und stellen Sie sicher, dass Sie diese bei Bedarf schnell wiederherstellen können.
Wenn Lese-/Schreibzugriff für den Offline-Cache konfiguriert ist, stellen Sie sicher, dass alle Benutzer ihre Offline Änderungen synchronisiert haben.
Für eine erfolgreichen Aktualisierung befolgen Sie bitte folgende Schritte:
Stellen Sie sicher, dass Sie während der Aktualisierung der einzige Benutzer sind, der die Datenbank verwendet. Wenn der Offline Modus aktiviert ist, weisen Sie Ihr Team an in den Offline Modus- oder zu einer anderen Datenquelle zu wechseln.
Erstellen Sie eine Sicherung Ihrer Datenbank.
Installieren Sie die gewünschte Remote Desktop Manager Version. Wenn Sie den Vorgang auf Ihrem eigenen Rechner durchführen, kann auch die Portable (USB) Version verwendet werden.
Öffnen Sie Remote Desktop Manager, mit einem administrativen Konto, der zudem auch über SYSDBA oder DB_OWNER Rechte auf der Datenbank verfügt.
You may be prompted with an upgrade message when your data source is accessed. If so, accept the upgrade.
If you were not prompted with an upgrade message, locate your data source to upgrade in File – Data sources and open its property window.
Switch to the Upgrade tab, then click on Update database.
Warten Sie auf eine Bestätigungsmeldung.
Schließen Sie das Dialogfeld.
Vergewissern Sie sich, dass Remote Desktop Manager die gerade aktualisierte Datenquelle verwendet.
Drücken Sie Strg+F5, um eine vollständige Aktualisierung zu erzwingen.
Überpüfen Sie den Inhalt und die Technologien (VPN etc.), die in Ihrer Umgebung einen hohen Stellenwert haben.
Aktualisieren Sie die Remote Desktop Manager auf allen anderen Rechnern.
Stellen Sie sicher, dass Sie während der Aktualisierung der einzige Benutzer sind, der die Datenbank verwendet. Wenn der Offline Modus aktiviert ist, weisen Sie Ihr Team an in den Offline Modus- oder zu einer anderen Datenquelle zu wechseln.
Erstellen Sie eine Sicherung Ihrer Datenbank.
Open Remote Desktop Manager macOS while logged on as a user with administrative rights. You must also be SYSDBA or DB_OWNER.
You may be prompted with an upgrade message when your data source is accessed. If so, accept the upgrade.
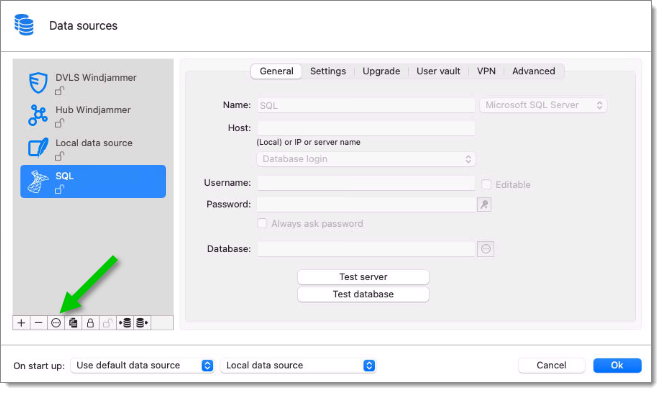
If you were not prompted with an upgrade message, locate your data source to upgrade in File – Data sources and open its property window.

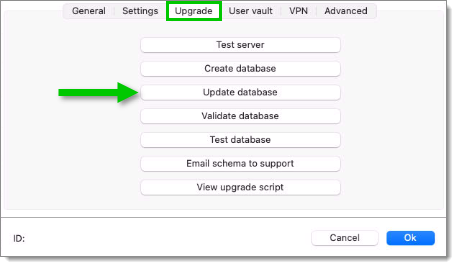
Switch to the Upgrade tab, then click on Update database.

Warten Sie auf eine Bestätigungsmeldung.
Schließen Sie das Dialogfeld.
Ensure your Remote Desktop Manager macOS application is currently using that data source.
Press Cmd+F5 to force a full refresh.
Überpüfen Sie den Inhalt und die Technologien (VPN etc.), die in Ihrer Umgebung einen hohen Stellenwert haben.
Aktualisieren Sie die Remote Desktop Manager auf allen anderen Rechnern.


