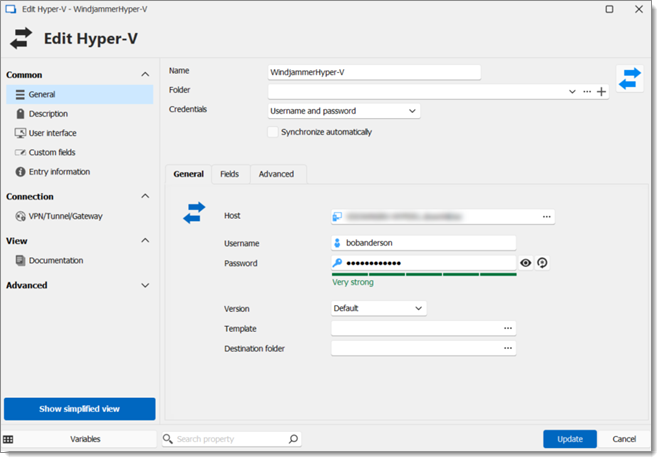
This article details the different settings and options available when configuring a Hyper-V synchronizer entry in Remote Desktop Manager.

SETTINGS | DESCRIPTION |
|---|---|
Name | Enter a name for the Hyper-V entry within Remote Desktop Manager. |
Folder | Choose a folder in which to create the entry. |
Credentials | Choose credentials to use for authentication between:
|
Synchronize automatically | The entry will synchronize automatically with Hyper-V. |
| SETTINGS | DESCRIPTION |
|---|---|
| Host | Manually enter a host or choose one from the Computer list (ellipsis button). |
| Username | Enter the username for the host. |
| Password | Enter the password for the host. |
| Version | Choose between Hyper-V generation 1 or 2. |
| Template | Choose an existing template from the Template list or leave blank. |
| Destination folder | Click the ellipsis button to set the folder path in the Remote Desktop Manager tree view (which can only be in the same vault). |
| SETTINGS | DESCRIPTION |
|---|---|
| Field | Select which fields will always be synchronized, and which will not. |
| Session name prefix | A prefix for the entry that will be created through the synchronizer |
| session name suffix | A suffix for the entry that will be created through the synchronizer. |
| SETTINGS | DESCRIPTION |
|---|---|
| Silent mode | Disable error dialogs (useful when the synchronizer runs automatically at set intervals). |
| Update folder only for newly discovered items | Prevent the synchronizer from moving already created entries. |
| Host type | Choose host type between:
|
| Action on entry mismatch | Choose what to do when there is a mismatch between the entries to synchronize. Here are the available options:
|
Check out Devolutions' Configuring Synchronizers course on the Devolutions Academy for more details.