Configure a basic SMTP email in Devolutions Server by following the steps below.
-
In Devolutions Server, go to Administration – Server Settings – Email.
-
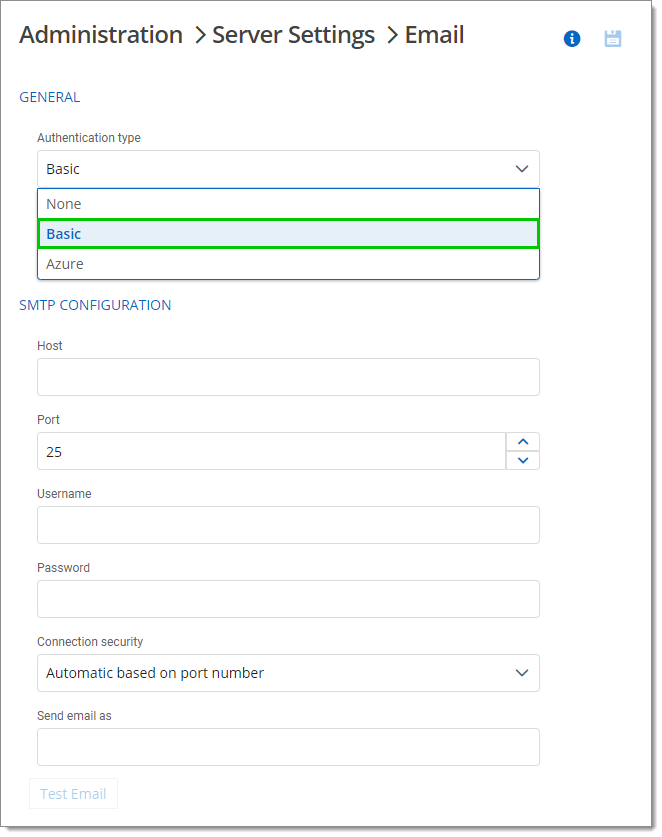
In the Authentication type drop-down list, select Basic.

Basic authentication type -
In the Administrator Email field, enter the recipient email address that will receive the errors.
-
Enter/select all necessary information under the SMTP Configuration section. See the table in the next section for information on each field/setting.
-
Once the information has been provided, test your email settings with the Test Email button.
-
If successful, Save your configuration using the icon at the top right.
| Field/Setting | Description |
|---|---|
| Host | Enter the name or IP address of the SMTP server. |
| Port | Select the SMTP server port. |
| Username | Enter the username used to connect to your SMTP server. |
| Password | Enter the password used to connect to your SMTP server. |
| Connection security | Set a specific security for the connection to the mail server. Choose between the following:
|
| Send email as | Enter the sender's email address. |
In Devolutions Server, the modern authentication for Azure can be used for the email configuration.
Before proceeding with the configuration in Devolutions Server, you must perform the following in your Azure portal:
Create an app registration. You can also reuse the one used for Azure AD / Office 365 authentication.
Add the "Mail.Send" application permission.
You can now configure the SMTP email in Devolutions Server.
-
In Devolutions Server, go to Administration – Server Settings – Email.
-
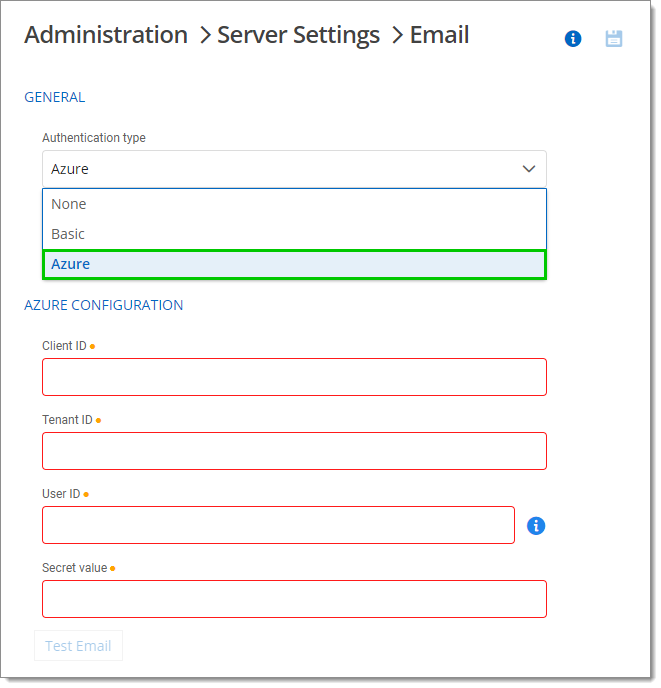
In the Authentication type drop-down list, select Azure.

Azure Authentication type -
In the Administrator Email field, enter the recipient email address that will receive the errors.
-
In the Client ID field, enter the ID of the application. In the Azure portal, this information is called Application (client) ID and can be found in the Overview of your app.
-
In the Tenant ID field, enter the ID of the tenant that can be found in the Overview of your application.
Please note that emails can only be sent to accounts of the same tenant; they cannot be sent externally.
In the User ID field, enter the ID of the user that is listed in the "From" section of the email.
In the Secret value field, enter the client secret. Either reuse the already existing Azure AD authentication secret or create a new one in your app registration by going to the Certificates & secret section and clicking on New client secret.
Once the information has been provided, test your email settings with the Test Email button.
If successful, Save your configuration using the icon at the top right.