> For the complete documentation index, see [llms.txt](https://docs.devolutions.net/llms.txt). Markdown versions of documentation pages are available by appending `.md` to page URLs; this page is available as [Markdown](https://docs.devolutions.net/server/getting-started/installation/devolutions-server-instance-creation.md).

# Devolutions Server instance creation

{% hint style="info" %}
For more information about any of the features in the deploy wizard, please consult their respective topic under [Server settings](https://docs.devolutions.net/server/devolutions-server-console/devolutions-server-settings/general/).
{% endhint %}

Multiple Devolutions Server instances can be hosted on the same server. Each instance resides in its own web application within IIS. The following steps are carried out using the Devolutions Server Console.

### IIS web server installation

1. Install Devolutions Server Console on the web server. It is available from the [Download](https://server.devolutions.net/home/download) page.
2. Execute Devolutions Server Console with elevated privileges. This is performed by right-clicking on the application and selecting ***Run as administrator***.

{% hint style="danger" %}
All operations performed through the Devolutions Server Console are done with the credentials used to launch Devolutions Server Console. If you must use other credentials, you will need to launch another Windows session. The `RunAs`command does not offer the option of starting a process with elevated privileges. The ***Run as different user*** option can work only if the account is a member of the server's local administrator group.
{% endhint %}

3. This step requires having logged into the Windows Server at least once with a VaultDBOwner account (with local admin rights on the server) connected through Windows authentication. Once this is done, open the Devolutions Server Console, and click on the ***New*** button or the ***Install new instance*** button to deploy a new server instance using the basic installation or the advanced installation wizard. For more information, continue to the next sections. It is also possible to [***Migrate SQL workspace***](https://docs.devolutions.net/server/kb/how-to-articles/migrate-sql/).

![](https://cdnweb.devolutions.net/docs/docs_en_server_ServerOp0049.png)

#### Basic installation

1. If an SQL Server instance is not available on the machine where Devolutions Server is hosted, an SQL Server Express edition instance will be installed by the wizard. An internet connection is required to download the SQL Server Express edition and the following prerequisites: [IIS Application Request Routing (ARR)](https://api.devolutions.net/redirection/f19f07f3-5ea4-436d-a3ba-4bb69d373321), [IIS Rewrite Module](https://api.devolutions.net/redirection/3cb42413-5dfd-4b1b-bd20-4e5968274ed0), and [ASP.NET Core Module (ANCM)](https://dotnet.microsoft.com/permalink/dotnetcore-current-windows-runtime-bundle-installer).

   ![](https://cdnweb.devolutions.net/docs/DVLS6011_2024_1.png)
2. The following dialog provides the credentials created for the san SQL account, the Devolutions Server administrator account and the Encryption Key password. Click on the ***Save as*** button to save the information in a file.

   ![](https://cdnweb.devolutions.net/docs/docs_en_server_ServerOp8177.png)
3. The following dialog displays the SQL Server information, including the sa account credentials, that will be used by Devolutions Server to create and connect to the SQL database.
4. Once the installation is successfully completed, the wizard will display the installation summary and will automatically open the default browser to connect on the Devolutions Server web interface.
5. On the Devolutions Server web interface, use the credentials provided during step #2 to log in. Afterward, a prompt will request a password change before continuing with the login process.

#### Advanced installation

1. For the first step, the installation wizard will run diagnostics on the server to verify if the IIS Server has all the necessary web server prerequisites installed and is ready to run Devolutions Server. Missing features are marked with an error icon. The Install Prerequisites button will install all missing features using a PowerShell script.Click on Close to continue. An internet connection is required for [IIS Application Request Routing (ARR)](https://api.devolutions.net/redirection/f19f07f3-5ea4-436d-a3ba-4bb69d373321), [IIS Rewrite Module](https://api.devolutions.net/redirection/3cb42413-5dfd-4b1b-bd20-4e5968274ed0) and [ASP.NET Core Module (ANCM)](https://dotnet.microsoft.com/permalink/dotnetcore-current-windows-runtime-bundle-installer).

   ![](https://cdnweb.devolutions.net/docs/docs_en_server_ServerOp8049.png)
2. The License Agreement needs to be read, understood, and accepted in order to proceed with the installation.
3. Under ***Database***, enter the server and database information before clicking ***Next***. The user account used to create the database must have sysadmin privileges in the SQL Server instance. See [Database](https://docs.devolutions.net/server/devolutions-server-console/devolutions-server-settings/database/) for more information.

   <div data-gb-custom-block data-tag="hint" data-style="info" class="hint hint-info"><p>To use <em><strong>Windows Authentication</strong></em> to connect to the database, it is important to change the <em><strong>Application Pool Identity</strong></em> in the IIS Manager and set the proper permission of the service account on the SQL database. Consult <a href="https://docs.devolutions.net/server/kb/how-to-articles/configure-windows-authentication/">Configure Devolutions Server to use domain single sign-on (SSO)</a>. Furthermore, <a href="https://docs.devolutions.net/server/kb/knowledge-base/pre-deployment-account-survey/">Pre-Deployment Account Survey</a> describes which accounts that can be created prior to deploy Devolutions Server.</p></div>

![](https://cdnweb.devolutions.net/docs/DVLSCONSOLE4036_2025_2.png)

4. Under ***General***, enter a custom ***Server name*** and ***Server description***. Click ***Next***.
5. Under ***Installation source***, select to either download from the web (latest version) or install from a zip file (available on the Devolutions website's [Download](https://server.devolutions.net/home/download) page). Click ***Next***.

   ![](https://cdnweb.devolutions.net/docs/DVLSCONSOLE4037_2025_2.png)
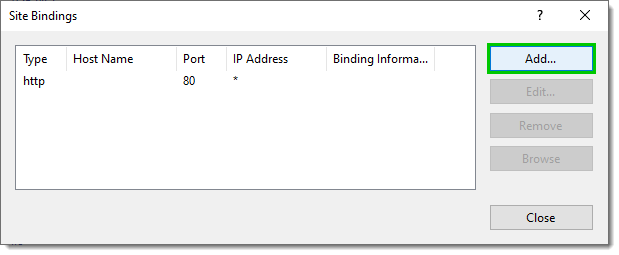
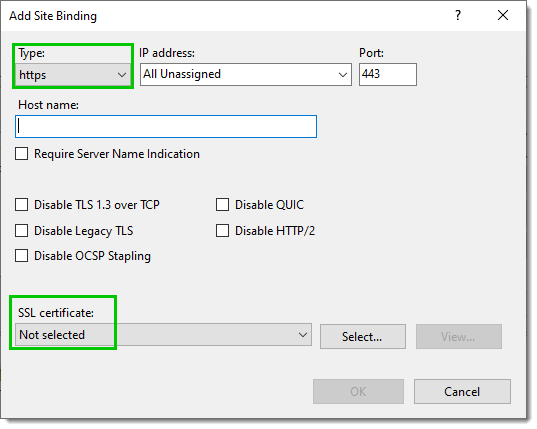
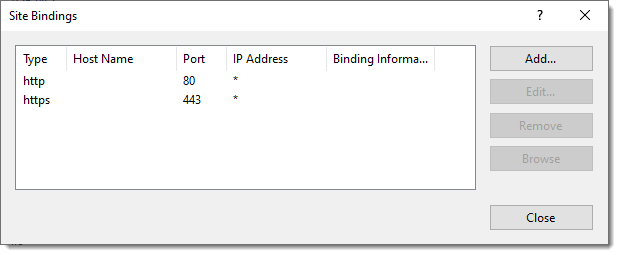
6. Under ***General***, select the ***Website***, ***Web application name*** and [***Access URI***](https://docs.devolutions.net/server/kb/knowledge-base/access-uri/) required to reach the Devolutions Server web page, which should be the full FQDN of the server (ex. `https://myservername.mydomain.loc/dvls`). Under ***Installation destination***, set the ***Installation folder*** where the instance's files will be located. The process to run Websites has been granted the proper permissions under `C:\inetpub\wwwroot`. We recommend to create a new folder beneath it and create the Devolutions Server instance within this folder. Under ***Application Pool***, set a ***Name***. Click ***Next***.

{% hint style="warning" %}
We do not recommend to set the installation folder to `C:\Program Files, C:\Program Files (x86)`, or `C:\inetpub`. Devolutions Server is a web application and this could result in unwanted behavior and issues because IIS do not have enough permissions to run web applications that are located under those folders. If you want to set the web application folder in a location different than the default `C:\Inetpub\wwwroot` folder, the IIS\_IUSRS built in local machine group will need Read and Read & Execute permissions on the entire Devolutions Server web application folder structure.
{% endhint %}

![](https://cdnweb.devolutions.net/docs/DVLSCONSOLE4038_2025_2.png)

7. Under ***Administration credentials***, fill in the information to create a Devolutions Server Custom administrator account. All fields are required.

   ![](https://cdnweb.devolutions.net/docs/DVLSCONSOLE4039_2025_2.png)

{% hint style="warning" %}
Be sure to keep a copy of these credentials in a safe place outside of Devolutions Server, as they could prove useful should any issue with the other authentication methods arise. Also, it is a best practice to keep the Devolutions custom login option checked (located under ***Administration*** – ***Server settings*** – ***Authentication***).
{% endhint %}

8. Under ***Scheduler service***, be sure to use the proper VaultDBScheduler account. The following features depend on the Scheduler: [Backup manager](https://docs.devolutions.net/server/web-interface/administration/backup/backup-manager/), [Domain users and users groups cache](https://docs.devolutions.net/server/web-interface/administration/configuration/server-settings/general/authentication/domain/), [Office365 Users and User Groups cache](https://docs.devolutions.net/server/web-interface/administration/configuration/server-settings/general/authentication/office-365/), [Email notifications](https://docs.devolutions.net/server/web-interface/administration/security-management/notifications/), [Cleanup logs](https://docs.devolutions.net/server/web-interface/administration/logs/cleanup-logs/) and [Privileged Access Management](https://docs.devolutions.net/pam/server/).

   ![](https://cdnweb.devolutions.net/docs/DVLSCONSOLE4040_2025_2.png)

{% hint style="info" %}
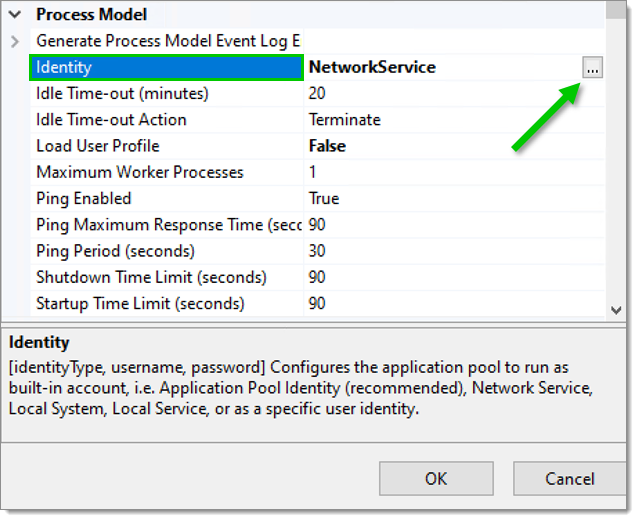
If the installation fails to start, search the service for DevolutionsSchedulerService, go into ***Properties*** and re-enter the username and password. Usually changing the account during the installation process does not work, in which case Devolutions Server will still be installed with the NetworkService account but will not be able to start. Additionally, the VaultDBScheduler account should be granted read rights on the `encryption.config` file under `C:\inetpub\wwwroot\dvls\App_Data</code>`.
{% endhint %}

9. Under [Recovery kit](https://docs.devolutions.net/server/devolutions-server-console/recovery-kit/), select the destination folder and file name of the Devolutions Server recovery kit file. Set a password to protect the Encryption Keys. If the ***Include sensitive data option*** is enabled, the SQL authentication credentials will be included in the recovery kit.

{% hint style="success" %}
We recommend keeping the recovery kit file and password in a safe place outside of Devolutions Server, as they can later be used to move or restore the database.
{% endhint %}

10. In the Devolutions Gateway window, choose whether or not to install Devolutions Gateway. See [Devolutions Gateway configuration with Devolutions Server](https://docs.devolutions.net/gateway/getting-started/server/server-configuration/) for more details.
11. In the ***Summary*** window, read and understand Devolutions' Software Licenses and Subscription Agreement, then validate the configuration and click ***Install***.

<figure><img src="https://cdnweb.devolutions.net/docs/DVLSCONSOLE4042_2025_2.png" alt=""><figcaption></figcaption></figure>

12. Once the installation is complete, a summary indicates if the Devolutions Server has been deployed correctly, click ***OK*** to close the window.

#### Change Devolutions Server application pool's identity to VaultDBRunner

1. Open IIS Manager, right-click on the dvls application, and click on ***Advanced Settings...***.
2. Under ***Process Model***, click on the ellipsis button next to ***Identity***, choose ***Custom Account***, set your VaultDBRunner information, and click ***OK***

   <figure><img src="https://cdnweb.devolutions.net/docs/INTERFACE4041.png" alt=""><figcaption></figcaption></figure>
3. Go to the Devolutions Server Console, and then ***Edit*** – ***Database*** – ***Advanced credentials***, click on ***Apply least permissions*** under ***Web application***, and click on ***OK***.

#### Update Devolutions scheduler service account <a href="#update-devolutions-scheduler-service-account" id="update-devolutions-scheduler-service-account"></a>

1. Open ***Services*** on the server where Devolutions Server is hosted.
2. Update the account in the ***Log on*** tab of the Devolutions scheduler service.
3. Go to the Devolutions Server Console, and then ***Edit*** – ***Database*** – ***Advanced*** ***credentials***, click on ***Apply least permissions*** under ***Scheduler service***, and click on ***OK***.

#### Import a certificate or create a self-signed certificate <a href="#import-a-certificate-or-create-a-self-signed-certificate" id="import-a-certificate-or-create-a-self-signed-certificate"></a>

1. Open IIS manager, select the server node in the Tree View and double-click the ***Server Certificates*** feature in the ***List View***.

   <figure><img src="https://cdnweb.devolutions.net/docs/docs_en_kb_KB4391.png" alt=""><figcaption></figcaption></figure>
2. Click on ***Import...*** in the ***Actions*** pane, and fill in the required informations to import an already existing certificate. To create a self-signed certificate, click on ***Create Self-Signed Certificate...***, give it a name and leave the certificate store to ***Personal***.

   <figure><img src="https://cdnweb.devolutions.net/docs/docs_en_kb_KB4392.png" alt=""><figcaption></figcaption></figure>

#### Create a SSL binding <a href="#create-a-ssl-binding" id="create-a-ssl-binding"></a>

1. Select the web site in the Tree View. Click ***Bindings...*** in the ***Actions*** pane. This brings up the binding editor that lets you create, edit, and delete bindings for your Web site.

   <figure><img src="https://cdnweb.devolutions.net/docs/docs_en_kb_KB4393.png" alt=""><figcaption></figcaption></figure>
2. Click ***Add...*** to add your new SSL binding to the site.

   <figure><img src="https://cdnweb.devolutions.net/docs/docs_en_kb_KB4394.png" alt=""><figcaption></figcaption></figure>
3. Select ***https*** in the ***Type*** drop-down list. Select the certificate you have imported or created from the ***SSL Certificate*** drop-down list and then click ***OK***.

   <figure><img src="https://cdnweb.devolutions.net/docs/docs_en_kb_KB4395.png" alt=""><figcaption></figcaption></figure>
4. Now you have a new ***SSL*** binding on your site.

   <figure><img src="https://cdnweb.devolutions.net/docs/docs_en_kb_KB4396.png" alt=""><figcaption></figcaption></figure>

#### Test the installation <a href="#test-the-installation" id="test-the-installation"></a>

To test the server installation, navigate to it (e.g.: `\http://<Machine\_Name>/<instancename>`) with any web browser or click on the ***Navigate to website*** button in the Devolutions Server Console.

{% hint style="success" %}
In some situations, the web page may not load properly. Ensure that the IIS IUSRS local built-in group has full read access on the **encryption.config** file located in the App\_Data subfolder located in the Devolutions Server web application folder (i.e., `C:\inetpub\wwwroot\dvls\App_Data`). If there is still an issue, contact us at <service@devolutions.net>.
{% endhint %}

To test the connection from a client by creating a workspace in Remote Desktop Manager. Consult [Configure a client workspace](https://docs.devolutions.net/server/kb/how-to-articles/configure-client-data-source/) for more information.

### Kestrel web server installation <a href="#kestrel-web-server-installation" id="kestrel-web-server-installation"></a>

Installing Devolutions Server with Kestrel requires fewer dependencies; in particular, IIS does not need to be installed on the machine.

The installation process is very similar to the [IIS web server advanced installation](https://docs.devolutions.net/server/getting-started/installation/create-server-instance/#advanced-installation). Instead of specifying a website and an application under IIS, enter URL to which the application listens (for example, "<https://localhost:5000>"). The access URI represents the URI used to access our application served on the given HTTP listener.

Known limitations:

* The application must be served on / ("<http://localhost:5000/>").
* Windows authentication is not currently supported under Kestrel.

#### See also <a href="#see-also" id="see-also"></a>

* [Devolutions Academy - Installing Devolutions Server](https://academy.devolutions.net/student/page/2942307-installing-devolutions-server?curriculum_activity_id=4493546\&path_id=2942210\&sid=1f0658ca-fdf5-4f74-a93f-a6a4b8853c09\&sid_i=0)


---

# Agent Instructions
This documentation is published with GitBook. GitBook is the documentation platform designed so that both humans and AI agents can read, navigate, and reason over technical content effectively. Learn more at gitbook.com.

## Querying This Documentation
If you need additional information that is not directly available in this page, you can query the documentation dynamically by asking a question.

Perform an HTTP GET request on the current page URL with the `ask` query parameter:

```
GET https://docs.devolutions.net/server/getting-started/installation/devolutions-server-instance-creation.md?ask=<question>
```

The question should be specific, self-contained, and written in natural language.
The response will contain a direct answer to the question and relevant excerpts and sources from the documentation.

Use this mechanism when the answer is not explicitly present in the current page, you need clarification or additional context, or you want to retrieve related documentation sections.
