> For the complete documentation index, see [llms.txt](https://docs.devolutions.net/llms.txt). Markdown versions of documentation pages are available by appending `.md` to page URLs; this page is available as [Markdown](https://docs.devolutions.net/server/es/knowledge-base/troubleshooting-articles/failed-request-tracing-with-iis/configuration.md).
# Configuración
Explica cómo configurar el rastreo de solicitudes fallidas en IIS para Devolutions Server mediante la herramienta de línea de comandos appcmd o la interfaz de IIS Manager.
Existen dos métodos para configurar el rastreo de solicitudes fallidas:
* [Usar el comando appcmd.exe](#using-the-appcmd.exe-command)
* [A través de la aplicación IISManager](#via-the-iismanager-app)
### Usar el [comando appcmd.exe](https://docs.microsoft.com/en-us/iis/get-started/getting-started-with-iis/getting-started-with-appcmdexe)
| |
| ------------------------------------------------------------------------------------------------------------------------------------------------------------------------------------------- |
| appcmd.exe set config -section:system.applicationHost/sites "/\[name='Default Web Site'].traceFailedRequestsLogging.enabled:True" /commit:apphost |
| appcmd.exe set config -section:system.applicationHost/sites "/\[name='Default Web Site'].traceFailedRequestsLogging.maxLogFiles:10" /commit:apphost |
| appcmd.exe set config -section:system.applicationHost/sites "/\[name='Default Web Site'].traceFailedRequestsLogging.directory:%SystemDrive%\inetpub\logs\FailedReqLogFiles" /commit:apphost |
| appcmd.exe set config "Default Web Site" -section:system.webServer/tracing/traceFailedRequests /+"\[path='\*']" |
| appcmd.exe set config "Default Web Site" -section:system.webServer/tracing/traceFailedRequests /+"\[path='\*'].traceAreas.\[provider='WWW Server',areas='Rewrite',verbosity='Verbose']" |
| appcmd.exe set config "Default Web Site" -section:system.webServer/tracing/traceFailedRequests /\[path='\*'].failureDefinitions.statusCodes:"400-599" |
{% hint style="info" %}
Tenga en cuenta que los pasos anteriores solo se aplican a IIS 7.0 o posterior, y que los comandos funcionan mejor cuando cmd.exe se ejecuta como administrador.
{% endhint %}
### A través de la aplicación IISManager
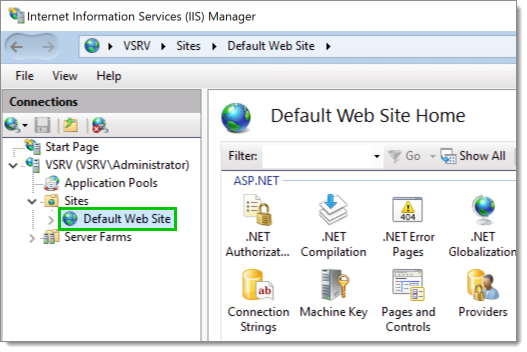
1. En IIS Manager, expanda el nodo raíz, expanda ***Sites*** y, a continuación, seleccione ***Default Web Site***.
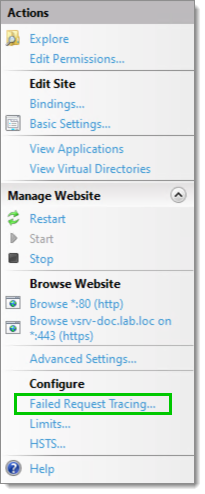
2. En el panel ***Actions*** de la derecha, seleccione ***Failed Request Tracing***.
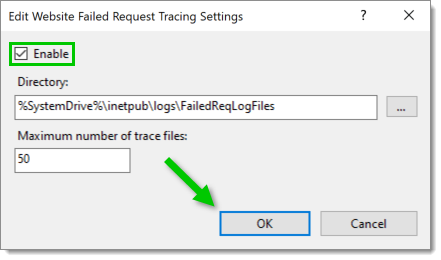
3. Marque la casilla ***Enable*** (obligatorio). Las opciones de destino ***Directory*** y ***Maximum number of trace files*** se pueden personalizar (opcional). Haga clic en ***OK*** cuando haya terminado.
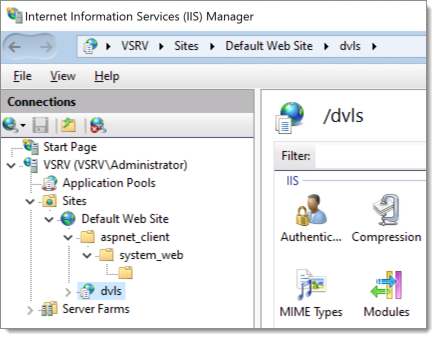
4. Expanda ***Default Web Site*** y, a continuación, seleccione el sitio web que se va a rastrear.
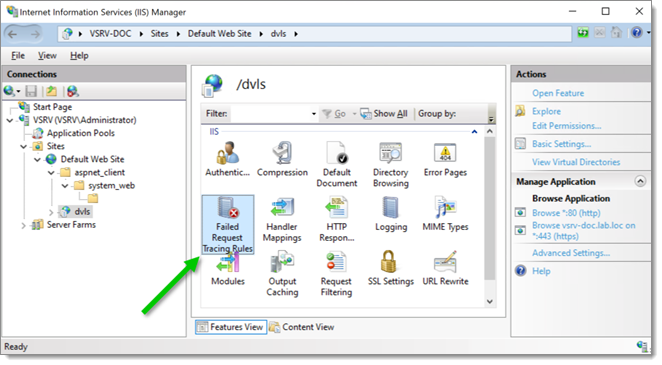
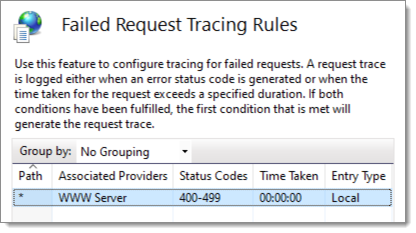
5. Haga doble clic en el icono ***Failed Request Tracing Rules*** del sitio web seleccionado.
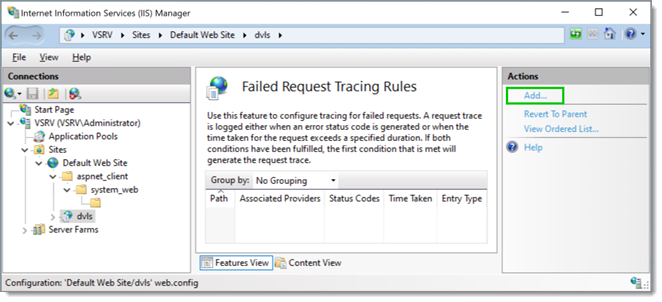
6. En el panel ***Actions*** de la derecha, haga clic en ***Add*** para añadir una nueva regla.
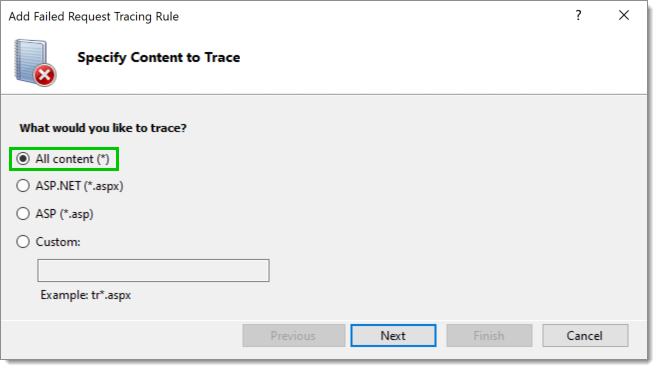
7. Seleccione ***All content (*****)**\*, y luego haga clic en ***Next***.
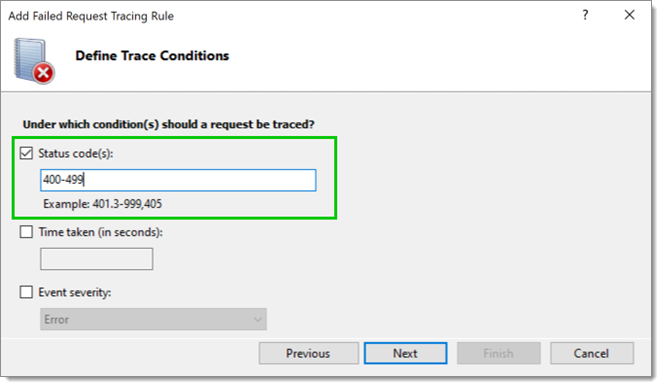
8. Marque la casilla ***Status Code(s)*** y, a continuación, introduzca el tipo de código de estado que se va a rastrear. En este caso, ***Status code(s)*** está configurado para supervisar todo, desde el código 400 hasta el 599. Haga clic en ***Next*** cuando haya terminado.
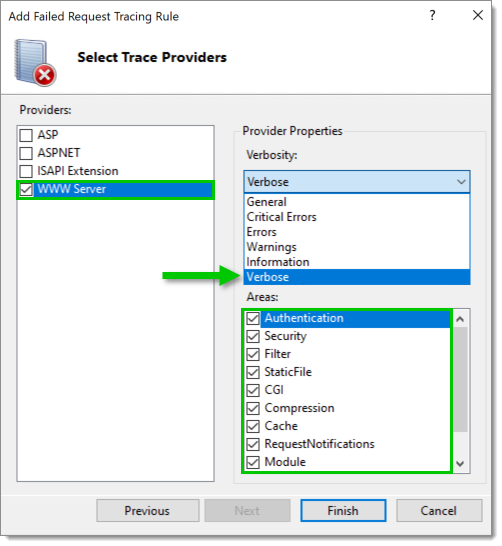
9. Seleccione los proveedores del rastreo. Para cada proveedor, establezca ***Verbosity*** en ***Verbose*** y seleccione todas las ***Areas***. En este caso, se seleccionó el proveedor ***WWW Server***.
10. Haga clic en ***Finish***. La regla de rastreo ya está definida.
---
# Agent Instructions
This documentation is published with GitBook. GitBook is the documentation platform designed so that both humans and AI agents can read, navigate, and reason over technical content effectively. Learn more at gitbook.com.
## Querying This Documentation
If you need additional information that is not directly available in this page, you can query the documentation dynamically by asking a question.
Perform an HTTP GET request on the current page URL with the `ask` query parameter, and the optional `goal` query parameter:
```
GET https://docs.devolutions.net/server/es/knowledge-base/troubleshooting-articles/failed-request-tracing-with-iis/configuration.md?ask=&goal=
```
`ask` is the immediate question: it should be specific, self-contained, and written in natural language.
`goal` is optional and describes the broader end goal you are ultimately trying to accomplish on behalf of the user. GitBook uses it to tailor the answer towards what is most useful for that goal.
The response will contain a direct answer to the question and relevant excerpts and sources from the documentation.
Use this mechanism when the answer is not explicitly present in the current page, you need clarification or additional context, or you want to retrieve related documentation sections.