> For the complete documentation index, see [llms.txt](https://docs.devolutions.net/llms.txt). Markdown versions of documentation pages are available by appending `.md` to page URLs; this page is available as [Markdown](https://docs.devolutions.net/resources/devolutions-agent/jump-host.md).
# Jump host
{% tabs %}
{% tab title="Windows" %}
The Jump host feature in Remote Desktop Manager connects to a remote host, often called a jump box, service host, or bastion server, which in turn connects to other hosts. In other words, Remote Desktop Manager's Jump feature allows for an RDP session in an RDP session. Remote Desktop Manager communicates with the jump host over a secure channel within the RDP session. The jump host then initiates the final session to the destination system.
This can be compared to RD Gateway from Microsoft and, to some extent, SSH port forwarding.
## Modes and coexistence (Remote Desktop Manager 2026.1+)
In Remote Desktop Manager 2026.1 and later, jump hosts support **coexistence** between the deprecated [RDM Jump agent](https://docs.devolutions.net/rdm/commands/tools/more-tools/rdm-jump-deprecated/) mechanism and the new [Devolutions Agent](https://docs.devolutions.net/rdm/support-resources/devolutions-agent/)-based method.
* **Devolutions Agent**: recommended mode going forward.
* **Deprecated**: the original RDM Jump agent executable packaged with Remote Desktop Manager.
* **Automatic**: attempts Devolutions Agent first and falls back to the deprecated RDM Jump agent if needed.
### Requirements and compatibility
* The jump feature does not bypass Microsoft licensing limits for more than two concurrent RDP sessions. To support additional connections, you must install the Remote Desktop Session Host role and purchase per-user RDS CALs. For details, see Microsoft: [Activate the Remote Desktop Services license server](https://learn.microsoft.com/en-us/windows-server/remote/remote-desktop-services/rds-activate-license-server).
* Remote Desktop Manager must be installed on the jump host. The application does not have to connect to any workspace, as Remote Desktop Manager only serves as a shell to facilitate jump operations.
* For **Devolutions Agent** mode, ensure the jump host is running **Remote Desktop Manager 2026.1+ and Devolutions Agent 2026.1+**. If it is running an older version (for example, 2025.3), jump operations may fail silently.
* If using the legacy RDM Agent-based jump then the executable must be **currently executing** in a Windows session on the remote host, and set to automatically start upon login.
## Deploying Devolutions Agent
Devolutions Agent is deployed separately than the previously Remote Desktop Manager packaged RDM Agent.
* **MSI** for direct deployment or integration with software management platforms
* **WinGet** for command-line installation (**Chocolatey** also available)
## Usage scenarios
### Accessing a secure network through a single host
This allows you to have a strict firewall policy that allows connections only from a specific IP address. This configuration only grants you access to hosts that are accessible from the Jump Box. Imagine you have the following infrastructure:
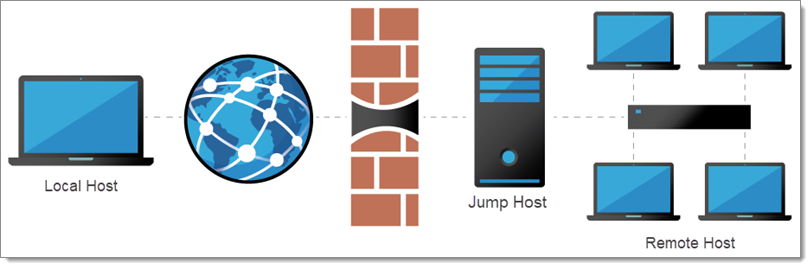
You need to access the remote hosts, but you want to limit risks and expose only the Jump Host to the internet traffic. This allows you to create strict firewall rules and to open only a single port. Therefore, it forces you to connect to the Jump Host before hopping to a remote host.
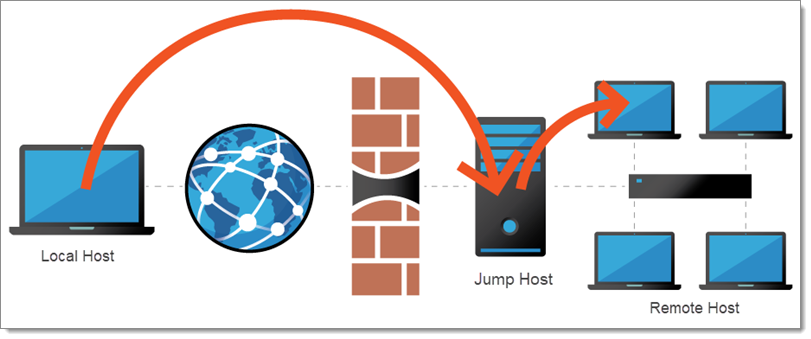
Remote Desktop Manager's Jump feature helps achieve that goal simply and efficiently.
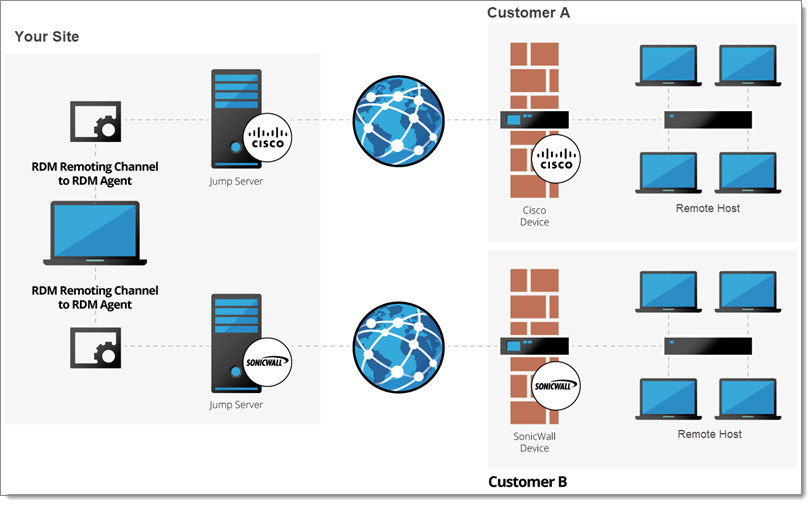
### Workaround limitations of some VPN clients
These limitations make it impossible to use multiple VPN clients concurrently on the same workstation. In this case, you can have multiple virtual machines, each running a single VPN client. Using these virtual machines as jump boxes allows you to connect to the virtual machine, launch the VPN client, and then launch the remote session.
## Configure a Jump Host
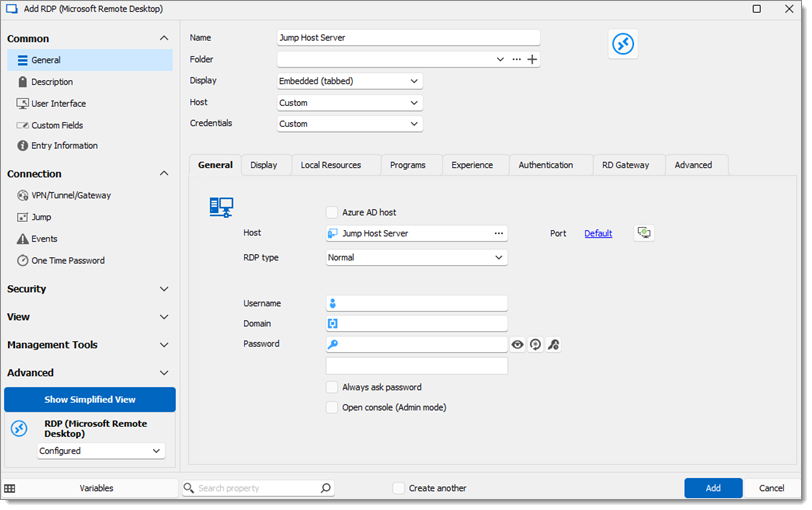
1. Create an ***RDP*** entry for the ***Jump Host***.
2. Fill the entry with a ***Name***, ***Host*** and the ***Credentials***.
{% hint style="warning" %}
For ***jumps*** to work, you need to supply the credentials via the ***Jump Host*** session. If the RDP sessions prompt you for the credentials after the start, the ***jump*** will fail.
{% endhint %}
3. In the ***Jump Host*** section, check ***Is Jump host***.
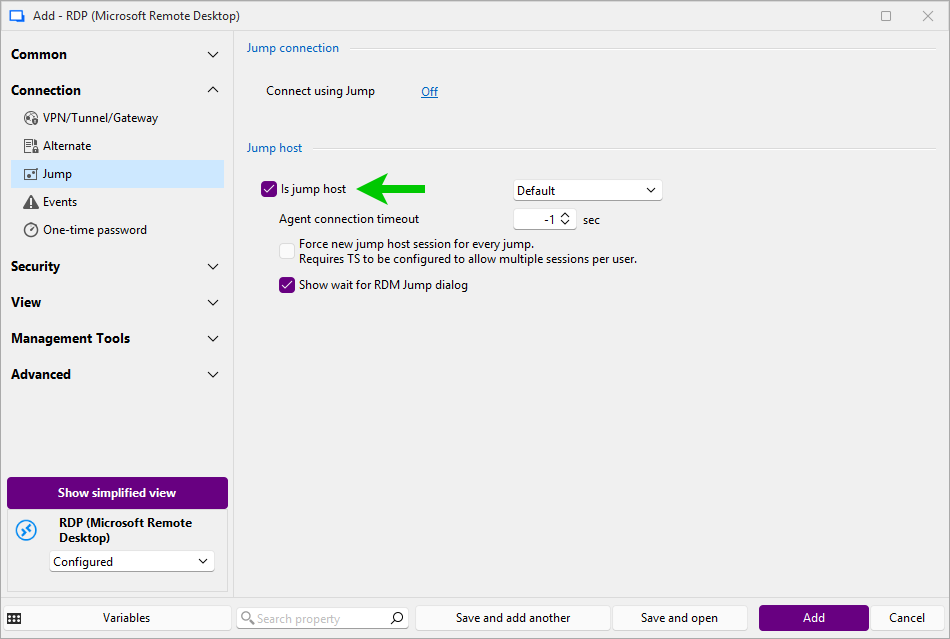
{% hint style="info" %}
***Show wait for RDM Agent dialog*** must be unchecked if your entry requires user interaction to open for any reason. If not, the jump will fail.
{% endhint %}
4. Click ***OK***.
5. Launch the ***Jump Host*** session.
6. Install Remote Desktop Manager on the ***Jump Host***.
{% hint style="success" %}
The ***Jump Host*** acts as a relay between the local and the remote systems, allowing to use the Remote Desktop Manager license that has been used on the local workstation to register the application on the ***Jump Host***.Install Remote Desktop Manager on the ***Jump Host***, perform your first jump and Remote Desktop Manager will be unlocked/licensed automatically via the jump communication/handshake.There is no need to create a workspace on the ***Jump Host***. Remote Desktop Manager will open for the first time with a default ***SQLite local workspace***. This is sufficient because the application on the ***Jump Host*** only acts as an intermediate between the local and the remote hosts.
{% endhint %}
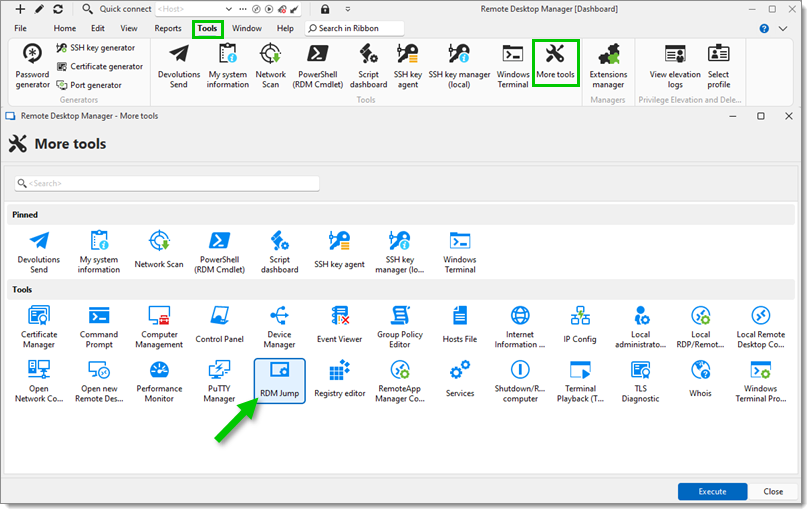
7. Confirm Remote Desktop Manager Agent is started and set to ***Auto Start***.
1. Go to ***Tools - More Tools***.
2. Select Remote Desktop Manager Jump.
3. Click ***OK***.
4. Click ***Yes***.
{% hint style="warning" %}
***Auto Start*** must only be activated for the Remote Desktop Manager Jump agent or Remote Desktop Manager but not for both. In the case where Remote Desktop Manager is set to ***Auto Start*** please make sure to delete the shortcuts form either/both the following locations:
* Run: shell:startup
* Run: shell:common startup
{% endhint %}
8. Right-click the Remote Desktop Manager Jump icon in the taskbar, and check ***Auto Start***.
9. Adjust the user interface of the ***Jump Host*** to maximize the area to display remote sessions.
* Make the application full screen.
* Hide the ***navigation pane*** in the ***View*** tab.
* Hide the ***Ribbon*** in the ***View*** tab.
* To show the ***Ribbon*** again, click the Remote Desktop Manager icon at the top left corner.
{% hint style="success" %}
To reset the layout, in the ***Window*** tab, click ***Reset Layout***.
{% endhint %}
The ***Jump Host*** is ready to use.
## Configure a session to use the Jump Host
1. Create an ***RDP*** entry, on the local Remote Desktop Manager instance.
2. In ***Properties*** – ***Connection*** – ***Jump***, set the ***Jump Host*** by clicking on the ***off*** button next to ***Connect using Jump***.
* The ***Jump Host*** can be ***Inherited*** if it is defined in the parent folder.
* You can also choose a specific ***Session*** to point directly to the ***Jump Host*** entry.

3. Click ***OK*** twice.
4. Launch the RDP session.
## Validate that the Jump Host works
1. Start the ***RDP*** session of the ***Jump Host Server***.
2. Wait for the Remote Desktop Manager Jump agent to connect.
3. On the ***RDP*** tab, right-click ***Agent Status***. Remote Desktop Manager Jump should be connected.
4. Keep the ***RDP*** tab open.
5. Start the ***Jump*** session. ***Jump*** session should start on the ***Jump Host Server***.
6. Close all sessions.
7. Start the ***Jump*** session directly. ***Jump Host Server*** and ***Jump*** session should both start.
All should be working correctly. If any of the steps fail, it is where you need to investigate.
## Pro tips
* To gain more space for the dashboard, in the ***View*** tab, hide the ***Ribbon*** and ***navigation pane*** since the menus are not needed.
* Use the same Remote Desktop Manager license on the local and the remote instances. The Jump Host acts as a relay between the local and the remote systems, allowing to use the Remote Desktop Manager license that has been used on the local workstation to register the application on the Jump Host.
* There is no need to create a workspace on the Jump Host. Remote Desktop Manager will open for the first time with a default ***SQLite local workspace***. This is sufficient because the application on the Jump Host only acts as an intermediate between the local and the remote hosts.
* **Session focus synchronization**: the selected session in your Remote Desktop Manager client can follow the session focus on the Jump host, but only when using the Devolutions Agent method.
* To run scripts on jump hosts with Devolutions Agent, right-click on the session and choose **Devolutions Agent → Execute Script.**
{% endtab %}
{% tab title="macOS" %}
The Jump host feature in Remote Desktop Manager offers a simple and efficient way to manage all your sessions including both jump hosts and internal machines within a single workspace. It works by connecting to a remote host (commonly referred to as a Jump Box, Service Host, or Bastion Server), which then connects to other internal systems. This approach is similar to using an RD Gateway or SSH port forwarding.
Getting started with the Jump host feature is straightforward. Once you've completed the configuration (instructions are provided at the end of this article), just launch the Jump connection. Remote Desktop Manager macOS will automatically initiate the RDP session to the jump host, followed by the session to the internal machine — all seamlessly. Even better, both sessions are logged directly to the workspace, keeping your audit trail complete.
### Usage scenarios
There are two scenarios in particular when using a Jump Host comes in really handy:
#### Accessing a secure network through a single host
This allows you to have a strict firewall policy that allows connections only from a specific IP address. This configuration only grants you access to hosts that are accessible from the Jump Box. Imagine you have the following infrastructure:
You need to access the remote hosts, but you want to limit risks and expose only the Jump Host to the internet traffic. This allows you to create strict firewall rules and to open only a single port. Therefore, it forces you to connect to the Jump Host before hopping to a remote host.
The Jump feature helps achieve that goal simply and efficiently.
#### Workaround limitations of some VPN clients
These limitations make it impossible to use multiple VPN clients concurrently on the same workstation. In this case, you can have multiple virtual machines, each running a single VPN client. Using these virtual machines as jump boxes allows you to connect to the virtual machine, launch the VPN client, then launch the remote session.
### Setting up a Jump Host
Note: The Jump feature for macOS is built into the Remote Desktop Manager macOS app. It requires an [Remote Desktop Manager Jump agent to be installed on the Jump or Bastion server](https://docs.devolutions.net/rdm/ribbon-menu-bar/tools/more-tools/rdm-jump-deprecated/), and a full installation of Remote Desktop Manager macOS on the local machine and the jump host.
1. Create a new RDP entry for the jump host.
2. In the ***General*** side menu, enter a name for the session
3. In the ***RDP*** side menu, enter the host name and credentials.
4. In the ***Jump Host*** side menu, check the option ***Is Jump Host***.
5. The session is now ready to be configured to use the Jump Host.
6. In the local Remote Desktop Manager macOS instance, create a session entry as usual.
7. Set the jump host by selecting the **Jump Off** button. The Jump Host can also be inherited if defined in the parent folder.
8. Now simply launch your session. Think of it like a session within a session.
{% endtab %}
{% endtabs %}
---
# Agent Instructions
This documentation is published with GitBook. GitBook is the documentation platform designed so that both humans and AI agents can read, navigate, and reason over technical content effectively. Learn more at gitbook.com.
## Querying This Documentation
If you need additional information that is not directly available in this page, you can query the documentation dynamically by asking a question.
Perform an HTTP GET request on the current page URL with the `ask` query parameter, and the optional `goal` query parameter:
```
GET https://docs.devolutions.net/resources/devolutions-agent/jump-host.md?ask=&goal=
```
`ask` is the immediate question: it should be specific, self-contained, and written in natural language.
`goal` is optional and describes the broader end goal you are ultimately trying to accomplish on behalf of the user. GitBook uses it to tailor the answer towards what is most useful for that goal.
The response will contain a direct answer to the question and relevant excerpts and sources from the documentation.
Use this mechanism when the answer is not explicitly present in the current page, you need clarification or additional context, or you want to retrieve related documentation sections.