> For the complete documentation index, see [llms.txt](https://docs.devolutions.net/llms.txt). Markdown versions of documentation pages are available by appending `.md` to page URLs; this page is available as [Markdown](https://docs.devolutions.net/rdm/ribbon-menu-bar/file/import/import-from-computer-wizard.md).
# Import from computer wizard
{% hint style="info" %}
This feature is only available when using an [advanced workspace](https://docs.devolutions.net/rdm/workspaces/workspace-types/native-workspaces/).
{% endhint %}
{% tabs %}
{% tab title="Windows" %}
The ***Import computer wizard*** allows you to create sessions for computers using one of the following sources below: Network neighborhood, Active directory (your current domain or another domain on your network), or Host list (list of computers from a file).
### Overview
The wizard has a few major steps:
1. Select computers by using one of the three sources.
2. Optionally apply a template from which to base new sessions on.
3. Optionally edit each newly created session prior to them being saved.
The template selection should not be overlooked. In fact, it is probably the most important step to ensure your newly created sessions are usable right after being created. You should divide the sessions in batches based on which template you need to apply and import one batch at a time.
### Workflow
Upon launching the wizard, you are prompted for the source to use.
The ***Resolve IP address*** option must be checked if you want to use the IP address in the host field of your sessions instead of the host name.
Refer to the sections below depending on the chosen source.
#### Network neighborhood
The next screen will immediately be populated with the result of the network discovery.
If you prefer your sessions to use the IP address instead of the Host name to connect to the devices, check the ***Select by IP address*** option. This requires that the ***Resolve by IP address*** was selected in the first screen of the wizard. Select the computers for which you want to create session and proceed to Template selection below. Multi-select is allowed by using Ctrl+click and Shift-click.
#### Active directory
The following screen allows you to select the domain to interrogate after which you must press refresh to load the list of computers that are available.
After the query is executed, the results are displayed in the grid.
If you prefer your sessions to use the IP address instead of the Host name to connect to the devices, check the ***Select by IP address*** option. This requires that the ***Resolve by IP address*** was selected in the first screen of the wizard. Select the computers for which you want to create session and proceed to Template selection below. Multi-select is allowed by using Ctrl+click and Shift-click.
#### Host list
The following screen allows you to enter a list of hosts in an Edit control. If you prefer that your sessions use the IP address to connect to the hosts, you must enter the host name, a pipe, then the IP address.
#### Template selection
The template selection is an optional step, but it is the only way that you have to choose a protocol type other than RDP. It also allows you to set your preferences and have them used by all the created sessions. In fact, we recommend you to import in batches for each of the session type that you need to import.
If you intend to modify each of your imported sessions as they are created, check the ***Edit*** imported entry option. Note that each session will be displayed sequentially so you can perform your modification and save. A [batch edit](https://docs.devolutions.net/rdm/commands/edit/batch-edit/) is probably preferable if you have more then a few sessions to import.
{% endtab %}
{% tab title="macOS" %}
The ***Import computer assistant*** option allows you to create sessions for computers using one of the following sources below: Network or Host list (list of computers from a file)
### Overview
The assistant has a few major steps:
1. Select computers by using one of the three sources.
2. Optionally apply a template from which to base new sessions on.
3. Optionally edit each newly created session prior to them being saved.
The template selection should not be overlooked. In fact, it is probably the most important step to ensure your newly created sessions are usable right after being created. You should divide the sessions in batches based on which template you need to apply and import one batch at a time.
### Workflow
Upon launching the assistant, you are prompted for the source to use.
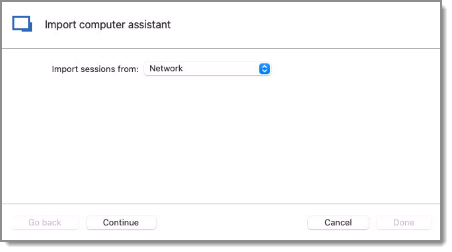
Refer to the sections below depending on the chosen source.
#### Network
The next screen will immediately be populated with the result of the network discovery.
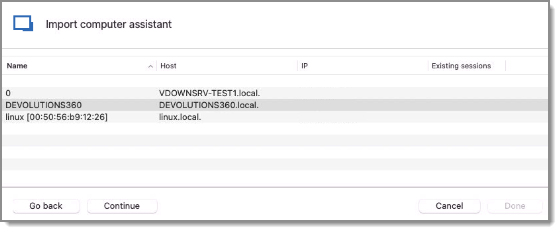
Select the computers for which you want to create session and proceed to Template selection below. Multi-select is allowed by using Ctrl+click and Shift-click.
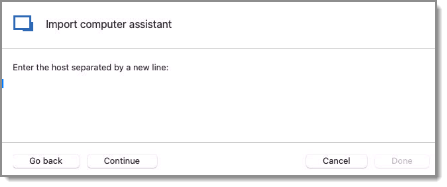
#### Host list
The following screen allows you to enter a list of hosts in an Edit control. If you prefer that your sessions use the IP address to connect to the hosts, you must enter the host name, a pipe, then the IP address.
#### Template selection
The template selection is an optional step, but it is the only way that you have to choose a protocol type other than RDP. It also allows you to set your preferences and have them used by all the created sessions. In fact, we recommend you to import in batches for each of the session type that you need to import.
If you intend to modify each of your imported sessions as they are created, check the ***Edit*** imported entry option. Note that each session will be displayed sequentially so you can perform your modification and save. A [batch edit](https://docs.devolutions.net/rdm/commands/edit/batch-edit/) is probably preferable if you have more then a few sessions to import.
{% endtab %}
{% endtabs %}
---
# Agent Instructions
This documentation is published with GitBook. GitBook is the documentation platform designed so that both humans and AI agents can read, navigate, and reason over technical content effectively. Learn more at gitbook.com.
## Querying This Documentation
If you need additional information that is not directly available in this page, you can query the documentation dynamically by asking a question.
Perform an HTTP GET request on the current page URL with the `ask` query parameter, and the optional `goal` query parameter:
```
GET https://docs.devolutions.net/rdm/ribbon-menu-bar/file/import/import-from-computer-wizard.md?ask=&goal=
```
`ask` is the immediate question: it should be specific, self-contained, and written in natural language.
`goal` is optional and describes the broader end goal you are ultimately trying to accomplish on behalf of the user. GitBook uses it to tailor the answer towards what is most useful for that goal.
The response will contain a direct answer to the question and relevant excerpts and sources from the documentation.
Use this mechanism when the answer is not explicitly present in the current page, you need clarification or additional context, or you want to retrieve related documentation sections.