> For the complete documentation index, see [llms.txt](https://docs.devolutions.net/llms.txt). Markdown versions of documentation pages are available by appending `.md` to page URLs; this page is available as [Markdown](https://docs.devolutions.net/rdm/knowledge-base/how-to-articles/set-up-an-ssh-tunnel.md).
# Set up an SSH tunnel
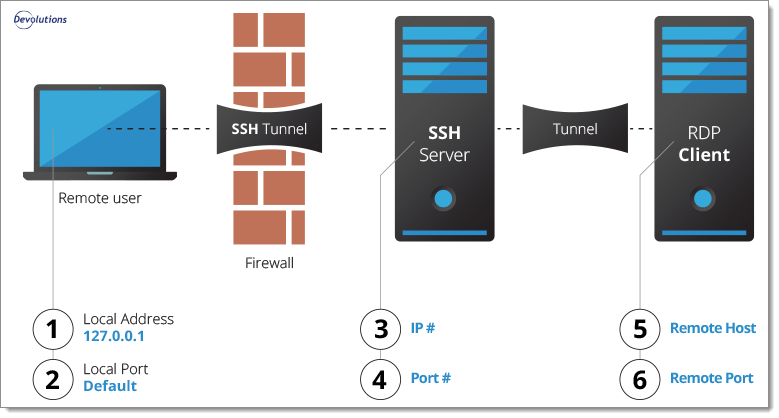
SSH tunneling is used to create an encrypted connection over an untrusted network. It consists of an encrypted tunnel leveraging SSH protocol, and thus providing a secure connection for data transfer. The SSH tunnel can be used to establish a kind of virtual private network (VPN) to access services across firewalls.
This is the procedure to establish a basic SSH tunnel to reach a remote machine:
### Create an SSH tunnel
To create an SSH tunnel, local connections through a specified port must be forwarded to an SSH server. For SSH tunnels, a given port of one machine needs to be forwarded to a port on the other machine which will be the other end of the tunnel. Once the SSH tunnel has been established, the user can connect to earlier specified port at first machine to access the network service.
* Create an ***SSH tunnel*** entry (***New entry*** – ***Session*** – ***SSH tunnel***).
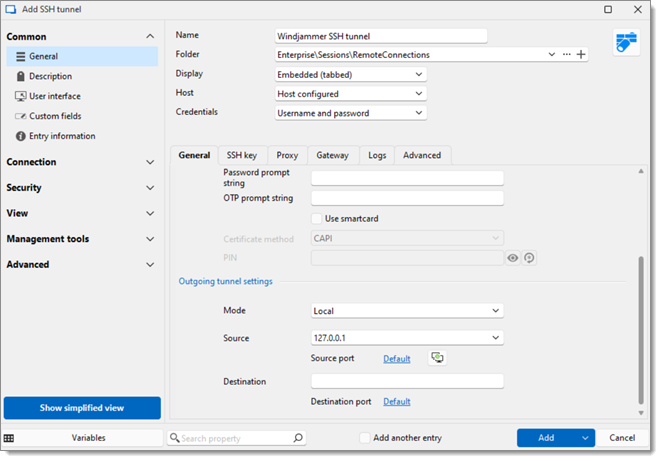
Set up the properties as follows:
#### SSH server settings
| SETTINGS | DESCRIPTION |
| ------------------ | ------------------------------------------------------- |
| **Host** | Set the IP address of the SSH server. |
| **Port** | Set the port of the SSH server. The default port is 22. |
| **Set public key** | Set up the public key. |
| **Username** | Enter the username used to connect to the SSH server. |
| **Password** | Enter the password used to connect to the SSH server. |
#### Outgoing tunnel settings
| SETTINGS | DESCRIPTION |
| --------------- | ------------------------------------------------------------------------------------------------------------- |
| **Mode** | Select between:
- Local
- Remote
- Dynamic
|
| **Source** | The local address must be left to 127.0.0.1. |
| **Source port** | In most cases leave the local port to its default value 3390. |
| **Remote host** | Enter the host or IP address of the remote client. |
| **Remote port** | Set the final port to be reached, in most cases it is best to leave it to its default value of 3389. |
At this time, launch the entry to check if the tunnel successfully opens or not, then end the session.
### Create a remote session
Create an RDP session entry and fill in the required settings before clicking on ***Add***:
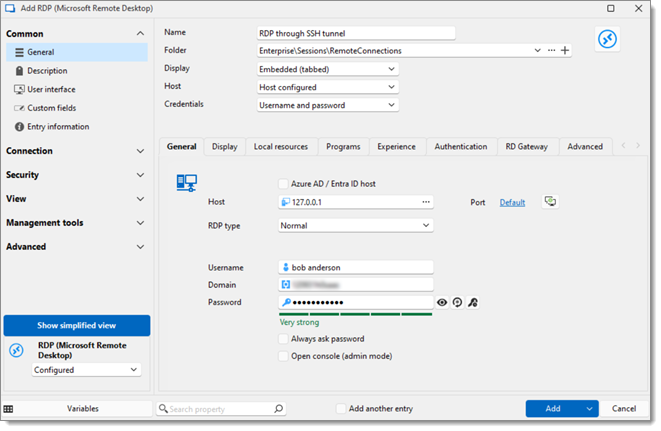
| SETTINGS | DESCRIPTION |
| ------------ | ------------------------------------------- |
| **Host** | Enter the local address which is 127.0.0.1. |
| **Port** | Enter the local port, which is 3390. |
| **RDP type** | Leave the RDP type to ***Normal***. |
| **Username** | Enter the username of the remote host. |
| **Domain** | Enter the domain of the remote host. |
| **Password** | Enter the password of the remote host. |
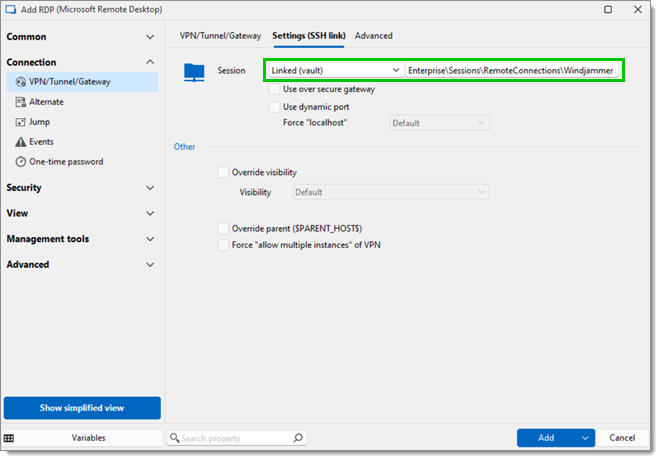
In the ***VPN/Tunnel/Gateway*** section of the RDP session, select set the ***Connect*** field to ***Always connect***, and the ***Type*** field to ***SSH link***.
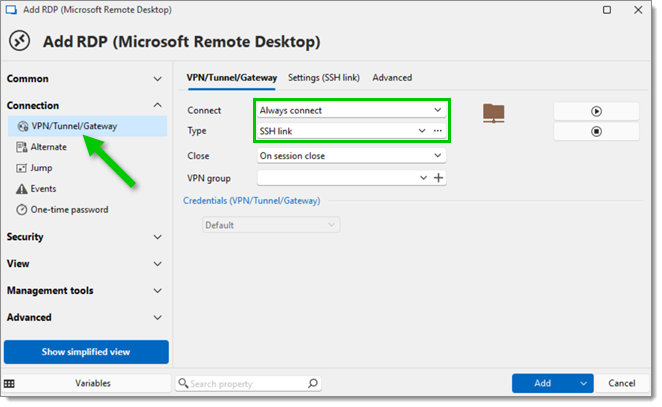
Still in the ***VPN/Tunne/Gateway*** section, go to the ***Settings (SSH link)*** tab, and select the newly created SSH tunnel entry from the ***Session*** dropdown menu. Click on ***Add***.
The session is now configured with the following instructions: for each connection that comes on the source 127.0.0.1 and port 3390, forward that connection to the SSH server and request the server to forward that connection to the remote host.
### See also
* [Devolutions Academy – Create and use SSH Tunnel entry in Remote Desktop Manager](https://academy.devolutions.net/student/activity/2594919-create-and-use-ssh-tunnel-entry-in-remote-desktop-manager)
---
# Agent Instructions
This documentation is published with GitBook. GitBook is the documentation platform designed so that both humans and AI agents can read, navigate, and reason over technical content effectively. Learn more at gitbook.com.
## Querying This Documentation
If you need additional information that is not directly available in this page, you can query the documentation dynamically by asking a question.
Perform an HTTP GET request on the current page URL with the `ask` query parameter, and the optional `goal` query parameter:
```
GET https://docs.devolutions.net/rdm/knowledge-base/how-to-articles/set-up-an-ssh-tunnel.md?ask=&goal=
```
`ask` is the immediate question: it should be specific, self-contained, and written in natural language.
`goal` is optional and describes the broader end goal you are ultimately trying to accomplish on behalf of the user. GitBook uses it to tailor the answer towards what is most useful for that goal.
The response will contain a direct answer to the question and relevant excerpts and sources from the documentation.
Use this mechanism when the answer is not explicitly present in the current page, you need clarification or additional context, or you want to retrieve related documentation sections.