> For the complete documentation index, see [llms.txt](https://docs.devolutions.net/llms.txt). Markdown versions of documentation pages are available by appending `.md` to page URLs; this page is available as [Markdown](https://docs.devolutions.net/rdm/knowledge-base/how-to-articles/configure-an-azure-bastion-entry-in-remote-desktop-manager.md).
# Configure an Azure Bastion entry in Remote Desktop Manager
Microsoft Azure Bastion is a comprehensive, fully managed service providing both Remote Desktop Protocol (RDP) and Secure Shell Protocol (SSH) access to Azure virtual machines (VMs) without their public IP exposure. An hourly billed service, Azure Bastion is tied to a specific Azure Virtual Network, allowing access to all VMs contained within.
{% hint style="info" %}
Azure Bastion is compatible with the latest versions (2023.1.x and later) of Remote Desktop Manager.
{% endhint %}
Remote Desktop Manager allows seamless connection to Azure Bastion instances through a VPN/SSH/Gateway entry either per connection or shared amongst many. Once Azure Bastion is provisioned, add the necessary details to Remote Desktop Manager, authenticate to Azure, and connect to any VMs within the given Azure virtual network.
### Provisioning Azure Bastion for an Azure Virtual Network
Before creating entries in Remote Desktop Manager, some steps are required for provisioning in your Azure Portal.
{% hint style="info" %}
Note that the steps contained in this section make for a minimal setup, and maytherefore differ substantially from your own optimal configuration. Step **#11**, however, is necessary for the Azure Bastion entry to work in Remote Desktop Manager.
{% endhint %}
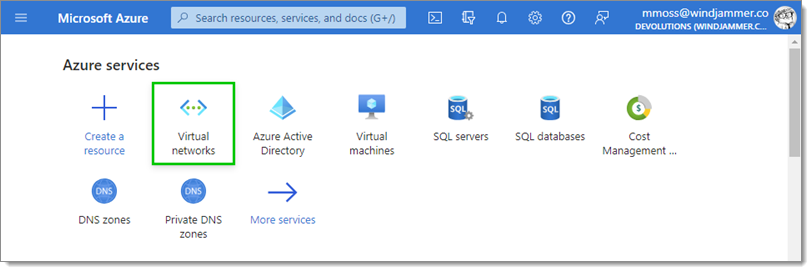
1. Open your [Microsoft Azure Portal](https://azure.microsoft.com/en-us/) and sign in to your account.
2. Select ***Virtual Networks*** in the ***Azure services*** section. If you do not see it, click on ***More services*** to make other services appear.
3. Click on a specific virtual network to add Bastion to (or create one).
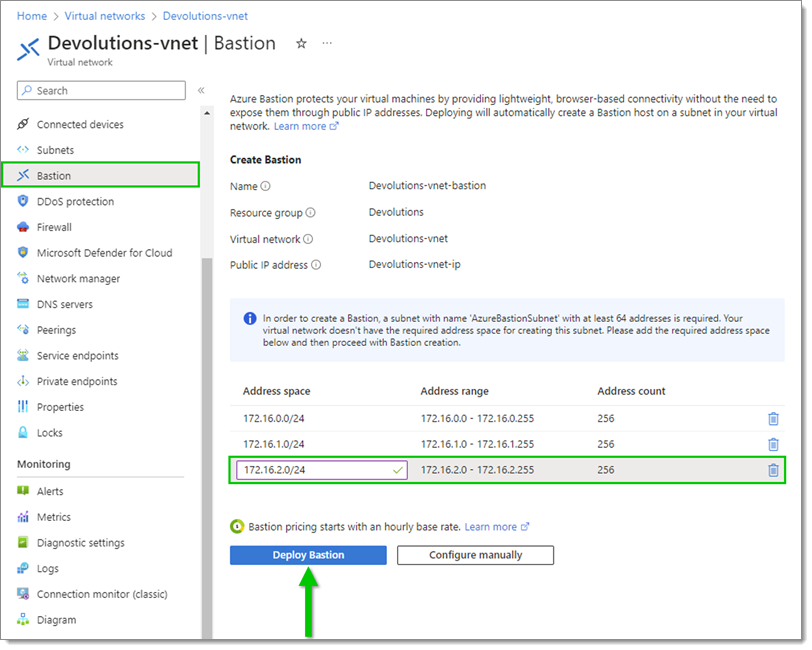
4. In the left menu, go to the ***Bastion*** pane to open the details, then click the ***Deploy Bastion*** button to start the process. If there is no existing subnet with enough space, then Bastion only shows the ***Configure manually*** button and prompts for the subnet creation. In the image above, subnet `172.16.2.0/24` was provided, and the ***Deploy Bastion*** button becomes enabled once the subnet is added.
* This is a multi-step process, which can take 10 minutes or more to complete.
* Creates a subnet named `AzureBastionSubnet`.
* Creates a resource for Azure Bastion - `{Existing Virtual Network}-bastion`.
* Deploys at least one Bastion application instance.
* Provisions a public IP tied to the Azure Bastion resource.
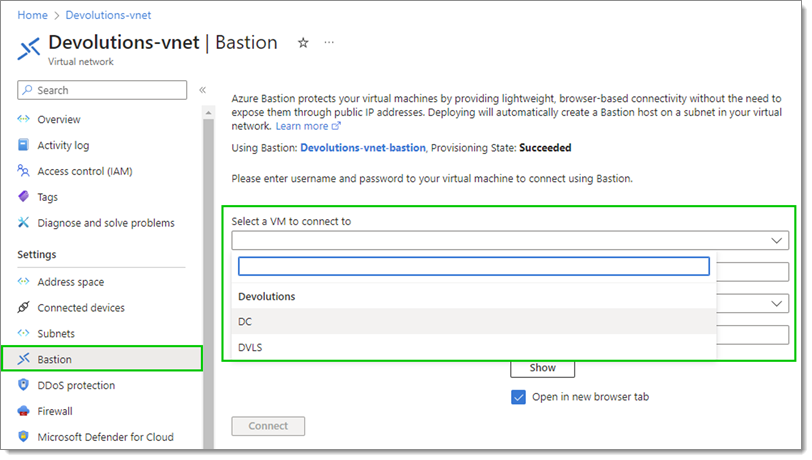
5. Once Azure Bastion is provisioned, navigate to the ***Bastion*** pane once again.
6. Select an available VM to connect to.
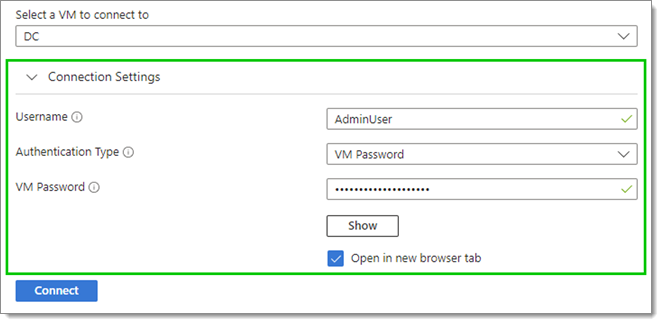
7. Enter appropriate local VM credentials under ***Connection Settings***.
8. Click on ***Connect***. Once connected, a new browser tab opens and shows the connection.
9. Still in the Azure Portal, navigate to the `{Existing Virtual Network}-bastion` resource.
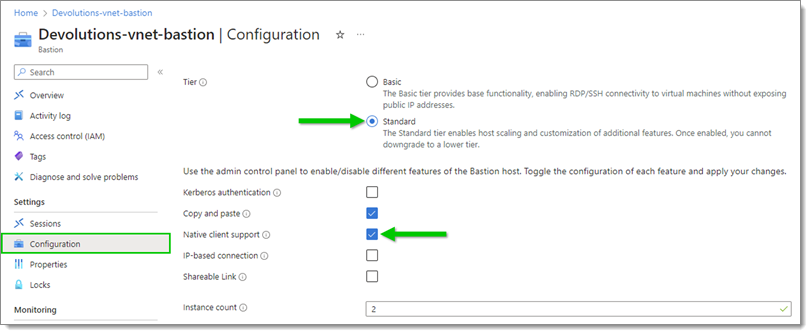
10. In the left menu, click the ***Configuration*** pane.
11. Select the ***Standard*** tier and enable the ***Native client support*** (disabled by default).
By default, Azure Bastion provisions the Basic tier, which does not allow for Native Client Support, which Remote Desktop Manager relies on.
12. Save the configuration and allow time to complete the upgrade and feature changes.
Once you have upgraded, you can no longer downgrade. Therefore, make sure you intend to do so, and be aware of the associated price increase.
### Connecting Remote Desktop Manager to Azure Bastion
With Azure Bastion now configured, you can now configure Remote Desktop Manager to connect to VMs behind Azure Bastion. The steps below show the creation of an external Azure Bastion VPN entry that is then linked to a RDP/SSH session entry. This is useful if you plan to use the Azure Bastion entry with multiple session entries.
However, if you plan on using only one session entry with it, you can set up the Azure Bastion configuration directly in that session's properties, under the ***VPN/SSH/Gateway*** section in the left menu. Still, you should follow the steps below, as the configuration and information to provide remains the same.
1. Before connecting, locate the following property details:
| Property | Example value | Notes |
| --------------------- | -------------------------------------- | ------------------------------------------------------------------------------------------------------------------------------------------------------------------------------------------------------------------------------------------------------------------------------------------------------------------------------------ |
| ***Host*** | `MyAzureBastion` | This value is derived from `{Existing Virtual Network}-bastion` and is not the provided Public DNS or Public IP value found in the resource information. |
| ***Subscription ID*** | `6f14d593-b33a-48ca-81es-428eeb0ff8b1` | It is assumed to be the same as the Azure Bastion Host, in which case it can be omitted. Locate this value by navigating to ***Subscriptions***. Then, select your specific subscription and copy the ***Subscription ID*** value. |
| ***Resource Group*** | `Devolutions-202309011056` | It is assumed to be the same as the Azure Bastion Host, in which case it can be omitted. It is the Resource Group that the Virtual Network and attached Bastion object is located in. |
| ***Tenant ID*** | `76377918-3e78-4fd7-b07a-6eb5d4bbf18f` | It is only needed if the Bastion does not exist in the default tenant for the Azure user. Either click the “…” button next to the ***Tenant ID*** in Remote Desktop Manager to populate the field or manually locate this value by navigating to Entra ID, choosing the ***Properties*** tab, and copying the ***Tenant ID*** value. |
2. With details in hand, open Remote Desktop Manager and navigate to where you want your Azure Bastion entry to be.
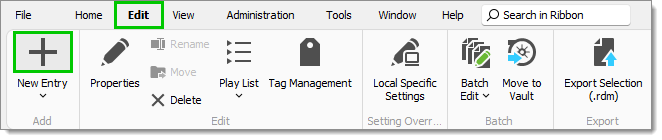
3. In the Ribbon, go to the ***Edit*** tab and click on the "+" symbol to add a new entry.
4. Under the ***VPN/SSH/Gateway*** entry types, select ***Azure Bastion*** and click ***OK***.
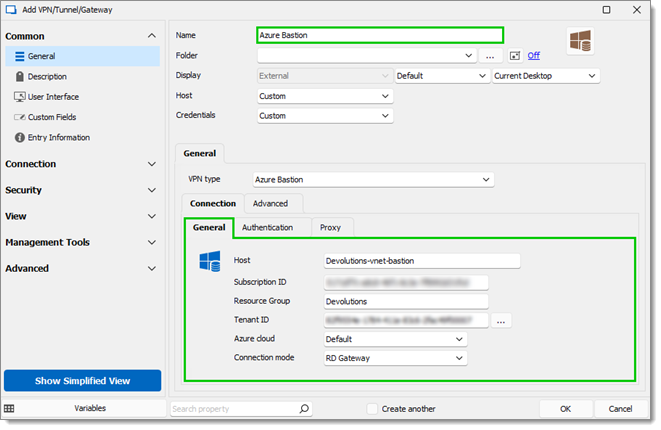
5. ***Name*** your entry.
6. In the ***General*** sub-tab, enter the information located in step 1 for the ***Host***, ***Subscription ID***, ***Resource Group***, and ***Tenant ID***.
7. Select an ***Azure cloud*** in the corresponding drop-down list. The ***Default*** value corresponds to Azure Public Cloud.
8. Select a ***Connection mode*** in the corresponding drop-down list. Choose between:
* ***TCP Tunnel (recommended)***: Allows unique port numbers but offers lower performance. Only available with the Standard tier. Supports non-standard ports and SSH entries. This mode mirrors the functionality of the ***az cli Bastion tunnel command***.
* ***RD Gateway***: Retrives an RDP connection file from the Bastion and uses it in the background for faster performance. Supports RDP session entries only.
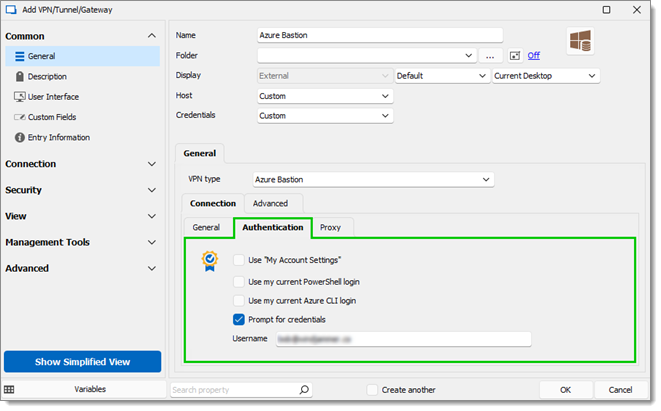
9. Open the ***Authentication*** sub-tab and select the appropriate value:
* ***Use "My Account Settings"***: Takes your credentials from ***File – My Account Settings***.
* ***Use my current PowerShell login***: Takes the current login context from Azure PowerShell (`Connect-AzAccount`).
* ***Use my current Azure CLI login***: Takes the current login context from Az CLI (`az login`).
* ***Prompt for credentials***: Prompts with an interactive login to authenticate via a web browser pop-up window. You can optionally provide the username as a login hint. The access token will be cached for subsequent connections in the same user session. In the example below, the connection is set to prompt with an Azure login screen and an optional login hint is provided to select the right account.
10. Click ***OK*** to save the entry.
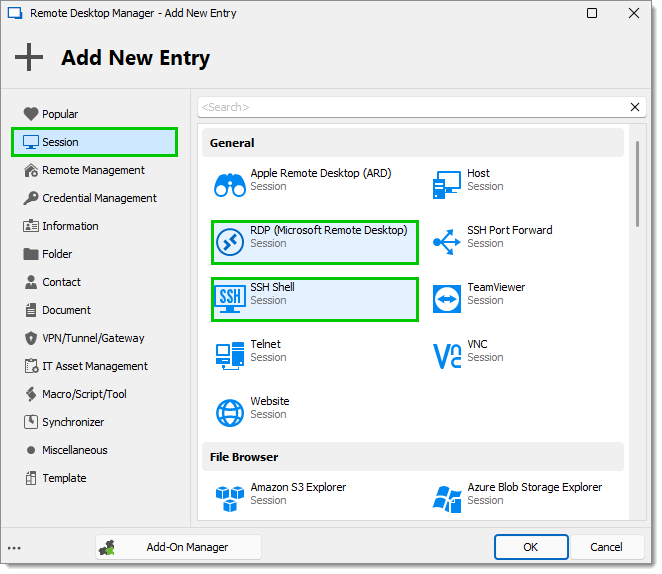
11. In the Ribbon, go to the ***Edit*** tab and click on the "+" symbol again to add another entry.
12. Under the ***Session*** entry types, select either ***RDP (Microsoft Remote Desktop)*** or ***SSH Shell*** and click ***OK***. For this example, an RDP session entry has been used.
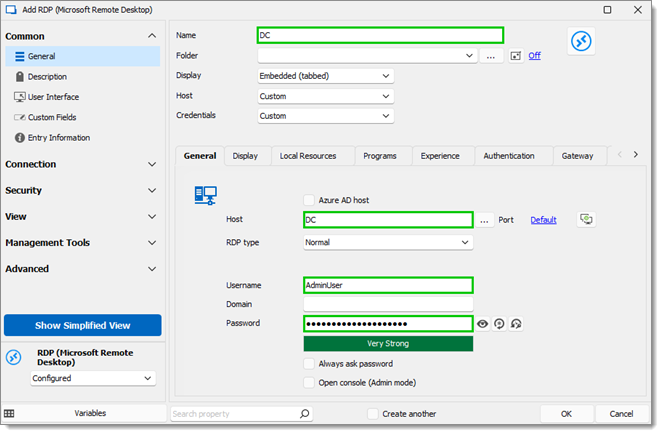
13. ***Name*** your entry.
14. In the ***General*** tab, enter the VM name that is within Azure in the ***Host*** field.
15. Enter the VM ***Username*** and ***Password*** to log in to the VM itself.
This VM is not yet domain-joined, so the domain field is left empty.
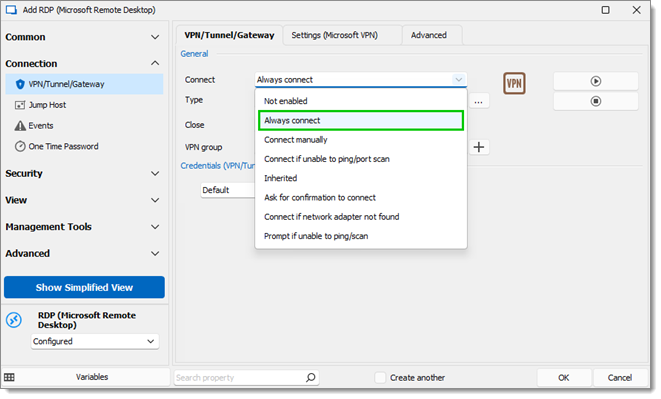
16. In the left menu, navigate to the RDP connection's ***VPN/SSH/Gateway*** screen.
17. In the ***VPN/SSH/Gateway*** tab, under ***General***, select ***Always connect*** in the ***Connect*** drop-down list.
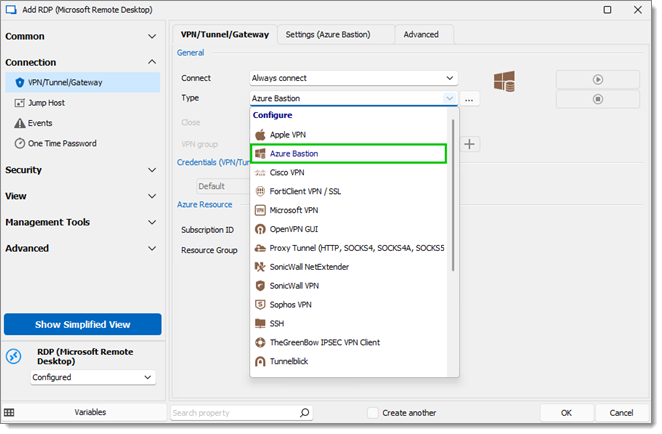
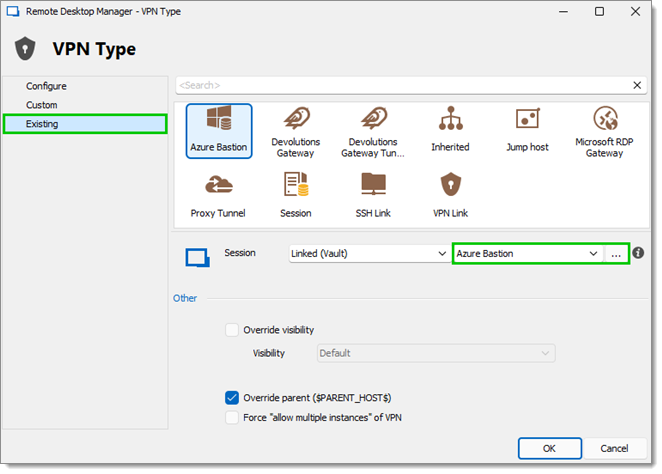
18. In the ***Type*** drop-down list, select ***Azure Bastion***.
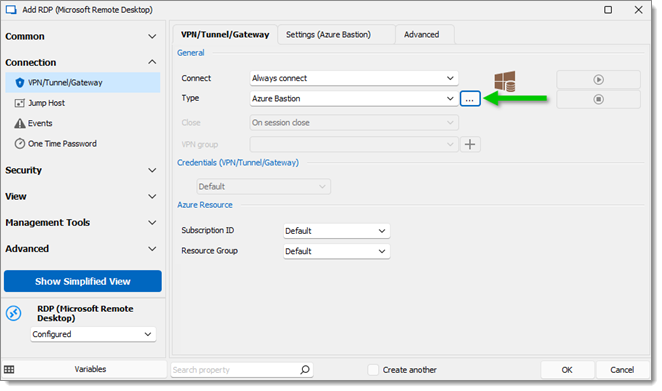
19. Click the ellipsis button next to the ***Type*** option.
20. Choose ***Existing*** in the left menu, then find the existing pre-created Azure Bastion entry.
21. Click ***OK*** twice to close the connection editing windows.
22. Launch a connection to the newly added VM.
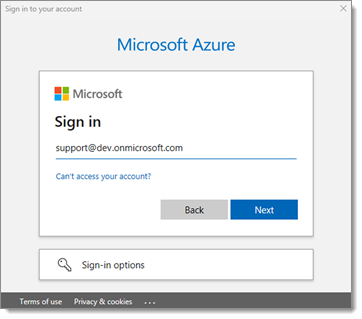
23. For interactive authentication, and particularly if your credentials are not yet cached, you will encounter a Microsoft sign-in prompt to authenticate against the Azure portal. Enter your Azure credentials to open the Azure Bastion connection and connect to the requested VM.
Your connection should now be open.
{% hint style="danger" %}
You may encounter this error message within Remote Desktop Manager: ***The Azure Bastion does not support native client connections (SKU: Basic Native Client: False)***. It means that you have not upgraded to the correct tier.If you are experiencing some issues using SSH tunnel over the Bastion with a network adaptor with IPV6 enabled, try navigating to the SSH tunnel ***Advanced*** properties and setting the ***Internel protocol*** to IPV4.
{% endhint %}
---
# Agent Instructions
This documentation is published with GitBook. GitBook is the documentation platform designed so that both humans and AI agents can read, navigate, and reason over technical content effectively. Learn more at gitbook.com.
## Querying This Documentation
If you need additional information that is not directly available in this page, you can query the documentation dynamically by asking a question.
Perform an HTTP GET request on the current page URL with the `ask` query parameter, and the optional `goal` query parameter:
```
GET https://docs.devolutions.net/rdm/knowledge-base/how-to-articles/configure-an-azure-bastion-entry-in-remote-desktop-manager.md?ask=&goal=
```
`ask` is the immediate question: it should be specific, self-contained, and written in natural language.
`goal` is optional and describes the broader end goal you are ultimately trying to accomplish on behalf of the user. GitBook uses it to tailor the answer towards what is most useful for that goal.
The response will contain a direct answer to the question and relevant excerpts and sources from the documentation.
Use this mechanism when the answer is not explicitly present in the current page, you need clarification or additional context, or you want to retrieve related documentation sections.