> For the complete documentation index, see [llms.txt](https://docs.devolutions.net/llms.txt). Markdown versions of documentation pages are available by appending `.md` to page URLs; this page is available as [Markdown](https://docs.devolutions.net/rdm/getting-started/workspaces/create-a-workspace.md).
# Add a new workspace
Upon first launch, Remote Desktop Manager uses a local SQLite workspace. The different workspaces are listed in [Workspace types](https://docs.devolutions.net/rdm/workspaces/workspace-types/). For help selecting a workspace tailored to your needs, please see our [Getting started](https://docs.devolutions.net/rdm/getting-started/) section.
{% tabs %}
{% tab title="Windows" %}
Once you have identified your needs, you can proceed with the creation of your first workspace:
1. In Remote Desktop Manager, go to ***File – Workspaces***.
2. Click ***Add a new workspace***.
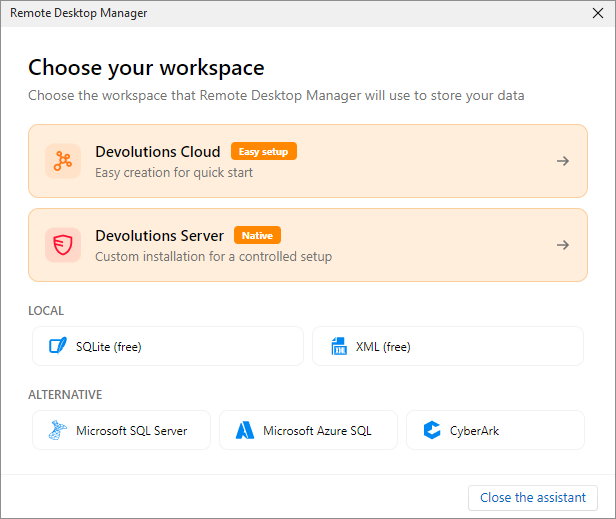
3. Select the type of workspace to create. In the example below, a Devolutions Server workspace is being created.
4. Configure the workspace connection settings. To validate the information, click on ***Test connection*** or ***Test host*** depending on the type of workspace being created.
5. Click ***Add*** when the configuration is complete.
6. Once created, the new workspace should automatically open. You can also manually open the workspace by selecting it from the workspace drop-down list at the top of the navigation pane.
You may have to [add a Remote Desktop Manager license](https://docs.devolutions.net/rdm/commands/administration/licenses/) to your workspace. If you are using [Devolutions Server or Devolutions Cloud](https://docs.devolutions.net/rdm/workspaces/workspace-types/native-workspaces/), there is no need to add a license in Remote Desktop Manager as the license serial is retrieved directly from the workspace.
{% endtab %}
{% tab title="macOS" %}
Once you have identified your needs, you can proceed with the creation of your first workspace:
1. In Remote Desktop Manager macOS, go to ***File – Workspaces***.
2. Click ***Add a new workspace***.
3. Select the type of workspace to create, then click ***OK***. In the example below, a Devolutions Server workspace is being created.
4. Configure the workspace connection settings. To validate the information, click on ***Test connection*** or ***Test server*** depending on the type of workspace being created.
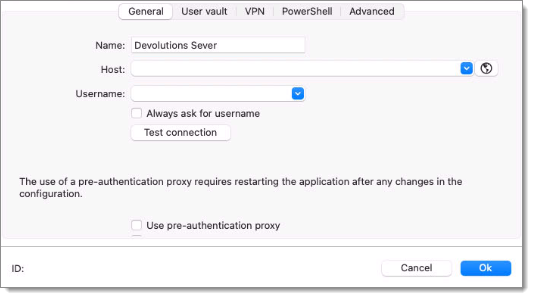
5. Click ***OK*** when the configuration is complete, then ***OK*** again to close the ***Workspaces*** window.
6. The new workspace should automatically open. You can also manually open the workspace by selecting it from the workspace drop-down list at the top of the navigation pane.
You may have to [add a Remote Desktop Manager macOS license](https://docs.devolutions.net/rdm/commands/administration/licenses/) to your workspace. If you are using [Devolutions Server or Devolutions Cloud](https://docs.devolutions.net/rdm/workspaces/workspace-types/native-workspaces/), there is no need to add a license in Remote Desktop Manager macOS as the license serial is retrieved directly from the workspace.
{% endtab %}
{% tab title="Linux" %}
Once you have identified your needs, you can proceed with the creation of your first workspace:
1. In Remote Desktop Manager, go to ***File – Workspaces***.
2. Click on ***Add a new workspace***.
3. Select the type of workspace to create, then click ***Add***. In the example below, a Devolutions Server workspace is being created. Click ***Ok***.
4. Configure the workspace connection settings. To validate the information, click on ***Test connection*** or ***Test host*** depending on the type of workspace being created.
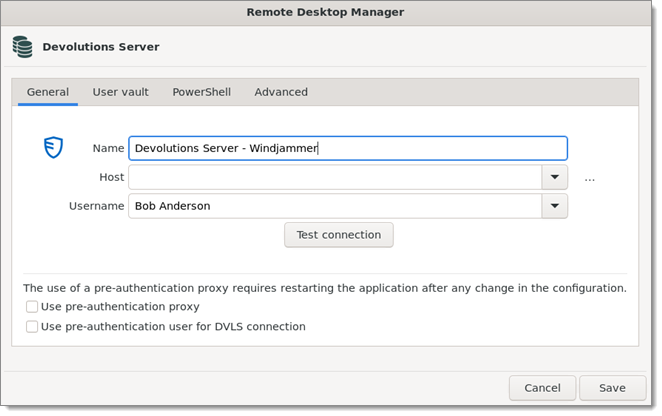
5. Click ***Save*** when the configuration is complete.
6. Once created, the new workspace should automatically open. You can also manually open the workspace by selecting it from the workspace drop-down list at the top of the navigation pane.
You may have to [add a Remote Desktop Manager license](https://docs.devolutions.net/rdm/commands/administration/licenses/) to your workspace. If you are using [Devolutions Server or Devolutions Cloud](https://docs.devolutions.net/rdm/workspaces/workspace-types/native-workspaces/), there is no need to add a license in Remote Desktop Manager as the license serial is retrieved directly from the workspace.
{% endtab %}
{% tab title="iOS" %}
The workspace in Remote Desktop Manager iOS can be a file or a database. You can configure multiple workspaces within the application.
1. To create a new workspace, tap on the left corner.
2. Select ***Manage workspaces***.
3. Tap ***Add a new workspace***.
4. Select the workspace type you want to create, enter all the required information and tap on ***Done***.
5. The workspace has been created.
{% endtab %}
{% tab title="Android" %}
Once you have identified your needs, you can proceed with the creation of your first workspace:
1. In Remote Desktop Manager Android, tap the menu icon located at the top left corner of your screen, then tap your current workspace.
2. Tap the plus icon (***+***).
3. Select the type of workspace to create, then click ***Ok***. In the example below, a Devolutions Server workspace is being created.
4. Configure the workspace connection settings. To validate the information, click on ***Test connection*** or ***Test host*** depending on the type of workspace being created.
5. Tap the floppy disk icon when the configuration is complete to save the new workspace.
6. Once created, the new workspace should automatically open.
You may have to [add a Remote Desktop Manager license](https://docs.devolutions.net/rdm/commands/administration/licenses/) to your workspace. If you are using [Devolutions Server or Devolutions Cloud](https://docs.devolutions.net/rdm/workspaces/workspace-types/native-workspaces/), there is no need to add a license in Remote Desktop Manager as the license serial is retrieved directly from the workspace.
{% endtab %}
{% endtabs %}
#### See also
* [Devolutions Academy – Create a new workspace](https://academy.devolutions.net/student/page/3182398-create-a-new-data-source?curriculum_activity_id=4932865\&path_id=2628397\&sid=0ad9db1a-87e2-4af2-a210-69ce1e2c4af1\&sid_i=0)
* [Devolutions Academy – Choosing the right workspace](https://academy.devolutions.net/student/path/1916054/activity/2667043)
* [Devolutions Academy – Quick start up: up and running in 10 minutes](https://docs.devolutions.net/rdm/knowledge-base/how-to-articles/quickly-deploy-remote-desktop-manager)
---
# Agent Instructions
This documentation is published with GitBook. GitBook is the documentation platform designed so that both humans and AI agents can read, navigate, and reason over technical content effectively. Learn more at gitbook.com.
## Querying This Documentation
If you need additional information that is not directly available in this page, you can query the documentation dynamically by asking a question.
Perform an HTTP GET request on the current page URL with the `ask` query parameter, and the optional `goal` query parameter:
```
GET https://docs.devolutions.net/rdm/getting-started/workspaces/create-a-workspace.md?ask=&goal=
```
`ask` is the immediate question: it should be specific, self-contained, and written in natural language.
`goal` is optional and describes the broader end goal you are ultimately trying to accomplish on behalf of the user. GitBook uses it to tailor the answer towards what is most useful for that goal.
The response will contain a direct answer to the question and relevant excerpts and sources from the documentation.
Use this mechanism when the answer is not explicitly present in the current page, you need clarification or additional context, or you want to retrieve related documentation sections.