> For the complete documentation index, see [llms.txt](https://docs.devolutions.net/llms.txt). Markdown versions of documentation pages are available by appending `.md` to page URLs; this page is available as [Markdown](https://docs.devolutions.net/pam/knowledge-base/how-to-articles/create-an-entra-id-pam-provider-devolutions-cloud.md).

# Create an Entra ID PAM provider (Devolutions Cloud)

The following guide provides steps to create an Entra ID user PAM provider for Devolutions Cloud.

### Create an Entra ID PAM provider

**In the Azure Portal**

1. In a browser page, open the [Microsoft Azure Portal](https://azure.microsoft.com/) and sign in to your account.
2. Select ***Microsoft Entra ID*** in the ***Azure Services*** section. If you do not see it, click on ***More services*** to make other services appear.

   <figure><img src="https://cdnweb.devolutions.net/docs/docs_en_kb_KB2291.png" alt=""><figcaption></figcaption></figure>
3. In ***App registrations***, click on ***New registration***.

   <figure><img src="https://cdnweb.devolutions.net/docs/docs_en_kb_KB2292.png" alt=""><figcaption></figcaption></figure>
4. Set the ***Name*** of the new registration.

   <figure><img src="https://cdnweb.devolutions.net/docs/docs_en_kb_KB2315.png" alt=""><figcaption></figcaption></figure>
5. Click ***Register*** at the bottom when done. You will be presented with an overview of your application.
6. Locate the ***Application (client) ID*** and ***Directory (tenant) ID***. You will need this information in later steps, so do not close this window.

   <figure><img src="https://cdnweb.devolutions.net/docs/docs_en_kb_KB2294.png" alt=""><figcaption></figcaption></figure>
7. [Download Devolutions Cloud Services](https://devolutions.net/download-center/#hub), and launch the installer.
8. After reading and accepting the ***End-user license agreement***, check ***PAM*** from the ***Custom setup*** feature list.
9. Enter your ***Host*** URL, as well as the ***Application secret*** and ***Application key***. You can then test your connection to see if everything is working properly. Click on ***Finish***.

**In Devolutions Cloud**

10. Connect to Devolutions Cloud.
11. Go to ***Administration – Privileged Access – Providers***.
12. Click on ***Add Provider (+)***.

    <figure><img src="https://cdnweb.devolutions.net/docs/docs_en_kb_KB2295.png" alt=""><figcaption></figcaption></figure>
13. Enter a ***Name*** (mandatory) for your provider. Optionally, enter a ***Description*** and select a [***Password template***](https://docs.devolutions.net/cloud/web-interface/administration/management/password-templates/).

    <figure><img src="https://cdnweb.devolutions.net/docs/docs_en_kb_KB2296.png" alt=""><figcaption></figcaption></figure>
14. Enter the ***Tenant ID*** and ***Client ID*** that you previously located in the ***Overview*** page of the enterprise application in your Azure Portal.

    <figure><img src="https://cdnweb.devolutions.net/docs/docs_en_kb_KB2297.png" alt=""><figcaption></figcaption></figure>

    <div data-gb-custom-block data-tag="hint" data-style="info" class="hint hint-info"><p>
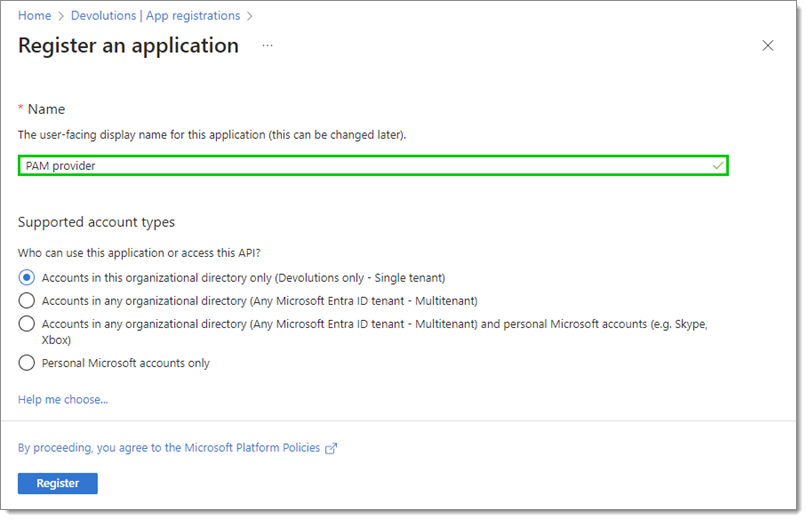
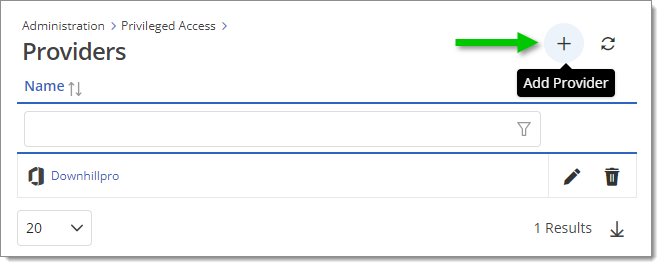
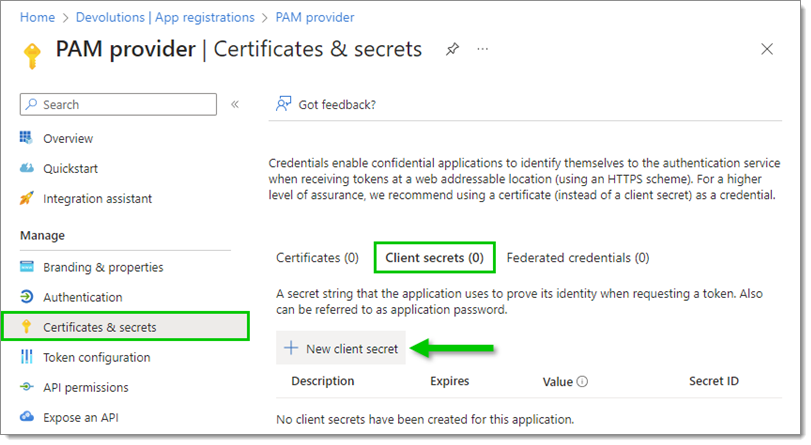
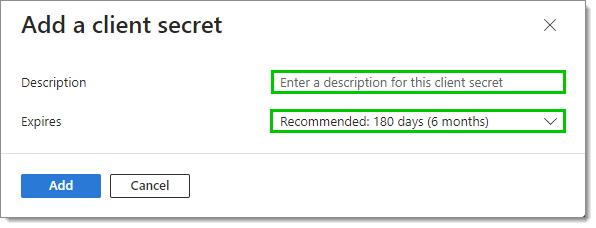
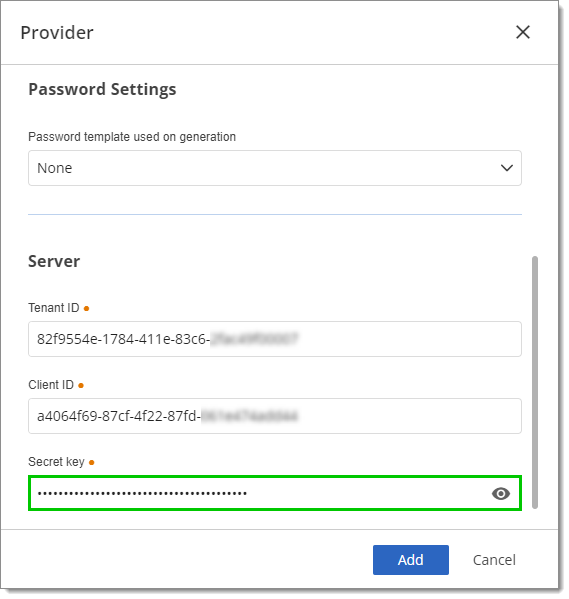
Do not close the provider settings window as you still need to enter the <em><strong>Secret key</strong></em>. Follow the steps below to create a client secret.</p></div>

### Create a client secret

**In the Azure Portal**

1. In ***Certificates & secrets***, select ***Client secrets***, then click on ***New client secret***.

   <figure><img src="https://cdnweb.devolutions.net/docs/docs_en_kb_KB2298.png" alt=""><figcaption></figcaption></figure>
2. Enter a ***Description*** and set an expiry date (or use the recommended one).

   <figure><img src="https://cdnweb.devolutions.net/docs/docs_en_kb_KB2299.png" alt=""><figcaption></figcaption></figure>
3. Click ***Add***.
4. Copy the ***Value*** of your new client secret (not the ***Secret ID***).

   <figure><img src="https://cdnweb.devolutions.net/docs/docs_en_kb_KB2300.png" alt=""><figcaption></figcaption></figure>

**In Devolutions Cloud**

5. Paste the client secret ***Value*** in the ***Secret key*** field.

   <figure><img src="https://cdnweb.devolutions.net/docs/docs_en_kb_KB2301.png" alt=""><figcaption></figcaption></figure>
6. Click ***Add***.

Your new provider has now been added to the list of ***Providers***.

### Set API permissions

**In the Azure Portal**

1. In your recently created application page, go to ***API permissions*** and click on ***Add a permission***.

   <figure><img src="https://cdnweb.devolutions.net/docs/docs_en_kb_KB2314.png" alt=""><figcaption></figcaption></figure>
2. Select ***Microsoft Graph***.

   <figure><img src="https://cdnweb.devolutions.net/docs/docs_en_kb_KB2303.png" alt=""><figcaption></figcaption></figure>
3. Select ***Application permissions***.

   <figure><img src="https://cdnweb.devolutions.net/docs/docs_en_kb_KB2304.png" alt=""><figcaption></figcaption></figure>
4. Locate and check the boxes next to the following Microsoft Graph API permissions:
   * ***Group.Read.All***
   * ***RoleManagement.ReadWrite.Directory***
   * ***User.Read.All***

![](https://cdnweb.devolutions.net/docs/docs_en_kb_KB2305.png)

5. Click on ***Add permissions*** at the bottom.
6. Click on ***Grant admin consent for \[your organization]***, then confirm by clicking ***Yes***.

   <figure><img src="https://cdnweb.devolutions.net/docs/docs_en_kb_KB2306.png" alt=""><figcaption></figcaption></figure>

The ***Status*** next to each permission should now be updated.

### Enable the application to rotate passwords

**In the Azure Portal**

1. Go back to Microsoft Entra ID, then go to ***Roles and administrators*** in the left menu.

   <div data-gb-custom-block data-tag="hint" data-style="warning" class="hint hint-warning"><p>
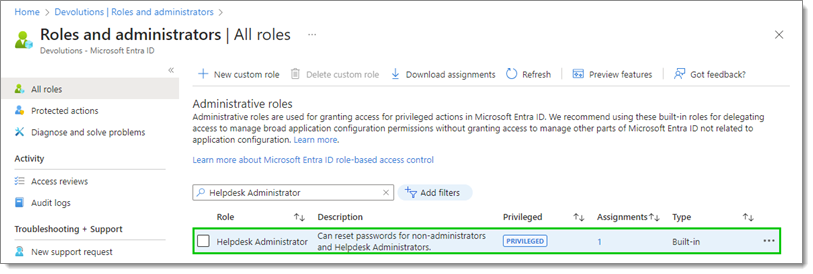
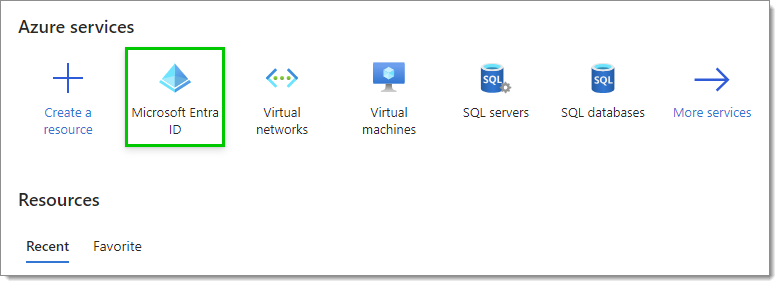
Make sure to go back to the main overview of Microsoft Entra ID. If you go to <em><strong>Roles and administrators</strong></em> while in the overview of your app registration or enterprise application, for example, you will only have access to administrative roles that are available for that section.</p></div>
2. In ***All roles***, search for the ***Helpdesk Administrator*** role. If the accounts managed by the PAM module are members of any administrator roles or groups, then also search for the ***Privileged Authentication Administrator*** role and complete the next steps for both roles.
3. Click on the name of the role (do not check the box).

   <figure><img src="https://cdnweb.devolutions.net/docs/docs_en_kb_KB2307.png" alt=""><figcaption></figcaption></figure>
4. Click on ***Add assignments***.

   <figure><img src="https://cdnweb.devolutions.net/docs/docs_en_kb_KB2308.png" alt=""><figcaption></figcaption></figure>
5. Click on ***No member selected***.

   <figure><img src="https://cdnweb.devolutions.net/docs/docs_en_kb_KB2309.png" alt=""><figcaption></figcaption></figure>
6. Search through the list to find the application.
7. Check the box next to the application, then click ***Select***.

   <figure><img src="https://cdnweb.devolutions.net/docs/docs_en_kb_KB2310.png" alt=""><figcaption></figcaption></figure>
8. Click ***Next***.

   <figure><img src="https://cdnweb.devolutions.net/docs/docs_en_kb_KB2311.png" alt=""><figcaption></figcaption></figure>
9. Enter a justification for the assignment, then click ***Assign***. Your application has now been added to the list.

<figure><img src="https://cdnweb.devolutions.net/docs/docs_en_kb_KB2312.png" alt=""><figcaption></figcaption></figure>

{% hint style="info" %}
If the accounts managed by the PAM module are members of any administrator roles or groups, remember to complete the above steps with the ***Privileged Authentication Administrator*** role as well.
{% endhint %}

#### See also

* [Devolutions Academy - Configuring an Active Directory Provider](https://academy.devolutions.net/student/path/2354099/activity/3423446)
* [Devolutions Academy - Configuring an Entra ID Provider](https://academy.devolutions.net/student/path/2354099/activity/3423447)


---

# Agent Instructions
This documentation is published with GitBook. GitBook is the documentation platform designed so that both humans and AI agents can read, navigate, and reason over technical content effectively. Learn more at gitbook.com.

## Querying This Documentation
If you need additional information that is not directly available in this page, you can query the documentation dynamically by asking a question.

Perform an HTTP GET request on the current page URL with the `ask` query parameter:

```
GET https://docs.devolutions.net/pam/knowledge-base/how-to-articles/create-an-entra-id-pam-provider-devolutions-cloud.md?ask=<question>
```

The question should be specific, self-contained, and written in natural language.
The response will contain a direct answer to the question and relevant excerpts and sources from the documentation.

Use this mechanism when the answer is not explicitly present in the current page, you need clarification or additional context, or you want to retrieve related documentation sections.
